• This Forum is for adults 18 years of age or over. By continuing to use this Forum you are confirming that you are 18 or older. No content shall be viewed by any person under 18 in California.

Induction brass annealer redux

It’s possible that the FETs on the ZVS board are sub standard. Might try replacing them with non-Chinese ones.
I want to make sure we are talking about the same thing. My power supply (chinesium 48v 1000w) died, you are suggesting that the FETs on the ZVS are causing that? I'm not arguing, just want to make sure I understand what you are saying given the bigger picture for my annealer set up.

Thanks.
 
If the power supply does not protect itself sufficiently bad FETs could cause a problem. I know some Chinese SSRs use inferior devices inside the case.
 
My power supply (chinesium 48v 1000w) died
OK the max out of the ZVS is 1,000 watts. That tells us that 1000 watts using 48 volts would be 1,000 / 48 = 20.83 amps of current draw. Normally when selecting a power supply you want to allow overhead and I like at least 20%. I would be looking at maybe a 1200 watt or greater 48 volt supply. You don't want a supply that is running at 100% of its rated load.

Ron
 
Hello everyone,
I would like to know what method you use to determine the annealing time. I prefer to see it shine, I don't like the Tempilac method.
Do you have any video examples where we can see the red appear?
Thank you for your help.
 
Hi, i havent quite gone through the whole 185 pages, but i read about half and havent come across the same issue that i am having. Thanks to all the contributors, this is an amazing resource.

I followed the MGZN annealer instructions and all the components are from the BOM.

Everything works, but there is a 4 or 5 second delay, before the actual annealing starts to happen. Looking at the ZVS boards, there is a green LED that comes on when the annealing is happening. when the program runs, the light flickers on for a second, then is off for 4-5 seconds and then turns fully on and starts anneling.

So, when i set the time for 8 seconds, the induction only kick in for the last 3 seconds. I even tried setting 10 seconds and surely, after it kicks on, it works fine.

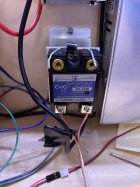
I tried to isolate the problem, but not really having much luck. First, i thought its the SSR relay, but i hooked up a small motor to it and with a separate power supply i tried if it turns the motor on immediately, or after some delay. The motor kicked on immediately.

I also tried just connecting and disconnecting the ZVS by hand (just touching the wires and thus completing the circuit). This turned on the ZVS instantly. This to me all indicates, that the power supply is ok.

Normally, i would say the relay is the issue, but i dont have much experience with these SSRs.. I thought they either work or dont work and not consistently work only after a 5 second delay.

Has anyone experienced similar issues? Thanks

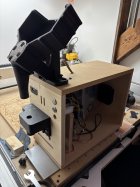
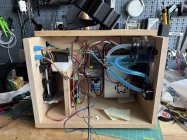
Attaching photos of my build.
 

Attachments

  • IMG_0712 Large.jpeg
    IMG_0712 Large.jpeg
    241.6 KB · Views: 30
  • IMG_0722 Large.jpeg
    IMG_0722 Large.jpeg
    221.1 KB · Views: 32
  • IMG_0727 Large.jpeg
    IMG_0727 Large.jpeg
    432.6 KB · Views: 33
A small motor wouldn’t draw much current. Hard to say if it’s the SSR but I wouldn’t use one made in China.
 
Hi, does anybody have an alternative to the Sestos timer used in the original build? I’m over in the UK and They don’t seem to be available anymore over here. Thanks
 
The power supply can put more power out. I wound a double layer coil and it was putting 12 amps out. It's definitely doing its 600w. It's what the MGNZ recommended to use with their control board which stops the zvs if it senses more than 12.3 amps anyhow so I'm thinking there's no point trying to use more power. I dont know though so I take on board what you say.
I having exactly the same issue as you..
All MGNZ parts, as soon as I turn on the ZVS, the power supply gets overloaded and restarts. This takes about 5 seconds and then starts annealing at around 12 amps. Obviously, this is not the way to go.

I turned down the voltage to 45V on the PSU and its working fine now. Current during annealing is around 10A. As you said, it takes almost 8 seconds to get the case glowing in the dark.

Regarding the 12.3 limit, this is based on the recommended 600W power supply. This is a variable in the code. If you get a better power supply (as im planning to do) you can very easily change this value in the code to 15A or even more. Depends on your other components, if they can take the load.
 
Just for reference....

Something to keep in mind:
A ZVS induction heater can experience a significant surge current, particularly at the moment of power activation, which can be several times higher than the nominal operating current, depending on the design and power supply used; typically ranging from 10 to 20 amps for small DIY setups, but can be much higher for larger systems.
The above quote taken from here.

This is another good and informative read on the subject of ZVS Induction Heaters.

A 1.0 KW unit running on 48 VDC @ 1.0 KW will have a current draw of about 1,000 / 48 = 20.8 Amps.

Ron
 
Last edited:
Hi, does anybody have an alternative to the Sestos timer used in the original build? I’m over in the UK and They don’t seem to be available anymore over here. Thanks
I discussed this a little over a year ago in post 3413:


This is not as capable as the sestos, but probably usable (remember, I only did research on this timer for feasability, and have never actually tested it). Another thing, if one is clever enough, they could probably use 2 of these in series to acheive the same 4 states that the sestos provides...maybe...

Also, I looked through the list of parts in that post, and although not the topic, the only one that doesn't seem right is the power supply...search for '48V 25A 1200W Switching Power Supply' as a minimum is my suggestion (which is more than the 20A 1000W I used to recommend).

 
Last edited:
I having exactly the same issue as you..
All MGNZ parts, as soon as I turn on the ZVS, the power supply gets overloaded and restarts. This takes about 5 seconds and then starts annealing at around 12 amps. Obviously, this is not the way to go.

I turned down the voltage to 45V on the PSU and its working fine now. Current during annealing is around 10A. As you said, it takes almost 8 seconds to get the case glowing in the dark.

Regarding the 12.3 limit, this is based on the recommended 600W power supply. This is a variable in the code. If you get a better power supply (as im planning to do) you can very easily change this value in the code to 15A or even more. Depends on your other components, if they can take the load.
Maybe a coding issue.? Have you talked it through with MGNZ.
I had my device doing a reboot every few cases recently. Turned out to be the Arduino screen. But I went the long route, replaced the MGNZ shield then the arduino board, The program update from my old version (4yrs?)is good with more features.
 
When building my next device, I would like to use the solution that OTTSM used in his machine. Unfortunately it looks like he is no longer an active member of this forum and his posts are from a few years ago . Maybe someone of you has built a machine based on his solutions and has somewhere in the archives the libraries needed for the code to work properly?
Unfortunately, the Github account to which he referred for the libraries is also no longer valid.
I really like the use of the rotary encoder to control the settings

Below is a preview of the approach I have in mind

code

working annealer preview
 
It also just happens to be the temp range for flash annealing cartridge brass.

This is debatable. There's also the question of time. But see below.

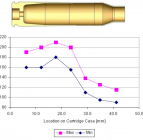
When the cartridge brass necks are bought to that temperature for just a heartbeat, the hardness value will usually be between 90 - 115 HV.

Source? We've always understood that there is a temp-time relationship and lower temps require holding them for longer. (People used to target hitting 750F but we then learnt that simply touching this temp wasn't enough.) The converse (obviously) is if we can snap to a much higher temp time is short enough to be just a very small fraction of a second.

I don't think anyone here has done the work required to determine what is "ideal" with respect to temp and time - or even ideal brass hardness. Over the years we've discussed various articles and opinions but I've yet to see anything authoritative. But it's fun to dabble and for some it's been fun to refine their induction annealers for greater control - even if they are likely kidding themselves that they are achieving more ideal results.

I have in the past argued that holding a lower temp constantly for 2.x seconds (I don't recall the exact time that has ben discussed here) was a hard way of having a guess versus hitting a higher temp for just an instant. And the Draper Point is a useful observation point even if 'seeing it' is still subjective and open to interpretation (did it glow enough?). Trying to use a sensor that is arguably ill-suited for the job in the first place (eg a flame sensor), 'calibrating' it by using 750F Tempilaq (again subject to interpretation), and then building a system to hold that 750F temp for several seconds, likely introduces far more error than simply an "annealing to glow in the dark" guess. And it conveys to the designer a sense of 'accuracy' that likely doesn't exist. It's the reason I dropped this approach. I do think a more useful approach would center on electronically (and so more consistently) detecting the Draper Point somehow so that time could vary with brass automatically. I'm not sure this is even possible. Even if it is, we likely still haven't answered the question as to whether heating to 977F for a brief moment achieves ideal brass hardness. Have fun all.
 
I don't think anyone here has done the work required to determine what is "ideal" with respect to temp and time - or even ideal brass hardness.
Sorry. You are wrong about that.

When teaching rookies to heat treat necks in the real world, we pivot on The Draper Point-time observations, but we ultimately control on hardness. We measure times to tenths of seconds and move up or down as required to center up on the hardness. There is a walk between hardness machines and the production line so that skill for hitting The Draper Point matters.

When we heat treat necks to these hardness levels, it isn't because we care so much about the hardness, but we do it in order to get the other material properties we want. In so many words, hardness is a proxy for those other properties we want so we use that as the specification control feedback.

1733884071407.png

We have many places during the path from raw materials to the finished product where we heat treat, not just for the necks. There are many temps, times, and methods used for those as well. However, the ones I relate on the forum are the ones I was taught as a rookie at the arsenals and that I would later tech myself.

They had been making cartridges from alpha brass for over 100 years before I came along and probably will be for a long time to come... using the Draper Point-time as a reference point and hardness as a proxy.

Granted, we did 99.9% of that work to make factory virgin material and maybe 0.1% to study reloads. With me, with my colleagues, my predecessors, and hundreds of man years of combined experience in ammo and weapons, we applied the same principals on reloads that we did to factory virgin.

Did we get it right? Let's just say they haven't asked me to refund my pension or my credentials.

Can you move up higher or lower than the MIL specs? Absolutely. Including not annealing at all. A few cycles and those necks go way above the spec I am showing and those can still work.

The majority of MIL spec ammo incorporates a crimp and sealant, reloads typically do not. You can argue about moving the neck tension up of down by changing the process if you like.... if you are trying to compare your reloads to virgin factory brass, then the spec hardness is like I have shown.

When rookies ask here about annealing cartridge necks for reloading, some of us who can actually tell them what to target are doing so based on sound engineering and experience, not rumors or internet guesswork. YMMV
 
Hi RegionRat

If you have real engineering expertise with respect to annealing cartridge brass to optimum conditions that would be awesome. In general, such expertise has been sorely lacking in this now very long thread (and elsewhere). At the outset, I should say that in general I am agreeing with your approach to anneal by touching a high temp. But a bit of a recap of the discussion that has been had here over the years is likely worthwhile.

I'd say that people have long recognized that touching 750F briefly wasn't hot enough (or long enough). But finding good, independent, expert material as to how best to anneal cartridge brass has been lacking. Various fragments would pop up here and there but often it wasn't enough. And, of course, discussions on forums such as these was often mere campfire belief that wasn't supported by proper technical evidence/experience. We'd get snippets here and there from independent technical documents but never a full picture. For a long while people relied on the fact that if a point one shoulder width below the neck hit 750F everything above was sure to be much hotter.

Then back in November 2022 VenatusDominus posted a formula mentioned in a video from a guy called Reese. For a while you joined that discussion but you didn't seem to offer your technical expertise.

Post of Reese's formula

At that link you can see the equations and me asking for its source in the subsequent post. The formula calls for 1.88 seconds at 1000F. You will also see VenatusDominus referencing the glow point of brass. A post or so later and you'll see a post from me of a paper by Ambrell. They mention a target temp of 1250F and if you plug this target into Reese's formula you get a target time of a mere 3 one-hundredths of a second. As I said back then "touch it and you're done."

I was never happy with this proposed formula. Reese never provided any source or support for its credibility. It also required assumptions for T1 and t1. It basically only 'translated' a 'required' T1/t1 to a higher temp T2 and spat out t2 the required time. Some people here, however, latched onto the 1.88s at 1000F as gospel. It suggested that 'touching glow' briefly wasn't enough. Even a slightly higher temp like 1000F, they believed, needs to be held for a couple of seconds. They built intricate machines to try to hold the brass at 1000F for a given period of time (1.88s). Some used poorly suited flame sensors as temperature sensors but of course still had to calibrate these. They used Tempilaq to do so. IMHO the appearance of more 'accurate' annealing was a mirage. Few had the ability to then test brass hardness. Neither the foundation for the 1.88s formula nor the 'results-on-brass' were supported. I almost went down this rabbit hole but, in the end, became disinterested.

So where are we left? I don't think we have the answer. Some (including you) say hit glow (c950F) momentarily. Others think you need to hold 1000F for 1.88s. That's a considerable difference. Ambrell mentions 1250F (way above the Draper Point). Few have actually tested induction settings with hardness testing of the brass. AMP have done the work but of course have kept the results to themselves.
 
So where are we left? I don't think we have the answer. Some (including you) say hit glow (c950F) momentarily. Others think you need to hold 1000F for 1.88s. That's a considerable difference. Ambrell mentions 1250F (way above the Draper Point). Few have actually tested induction settings with hardness testing of the brass. AMP have done the work but of course have kept the results to themselves.
I think you are little off when you say that there is a considerable difference between 950F and 1000F.

The difference in The Draper Point by eye, without training or a reference on hardness, can be a little arbitrary. It is best taught in person but many folks figure this out on their own after a little trial and error.

If an expert shows you what to look for and how long, then odds are you would be able to repeat what they have shown you even without the benefits of a metallurgical laboratory or hardness measurements and get it right on the first try.

Because the neck temperature is climbing fast in this context, it will climb quickly from 950F to over 1000F and beyond. So, when you pause for a heartbeat at The Draper Point for a two count, you get that Goldilocks result but not because you had it at exactly 950 or 1000. Neck annealing has temperatures that are a moving value, not ones that have lots of dwell at some steady equilibrium.

Cartridge necks are thinner than standard metallurgical pucks used in standardized tests. Thin necks do not use the same heat-time schedules as thicker samples and the crystal boundaries move differently, so those mechanical properties change differently as well. Many standard charts in college textbooks do not apply to cartridge making. But there is no need to go this deep down the rabbit hole.

In the equation Reese published, the material constants will account for a thin neck, but even that equation isn't really adjusting for a specific hardness value. That and the Ambrell paper showing even higher temps, are best adjusted through trial and error using either hardness or seating force as feedback.

And a lot more folks have measured their hardness than you assume. Just like many folks measure their seating force, but more on that later.

If we were to plot the other mechanical properties like modulus and yield, you would see they get us into good neck tension results as long as we are close to those spec hardness levels. It is those other properties that give us the "neck tension" we want as long as we also manage the friction coefficient.

As a hobbyist, a secondary goal is to nail the settings from session to session, but a primary goal is to get the results in the correct hardness range and not allow part to part variation. If a hobbyist is off by five or ten hardness points between sessions, it isn't the end of the world. After all, many folks do just fine without annealing at all.

Fired brass also has a complex oxide layer in the neck that factory brass does not. The grip on the bullet is a result of the friction coefficient times the forces from the brass. It is just as important to manage the friction coefficient as it is to manage the heat treat.

Ammo manufacturers have spent a lot of time and money on their production lines and their people. They don't publish what they consider private information and they require PIAs and NDAs from everyone who goes behind the curtains. It isn't up to those folks on the ground to decide what gets published in conference papers or at symposiums. One or two generic publications on ammo making are in the public domain and if you want to go down the rabbit hole most of what I have shared is in there or I couldn't say it here.

I'll try and link or share one of them here.
Ammunition Making by George Frost

You will find a few points at which he discusses several heat treatments, but he still doesn't give you an exact schedule or fine details.

My takeaway is that folks using induction or flame annealing can expect to spend some time in trial and error while using either hardness or seating force as the feedback. Even then, you need some skills and attention to detail or you will make things worse instead of better. YMMV
 
I think you are little off when you say that there is a considerable difference between 950F and 1000F.
My point was that 2 seconds at 1000F is a lot more than briefly hitting 950F. Obviously the temps are close but duration not so.
So, when you pause for a heartbeat at The Draper Point for a two count, you get that Goldilocks result but not because you had it at exactly 950 or 1000.

You seem to now be favoring a longer hold at or near to the Draper Point.
Neck annealing has temperatures that are a moving value, not ones that have lots of dwell at some steady equilibrium.

A 2 count is a good deal of dwell time in this context. A higher temp means a dwell time of next to zero.
But there is no need to go this deep down the rabbit hole.
That's good
In the equation Reese published, the material constants will account for a thin neck, but even that equation isn't really adjusting for a specific hardness value. That and the Ambrell paper showing even higher temps, are best adjusted through trial and error using either hardness or seating force as feedback.
This is my point. One has to trial and error alongside actual hardness testing. Quality machines that can do this are very expensive. The cheaper (still a few hundred dollars) handheld devices require a brass thickness that exceeds that of my turned brass necks so I dropped the idea of acquiring one of those. And even if one can measure brass hardness well, what's the ideal target? Back to factory new brass condition? (At least for that we have work done on Norma brass that I have posted here before or can simply measure virgin brass.)

And a lot more folks have measured their hardness than you assume.

Shame they don't post here.

but a primary goal is to get the results in the correct hardness range and not allow part to part variation.

And what would you describe the "correct harness range" to be? (Assuming that measuring it is indeed practical for the hobbyist.)

I'll try and link or share one of them here.
Ammunition Making by George Frost

I will take a look

My takeaway is that folks using induction or flame annealing can expect to spend some time in trial and error while using either hardness or seating force as the feedback. Even then, you need some skills and attention to detail or you will make things worse instead of better. YMMV
Perhaps seating force is where one should skip to given the complexity and expense of measuring brass hardness. Again, however, it's expensive to purchase a good device for measuring this. Likely more than most here have spent on their induction annealers...
 
My point was that 2 seconds at 1000F is a lot more than briefly hitting 950F. Obviously the temps are close but duration not so.
The main takeaway is that observing The Draper Point is far less expensive for folks who are making an Annie Annealer at home (or using a different induction design or flame for that matter). It still requires some trial and error but serves as a physical constant that happens to be at the right temperature range for us to use. By itself, it takes a little skill and adjustment to YOUR process since no two flames or induction devices tend to heat at the same heat-rate. There is no way to give an exact time-based guide since we never really know the temp to those levels, but using The Draper Point we know it "good enough" as my predecessors would say.

I personally don't like examples that use very high power and go super-fast since that means the timing becomes critical. The temperature is never steady since we are never at an equilibrium temperature, so you are always discussing a process time that is dependent upon a consistent heat rate.

A 2 count is a good deal of dwell time in this context. A higher temp means a dwell time of next to zero.
Yes, if the temp goes to white-hot then you can even melt the brass, but there isn't a point to that.

The cheaper (still a few hundred dollars) handheld devices require a brass thickness that exceeds that of my turned brass necks so I dropped the idea of acquiring one of those.
Those still usually require shop resources for modification since many times the anvil diameter on the instrument is too large and the necks won't clear the body on the tools. These tools are not designed for our thickness, but I own one at home and can make it work but never really use it. I don't generally recommend them since it isn't really that helpful compared to seating force.

And even if one can measure brass hardness well, what's the ideal target? Back to factory new brass condition?
Yes, my advice is to get the necks back to as near equal to virgin brass as you can. In that chart above, you can see that would be somewhere near 90 - 115. Another way to go about this without hardness values is to use your seating force.
I have already said this isn't a law of physics, it has just been well developed over 100 years but you are free to let the values climb if you choose. This is defacto what folks who do not anneal are doing is it not? For some folks that works too.

Now, without opening up yet another rabbit hole, we can all admit that there is no one perfect seating force level. There can be factors of difference that still work. We have general knowledge that some types of actions can tolerate very low seating forces and some folks even soft-seat with jam using their rifles. On the other hand, you don't want very low seating forces in a semi or full auto for example.

I mention this to point out that the annealing hardness values that work for folks also have a wide range and an individual must balance their own system of neck prep and friction to get good performance, Annealing results are just a part of this game.

Perhaps seating force is where one should skip to given the complexity and expense of measuring brass hardness. Again, however, it's expensive to purchase a good device for measuring this. Likely more than most here have spent on their induction annealers...
Agree. Although a force-pack on a Wilson or a hydro from 21C isn't that expensive in the grand scheme is it?
An AMP Press is also not expensive compared to the grand scheme either, while I admit it isn't for all of us.

There are countless folks who have managed to anneal very well without any of those resources and the evidence can be seen in their scores and longevity in their brass. At the same time, I am sure there are folks who botch things up and never know it.

Most folks don't have the skills to build an Anni Annealer but that is just another rabbit hole discussion we don't need to dive into today. YMMV
 
I
My takeaway is that folks using induction or flame annealing can expect to spend some time in trial and error while using either hardness or seating force as the feedback. Even then, you need some skills and attention to detail or you will make things worse instead of better. YMMV
This is the best advice so far. I wasted a lot of time under annealing due to the 750 deg Tempilac nugget. When I started using the color to set my timer the results got much better. I use shoulder bump spring back and bullet seating force to determine when to anneal.

Fired brass also has a complex oxide layer in the neck that factory brass does not. The grip on the bullet is a result of the friction coefficient times the forces from the brass. It is just as important to manage the friction coefficient as it is to manage the heat treat.

I also don't anneal every time because it affects the nice carbon layer that builds up on fired brass that makes for very smooth/consistent bullet seating/release.
 
Hello all,

I have built a MGNZ annealer, with recommended 600w PSU. I am struggling with (I believe) PSU dropping out due to high current draw. It runs OK with no brass in the coil (drawing 10.4A according to the arduino display), but PSU resets when the brass gets even close to it. I am running the PSU at 40v.

The coil is 6.5 turns, 20mm ID, approx 28mm height.

I have tried a variety of coil shapes and followed the troubleshooting points on the MGNZ page.

I am thinking purchasing a 48v 1000w PSU would give me more headroom, but want to check in if this is the correct course of action or if there are other ideas to try.

Many thanks in advance.
 
Last edited:

Upgrades & Donations

This Forum's expenses are primarily paid by member contributions. You can upgrade your Forum membership in seconds. Gold and Silver members get unlimited FREE classifieds for one year. Gold members can upload custom avatars.


Click Upgrade Membership Button ABOVE to get Gold or Silver Status.

You can also donate any amount, large or small, with the button below. Include your Forum Name in the PayPal Notes field.


To DONATE by CHECK, or make a recurring donation, CLICK HERE to learn how.

Forum statistics

Threads
165,064
Messages
2,188,947
Members
78,679
Latest member
Janusz
Back
Top