The start is edge triggered from contact open to closed and can be held in for as long as you want. It resets when the contact opens up. Even if held in for 10 seconds the annie will only cycle once.
If that's the case a switch or proximity switch that triggers when a case is dropped into the case holder, and then output C operating both the trapdoor and the case feed motor and then a switch at the top of the drop tube for STOP might be all that is needed, Dillon case feeders already have a long bladed switch in the upper drop tube area, if the time the switch is closed meets the timer criteria for the STOP signal we're golden.
That is a gorgeous piece of wood(and finish) on your annealer. Is that cherry?
It's a piece of red cedar. I know someone with a mil and an endless supply of cedar so that's what I use on most projects.
Cooling system maths-
Energy (in joules) = specific heat capacity of water (joule/g per °C= 4.187) * mass of water(g) * change in temperature(°C)
1 joule = 1 watt for 1 second.
4.187 * 500g (17 oz.?)* 25C temp rise = 14.5 watt hours absorbed by the water. (4.187 * 500 * 25= 52335.5/3600) 3600= seconds to hr conversion.
Just when I thought I was clever I see this --- GREAT JOB!!!
Additional on cooling:
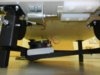
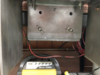
I was a little concerned with the 75 F rise of the coolant when annealing 100 cases as fast as possible, so I decided to add a radiator and fan. I added an XPSC EX120 radiator ( $37.99 Amazon) another Jameco 12 VDC fan ( #1928020, Jameco $10.95, a filter, Jameco 196817 $2.19) and two Mettler Air G1/4 to 1/4 Tube fittings ( Amazon, $5.40 + $5 ship).
I was able to run 100 22-250 cases in 8 min, 45 sec, with a temperature rise of only 18 F, and I will use it as is without worrying about temperature rise.
I had a couple air blockage problems, but got it working ok by tilting the assembly while running the pump to get air out of the radiator. The radiator is almost horizontal, a lousy way to mount it, because I wanted to hide it under the box. If I had designed the box originally with a radiator, I would have made it a little taller, and placed it directly in front of the box fan. I didn't want to mount it vertically on the side or back of the box simply because it would look ugly.
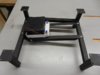
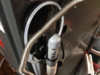
I mounted the fan and radiator on two pieces of 1 X 1 X 1/16 aluminum angle ( Home Depot) across the tubes of the leg assembly, and tilted it so the air would go to the "top". here are some pics.


I re routed the tubing so it goes from pump to annealing coil to radiator to reservoir.
So now I am set to anneal lots of cases, but it's too cold to do much shooting. The project has been a fun item for the winter.
-
DSCN1495_Small.JPG
46 KB
· Views: 68
-
DSCN1502_Medium.JPG
76.9 KB
· Views: 69
-

DSCN1500_Medium.JPG
110.9 KB
· Views: 62
Hi, Where did you get the radiator? Thanks.
That is just AWSOME! What a piece of workmanship. I'd like one like that. It is very clean, no clutter, and appears to work very fast. It anneals while you get another case ready to drop into the coil, it is so fast I would not think you would need a feeder system with it. Great thinking and great layout. Thanks for sharing that with us, Rick
Hi, Where did you get the radiator? Thanks.
Amazon. It is an XPSC EX120, which has two G 1/4 Threads for which you purchase the fitting which have the type of connects you wish. I have 1/4 tube, so I bought 1/4 press to connect fittings.( also from Amazon.)
Mare details on the radiator at
http://www.xs-pc.com/radiators-ex-series/ex120-single-fan-radiator-white
-
upload_2017-1-9_15-39-29.png
1.1 MB
· Views: 80
-
upload_2017-1-9_15-42-13.png
1.2 MB
· Views: 72
That is a work of art! How many hours do you have invested in this build? I love the way my new Annie is anneals brass. It is ultra precise, and repeatable results every time. I built an adjustable height table with enough adjustment for small handgun cartridges clear up to 50 BMG out of cold rolled steel and attached a 12 volt E bay special to it with a little fabrication. Yesterday i did away with the Fluxion water recirculation tank and piped directly in to city water, ran drain side over to my condensate return line coming off of my nat gas furnace. added a ball valve so I can adjust my water flow, and never have to worry about my recirc water getting hot. I am annealing 08 and 10 Lake City .223 brass at 1.2 seconds a piece. Here are a few pictures of my little setup.
View attachment 998156View attachment 998158View attachment 998162View attachment 998159View attachment 998160View attachment 998161View attachment 998163View attachment 998164
maconusmile; I don't know how long it took me to make the box and all. I spent a lot of time on the CAD drawings to get everything like I wanted. It was more of a hobby project. Like I tell my wife, when I am building something, or reloading, or woodworking in the basement, it keeps me happy and off the streets.
I am impressed with the great metal fab work you did. You also made most of my work useless. I was under the impression that I had to keep all metal far away from the annealing coil, and you blew that concept out of the water. I was using 1.8 seconds on a 223 , and yours is 1.2 seconds. So the metal nearby either doesn't matter, or helps. Apparently the RF effect is very local.
I went though a lot of decisions on materials so I would not have metal around the coil area. I used Corian for the base plate,(non metallic and reasonable temperature resistance). Well, I found that it doesn't get hot below the coil, the water cooling helps that. I used the same solenoid as Gina-Erick so I would not reinvent the wheel. It is small, so I used UHMW polyethylene for the guide (non metal, and slippery)and nylon screws. I used fiberglass for the slide (non metallic), straight, and stiff. You used a piece of sheet metal, and it works great.
So, great job, and thanks for posting. It all adds to the understanding of induction annealing. I agree the Annie is a great unit.
Nice job.....
As far as induction into the metal base. If you notice the coil in the pictures is well above the metal base plate. Most likely if you were trying to anneal smaller cases (ie 6BR) the coil would have to be closer to the base plate (almost on it). At that point there would be magnetic induction into the metal base plate and it would start to get warm/hot. This would be a parasitic drain of annealing current. Annealing time for small cases may take longer. That was the need for nylon screws close to the coil, as well as the Corian. Tried to cover all bases.
The annie being a 1,000 watt unit, I'm I believe it could handle the extra parasitic load.
gina
I admire all the complex design and solutions to try and resolve the short comings of orginal Annie. It seems to me that a "Space Shuttle" level of complexity isn't necessary to overcome the proper level of ventilation needed to just anneal with propane.
Ben
I admire all the complex design and solutions to try and resolve the short comings of orginal Annie. It seems to me that a "Space Shuttle" level of complexity isn't necessary to overcome the proper level of ventilation needed to just anneal with propane.
Ben
I didn't know of shortcomings in the Annie, I just built the set-up to give me the accurate, repeatable settings of anneal timing and case location. With the case in the same spot every time, the timer adjustment in the Annie gives completely repeatable annealing without any trial cases. Besides, I enjoy building stuff, and it was fun to do.
No reflection on propane annealing, which has been proven to be very effective and cost efficient, it's just a different way of doing the same job.
I finally got around to annealing some 6ppc cases, and it took 2.0 seconds, 2.1 if you want to go a little farther down the case body.
The list is now:
223 1.8 sec
22-250 2.7
30-06 1.8
7mm Mag 1.9
6mmBR 2.5
6ppc 2.0
I have an Annie and the helical coil and the Fluxion cooling system.
I will tell you that a retail $40 aquarium pump, a $2.00 bucket and a barb connector for the two different sized hoses needed will get you there equally as well. My unit stopped pumping and while Fluxion had shipped a replacement immediately, my wife, unbeknownst to me, went to an ACE Hardware and got the pump and bucket from them.
I want to thank you for sharing all of this information. This forum and this thread came to my attention in another forum where induction annealing was being discussed. Thanks again, including a thank you for the parts list and part numbers which were provided.
Ron
Magnificent piece of work. If I had the tools and the skill, I would attempt it.
One thing on the water cooler. I have the Annie with the glass jar. The pump went out on me and received a replacement from Fluxeon. While waiting for a response, I bought a Little Giant water pump at ACE, some tubing and a five gallon plastic paint bucket. I have the room for the same in my reloading room. The pump gives a great flow and the bucket, when filled to about 2/3, never allows heat to warm up the water beyond tepid even after annealing 200 .223 cases in rapid succession ( I got into a rhythm ). The pump is silent and sits on the bottom of the bucket. One thing- you need to get a barb connector at ACE or elsewhere to connect the two sizes of hose to one another.
California Hunter Education Instructor
This is more than craftsmanship; this is a piece of art. Hat's off to you sir.


