• This Forum is for adults 18 years of age or over. By continuing to use this Forum you are confirming that you are 18 or older. No content shall be viewed by any person under 18 in California.

Induction brass annealer redux

I'm interested in building one of these units as well. I've developed heating sequences for industrial induction processes, so I'm familiar with the concept, but I've never built one. I'm reading through all 183 pages of information now, and I hope you guys who are currently building units keep posting so I can follow your progress.

This may have been answered already, but is there a good way to verify the inductance of our handmade coils?

FYI, closed-loop feedback has been mentioned a few times, and in my experience, it hasn't worked well for this kind of application. Pyrometers (IR sensors) rely on an emissivity value to estimate temperature, and emissivity often changes as a part is heated. Additionally, metals often reflect IR as a mirror, and sources of heat from the station itself (such as the coil) will contribute to bad readings. IR sensors generally have a conical field of view, so they need to be placed carefully to minimize error. Whenever their values are suspect, they need to be checked against a handheld thermocouple. A PID controller is only effective when the feedback is accurate. For this application, constant power for a fixed time is almost certainly the best option, as long as power is in fact constant, and the timer is consistent. This assumes the brass will always start close to room temperature and will be clean and dry, of course. I've no doubt that some clever builders can get a PID running well, but the investment in time and money is probably not worth it for most of us.
 
Re inductance measuring, IIRC I used a Hz counter and called it good when it was oscillating at 95. Then adjusting time per dull light glow method. Recorded that number for each type of brass or brand.
If I ever did another build I would build the ZVS using a kit and sub out for known quality parts where it counts and use the mosfets as a on/ off rather than a relay (two most common problematic areas. )
Also the Flux conc method is simpler ....no pump, no water, but more difficult to automate, just look at how AMP approached auto feeding.
 
I bought one of the cheap boards off Amazon and figured I would read this thread while I waited on it to arrive. In hindsight, I should have planned on building a ZVS as you described, since I'm expecting this board to fail.
Regarding the mosfets, are you saying that the current for the heating circuit is passing through them rather than having separate control and power circuits?
I do remember seeing flux concentrators on all of the industrial coils I worked with. They were designed by a company that specializes in induction, so I wouldn't know where to start with the math to get the inductance correct, though. Is water cooling not required because the process is more efficient?
Your turn table setup is clever. Do you have plans to automate the feed system?
 
Somewhere around P100? There is talk of using one of the ZVS Mosfets gate to turn on the actual zvs cycle rather than an independent relay. The board needs a "hard" start so it immediately cranks the voltage required, if the V ramps up to the target level it will stall and fail.
Independent SSR's seem to suffer quality issues.
Look up Annie https://fluxeon.com/product/annie-flux-concentrator-coil/
They have sizes and types available.
 
FYI, closed-loop feedback has been mentioned a few times, and in my experience, it hasn't worked well for this kind of application.
I wonder if you could provide more details (annealing brass cases) from your experience.

Pyrometers (IR sensors) rely on an emissivity value to estimate temperature, and emissivity often changes as a part is heated. Additionally, metals often reflect IR as a mirror, and sources of heat from the station itself (such as the coil) will contribute to bad readings.

- There is not much mirror reflection from a fired case.
- Heat from the coil, or whatever inductor is in use, does contribute to the rate of heating but does not affect the themperature reading.

IR sensors generally have a conical field of view, so they need to be placed carefully to minimize error. Whenever their values are suspect, they need to be checked against a handheld thermocouple.

Placement is crucial. On my built the sensor is aimed to the neck, one inch from it. In addition, it is protected from the outside light.

A PID controller is only effective when the feedback is accurate. For this application, constant power for a fixed time is almost certainly the best option, as long as power is in fact constant, and the timer is consistent.

The most important part is to have your brass annealed to certain CONSTANT degree of hardness. If you use a feedback system, neither the power nor the annealing time are constant. They all change since all cases are not created equal. When using a feedback system all cases are annealed (hardness level) equally at the end.


"I've no doubt that some clever builders can get a PID running well, but the investment in time and money is probably not worth it for most of us."

PID control is built in the Arduino board (less than $20 investment)

Automatic feeder:
If you can zero in the case drop into the shell holder, it works flawlessly. I installed a vibration sensor underneath the shell holder. In case of miss, the annealing stops and the dropping arm clears the jam. Small beep follows.

The horizontal funnel holder is housing the IR sensors. The skirt around protects the IR from the ambient light.

The base box is designed to move up and down to accommodate different calibers. No adjustments are required, except the dropping arm, as long as the new neck/shoulder junction is at the same place.

There is a PB under the base box - It switches Manual/Auto modes. Another PB initiates the first case drop.

All components are 3D printed.
 

Attachments

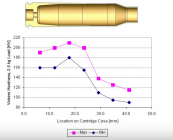
  • Nardness.png
    Nardness.png
    275.3 KB · Views: 63
  • P1050792.JPG
    P1050792.JPG
    388.6 KB · Views: 66
@oliverpsmile how wide is your gap between the ferrite? I kept mine at around 10mm so it won't allow for direct drop of larger case bodies like .303 Brit.
Maybe I could go wider? I was concerned about Flux field getting too small.
 
Your graph is an excellent visual of the annealing effect as well.
So it looks like the gap isn't as critical as I thought. One of my builds is achieving the same results time and voltage wise with a narrower gap. I would have anticipated it to be quicker.
I don't have access to hardness testing and just using the visual cue of colour change distance on the case.
 
I wonder if you could provide more details (annealing brass cases) from your experience.
I don't have any experience with brass annealing. By "this kind of application" I meant an induction heating process with a relatively small component shrouded by the heater coil. In every case where a pyrometer has been used in such a setup (that I've been called to fix), error in the temperature measurement has been quite large.

- There is not much mirror reflection from a fired case.
- Heat from the coil, or whatever inductor is in use, does contribute to the rate of heating but does not affect the themperature reading.
Have you tested this? Brass is considered moderately to highly reflective on every chart I've seen (especially when polished), and care should be taken to minimize IR reflected towards the pyrometer. The emissivity of the polished case is likely lower than that of the coil, and if the coil is wrapped in fiberglass then the difference is huge. A small temperature increase in the coil will read as a large temperature increase in the case, if the pyrometer sees the reflection of the coil in the surface of the case. As you said, placement is crucial, and reflected IR is the most common reason for loss of process control that I've encountered.

The most important part is to have your brass annealed to certain CONSTANT degree of hardness. If you use a feedback system, neither the power nor the annealing time are constant. They all change since all cases are not created equal. When using a feedback system all cases are annealed (hardness level) equally at the end.
I completely agree, and I should have clarified when I said that 'constant power for a fixed time was almost certainly the best option', I meant from the standpoint of cost and setup time. There is no doubt that consistent hardness is the goal, and that PID is the ideal control scheme to hold the case at a set temperature for a set time. But for the process to be consistent, the feedback must be accurate, and in my experience it generally is not. By providing constant power for a fixed time, the process is very similar to annealing with a torch, which seems to have merit based on its popularity. If the power supply is upgraded to a programmable version, process recipes can be created to vary power across time, and you have a system similar to what AMP is making. Varying power in real-time with a PID controller based on temperature feedback is the ultimate in process control, but the feedback must be validated. I haven't seen anyone mention yet how they are determining emissivity values and validating measured temperatures.

PID control is built in the Arduino board (less than $20 investment)
Yes, PID easy to implement, even on hobby electronics. The cost expense is in the feedback loop, and the time expense is in validating that feedback is accurate and tuning the parameters. What pyrometer are you using, and what did it cost? I've used the Micro Epsilon that was mentioned a few pages back, as well as most of the Keyence product line. They aren't cheap and take time to tune.


The horizontal funnel holder is housing the IR sensors. The skirt around protects the IR from the ambient light.
It looks like your setup is well engineered and I've no doubt you're getting great results. The shape of the flux concentrator coil provides a line of sight from the case to the sensor that should minimize erroneous measurement. I'm starting out with one of the more common helical coils that obscure the case, so I'm expecting a lot of error if I attempt to use a pyrometer with my setup. From what I've read, most of us are using helical coils, so my comments were more intended to be cautionary to those builds.


I hope I didn't come off as attacking any of the PID builds. You guys know what you're doing. I wanted to share my experience with induction processes, because I've seen a lot of catastrophic damage result from a sudden loss of process control when pyrometers are used, and I've seen a lot of ways that they can return erroneous values. If you know how to account for that, by all means, PID is the way to go. For most people building their first annealer (including myself), I would recommend using a simpler control scheme initially, then adding complexity later as needed.
 
I hope I didn't come off as attacking any of the PID builds. You guys know what you're doing. I wanted to share my experience with induction processes, because I've seen a lot of catastrophic damage result from a sudden loss of process control when pyrometers are used, and I've seen a lot of ways that they can return erroneous values. If you know how to account for that, by all means, PID is the way to go. For most people building their first annealer (including myself), I would recommend using a simpler control scheme initially, then adding complexity later as needed.
Well said. We (my self and others in this forum) use flammable sensors. My personal feed back algorithm is discrete - power control ON/OFF for a temperature range of +/- 0.1%. every 10 milliseconds. I use averaging temperature values out of 100 members array, continuously updated in the loop.

Our feedback systems (discrete or PID) do not need recipes as any other builds in this forum or AMP. The ultimate judgment would be the hardness of our cases. Unfortunately, I'm not aware of any published study or data.

We all are shooters. I had great time building various annealing tools. Now back to the range.
 
Hi all. I've just burned up another 48v - 1000w PS. I have the standard low end ZVS board (

1000W Low Voltage Induction Heating Board Module Tesla Coil 12V-48V Flyback Driver) https://www.amazon.com/gp/product/B01C70G7Y8/ref=ppx_yo_dt_b_search_asin_title?ie=UTF8&psc=1

and have annealed hundreds of cases. Usually in batches of 50 or so. Last time I went 70 or so. I think I over-drove my power supply. What brand/ model number Power Supply is recommended for this application. I'm sure it's not the cheap chinesium ones I've been using.
 
I believe Mean Well is Chinese but I think they are decent.
Is the power supply still functioning? Never mind, I just re-read your post. A decent PS should have current limiting and short circuit protection.
 
Last edited:
Are you using a different coil than the one supplied? A fan over the board to keep the caps and heat sinks cool?
 
Are you using a different coil than the one supplied? A fan over the board to keep the caps and heat sinks cool?
Yes, different coil (double wound, approx .70 inch internal diameter), 3 high output fans blowing over boards as well. Power supply also has built in fan. Also planning to reprogram arduino to stop after 30 cases for cool down, right now I think I have that number set up around 150, so hoping that making it take more breaks will help too. Plus using water cooling as well.
 
 
It’s possible that the FETs on the ZVS board are sub standard. Might try replacing them with non-Chinese ones.
 

Upgrades & Donations

This Forum's expenses are primarily paid by member contributions. You can upgrade your Forum membership in seconds. Gold and Silver members get unlimited FREE classifieds for one year. Gold members can upload custom avatars.


Click Upgrade Membership Button ABOVE to get Gold or Silver Status.

You can also donate any amount, large or small, with the button below. Include your Forum Name in the PayPal Notes field.


To DONATE by CHECK, or make a recurring donation, CLICK HERE to learn how.

Forum statistics

Threads
165,022
Messages
2,188,598
Members
78,647
Latest member
Kenney Elliott
Back
Top