• This Forum is for adults 18 years of age or over. By continuing to use this Forum you are confirming that you are 18 or older. No content shall be viewed by any person under 18 in California.

Swivel varmint benches

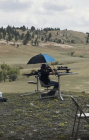
This was my version back in 2013 -
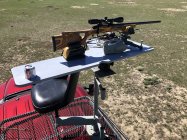
"portable" rotating shooting table

The pics disappeared so I'll attempt to add some.
tempImageygZpQv.jpg
24" scale for reference (top)

tempImagegTLUMr.jpg
Bottom glued & screwed

tempImagex2dwxf.jpg
T-nut

tempImagew91Ha7.jpg
Hole for a spanner to tighten (and, more important, un-tighten).

tempImageJ1Zskl.jpg
top side of frame

tempImageTLMTgs.jpg
bottom

remaining pics in next post.
 
tempImagedgDsSE.jpg

tempImageT16Ovj.jpg
line one bubble in line with 2 legs, other bubble with remaining leg.tempImage7C5vjP.jpgtempImageIJuS61.jpgThe "nut". 1/2 to 1/4 turn is enough to lock or unlock. Pretty rigid. Top with nut weighs 28.5 lbs, frame with legs weighs 49 lbs.

The seat is a captains chair, cooler or 5 gal bucket, whatever works. Granted, you have to get up and move the seat once you go beyond a comfortable rotation angle, but it's not bad.

Somewhere I have some pics of the tarp setup for shade. Doesn't take too long to set up and it provides a fairly large area for shade and the wind doesn't affect the table.
 
Last edited:
View attachment 1363196

View attachment 1363197
line one bubble in line with 2 legs, other bubble with remaining leg.View attachment 1363198View attachment 1363199The "nut". 1/2 to 1/4 turn is enough to lock or unlock. Pretty rigid. Top with nut weighs 28.5 lbs, frame with legs weighs 49 lbs.

The seat is a captains chair, cooler or 5 gal bucket, whatever works. Granted, you have to get up and move the seat once you go beyond a comfortable rotation angle, but it's not bad.

Somewhere I have some pics of the tarp setup for shade. Doesn't take too long to set up and it provides a fairly large area for shade and the wind doesn't affect the table.
Great design! No seat attached ! Loosen handle swivel, move comfortable seat/chair, tighten handle and hammer done! well done sir !
“Shaved off 30 lbs off of 65 lbs.. boy that will save your back!
 
My 10x12 tarp setup. If it’s not too windy one person can do it. If it’s windy you’ll create a new dictionary for cuss words! If you plan on being in one spot for an hour or so it may not be worth it. Although with 2 people it may only take 15 minutes or so.

I used 2x2 for poles which I cut to 6’. Bored a 3/4” hole in the bottom about 9” deep.
FDE1124D-2421-4981-A3C3-F22243164BC1.jpeg

I put a hook on the top and an eye (that I opened up a little) on the side about 9” from the top.
03EA02FE-AA9E-4E8A-BD0D-E88B378FCB9D.jpeg
C13E2BA4-12E0-4BE6-B1CC-BC42206F8C8D.jpeg

Open up the tarp and lay it on the ground where you want it. Drive a stake in at each of the 4 corners. Don’t know what they are called but they can be found at Home Depot. Mine are about 16” long. Don’t remember if I cut them or not.
Put a pole on each one.

To be continued………
 
C5A2C5FE-6BC0-48B6-AE9A-51E2380DE3FB.jpeg
I added a piece of angle to the top of the guy wire stake so it didn’t mushroom and keeps the rope from sliding off.

53361B20-B5A2-4181-B7A0-09532B73E6DC.jpeg

I made the “guy wires” from nylon rope and a 4-1/2” long piece of 3/4” diameter hardwood (oak I think). Make a loop at one end.
14FCAE7B-E43D-410B-A8E7-B0726EEDB552.jpeg
D8829668-DCC8-454F-B1C4-86B10AB2D22B.jpeg
Place the open end (closest to the dowel) in the eye on the pole and the other end (with loop) over the other stake. Position it in a suitable spot.

Hook one corner of the tarp on the hook of one of the poles. Then the diagonal corner. Snug up the guy wires. Then do the other corners. I made another pole, for the center, 6” longer. That also has a stake. I rounded the corners of the pole so it wouldn’t dig into the tarp. It probably could be longer.
A6AD81B8-BFE5-473A-A55C-A1F57A87B473.jpeg

I made 2 extra poles to put at the midpoints of the 12’ side if the wind required it.
Lots of shade!
 
Last edited:
Yup, that 65 lbs issue is what prompted the development of the BRP Lite. It shaved almost 30 lbs off the assembly with the use of T6 alloy. When we sold the BRP, we stressed it was a "Vehicle Served" product, never intended for backpacking; there are other options for that.

There's 'rock-solid' and 'portable'. Take your pick....carry on.
I will settle for rock-solid. I am in the market for another BRP.
 
An old man used to build and sell benches like the DOA bench. In the 90`s he sold the benches for $200. I still have the one purchased from the old man. Bless his heart, and building skills.
 
An old man used to build and sell benches like the DOA bench. In the 90`s he sold the benches for $200. I still have the one purchased from the old man. Bless his heart, and building skills.

That was most likely Bob Jourdan from OK. He advertised his benches and wrote articles in Precision Shooting for years.
 
Last edited:
MTM used to maybe still does one called High low shooting table. I got one, and I love it. But had 3 buddies who wanted one, no one had one. So in checking its basically a 3 legged surveyors tripod, has a flat round surface at top, cut your table top to what size you want, I would stay around 18-24" wide, and 30-36 long, and do a bolt and nut to attach it. It will handle just about any uneven ground, the spikes go in and stay, VERY stable when you get setup, you can stand up and shoot or get a chair/stool and sit. Weights about 10-12 lbs and you can be setup and shooting in 3 minutes. We take a utv out, drive along setup, shoot, load up, drive to next spot, setup, shoot, etc.. nice setup
 
About 15 years ago, my brother built the Cabela's super-deluxe model for several years for them. We sold about 1500 units over a few years. The originals had a white plastic U-shaped top and round seat which I never liked. The DOA base design looks like a straight knockoff, but then so did the Caldwell unit the Cabela's sold after it we stopped making ours. Ours was built out of heavy-duty square tubing and weighed in between 50 and 70 pounds if I remember.

The swivel design seems like a good idea, but I found the whole rig to be too wobbly. The primary problem is having the shooter's seat attached to the rifle platform. A simple folding leg table and a separate chair or shooting stool disconnects the shooter from the table and improves the whole setup 100%. Need to swivel? Just move the table.

Rod
 
We bought a used ladder rack and fired up the welder. Axle hubs, swivel chairs, umbrella holders. When we want to move within the field we put the guns away, put the rests and other gear in a tote mounted on top of the the rack, lay 2 stabilizer poles in the bed of the truck and drive across the field.

This summer will be the 9th year with the ladder rack. The altitude gives a great field of view
 

Attachments

  • 2015.jpg
    2015.jpg
    93.2 KB · Views: 49
  • IMG_4520sized.jpg
    IMG_4520sized.jpg
    1.4 MB · Views: 48
  • IMG_4513sized.jpg
    IMG_4513sized.jpg
    225.1 KB · Views: 49
Saw this setup out in OR last year in the motel parking lot. Did not talk to owner or see it in action. I would probably fall off and hurt myself. :D IMG_4072.JPGIMG_4071.JPGIMG_4070.JPG
 
Yup, I remember the RASS, it had the dreaded "trip feet" that absolutely guaranteed you'd trip over the things in the field while off the seat. It also had no room for any kit you'd normally find on a bench top used for shooting rats or PD's like ammo, bino's, range finder. No wonder it was discontinued after a couple of years. (That pic looks like it was taken at the Rimrock Motel in Alturas......)

But it appears the truck owner knows the benefits of some elevation with his bed platform. Sort of crude, but it probably works. Just don't stand up too fast and loose your balance. Some of our rancher buddies let us use some of the ranch rolling stock for getting that critical elevation advantage; most appreciated.


With a canopy on my truck, the bed shooting option is nil, so ranch equipment for elevation is a real boost for getting eyes on that rat out there frolicking about at 300 yards in the alfalfa. Which brings up the thought that it's almost March......the countdown begins. ;)
 
My rat buddy sets up in the bed of his truck. I have a tonneau cover on my truck, it might be possible to set it all up in the bed, but again, I would probably hurt myself getting in behind the bench. I may try a tripod but initial tests indicate I need more stability. LOL
 
Yup, I remember the RASS, it had the dreaded "trip feet" that absolutely guaranteed you'd trip over the things in the field while off the seat. It also had no room for any kit you'd normally find on a bench top used for shooting rats or PD's like ammo, bino's, range finder. No wonder it was discontinued after a couple of years. (That pic looks like it was taken at the Rimrock Motel in Alturas......)

But it appears the truck owner knows the benefits of some elevation with his bed platform. Sort of crude, but it probably works. Just don't stand up too fast and loose your balance. Some of our rancher buddies let us use some of the ranch rolling stock for getting that critical elevation advantage; most appreciated.


With a canopy on my truck, the bed shooting option is nil, so ranch equipment for elevation is a real boost for getting eyes on that rat out there frolicking about at 300 yards in the alfalfa. Which brings up the thought that it's almost March......the countdown begins. ;)
Id sure like to find one of those you made someday
 
DeWalt construction saw horses with matching quick attachment on the bottom of the plywood top. Sets up in 60 seconds and the tops stack flat for the trip, love them. Regular shooting stools...
Rock solid, 500lb rated, JohnView attachment 1416041
View attachment 1416040
I used a Ryobi miter saw with QD clamps for mine. I use a "shower" stool that breaks down for easy transport and few pieces of hardwood flooring samples for those uneven surfaces out in the fields. LOL
 
I would definitely suggest to add a boat seat to your bench when you build it. Most of them will come with the seat and the mount. Your back will thank you! Much better than the flat round seats that the Caldwell benches come with.
 

Attachments

  • 9C8ED389-41F2-4285-BBD9-A1F4A60B396F.jpeg
    9C8ED389-41F2-4285-BBD9-A1F4A60B396F.jpeg
    436.5 KB · Views: 42

Upgrades & Donations

This Forum's expenses are primarily paid by member contributions. You can upgrade your Forum membership in seconds. Gold and Silver members get unlimited FREE classifieds for one year. Gold members can upload custom avatars.


Click Upgrade Membership Button ABOVE to get Gold or Silver Status.

You can also donate any amount, large or small, with the button below. Include your Forum Name in the PayPal Notes field.


To DONATE by CHECK, or make a recurring donation, CLICK HERE to learn how.

Forum statistics

Threads
165,936
Messages
2,206,403
Members
79,220
Latest member
Sccrcut8
Back
Top