What do you use to keep your rifle steady and level while installing a scope?
What do you use to keep your rifle steady and level while installing a scope?
I use a rifle cleaning cradle that has a padded clamp to lock the buttstock in place.
A) clamp barrel in a rubber jaw vise.
B) use the wheeler level that clamps to the barrel and just have the rifle on a bipod
I clamp the barrel into a vice (padded with wood). But here is my exact process:
First, I adjust the eyepiece, so the reticle is clear.
Second, with the rings lightly tightened, I adjust the eye relief, mark the position with a pencil line on both rings so I return the scope to the proper eye relief. At this point I'm not concerned with reticle leveling.
Third, I clamp the rifle's barrel into the vice after I leveled the rifle. Leveling the rifle usually requires removal of the scope to obtain a flat surface to place the level.
Fourth, I reinstall the scope aligning the eye relief position using the pencil marks references on the rings then level the scope.
Last, I tighten the rings using a cross (X) tightening sequence keeping the level on the scope to make sure the tightened sequence does not change the level of the scope.
The appropriate sky hook,...... I have yet to find the perfect vise or cleaning stand that will hold perfectly still when some dummy has to bump or twist the wrong way
I had an aluminum plate that was once used as a rear rest. It had a carrying handle and 4 adjustment screws. I had a left over piece of bar stock from another project and decided to build a leveling mount for my scopes. I didn't do the work myself but told my gunsmith what I wanted.
The mounting device is placed on a table and by adjusting the 4 screws the base will be perfectly level. The scope is first placed on the rifle and I set the distance for my eye to ocular and get the rings set on the rifle.
The scope and rings are transferred to the leveling base. By using a vertical line, the vertical cross hair is line up with the line. The rings are tightened down and the unit is placed back on the rifle and it's ready to go.
It's really fast. I can level a scope in less time than it took me to write this up.
-
Scope Level.jpg
593.6 KB
· Views: 170
A Decker Rifle Vise

I`ve had this vise since the 1980`s and would not give it up. It has served me well. Jeff
I need to make some decker vises since they sold to sinclair and they “improved” it before just dropping it for some china junk.
Gauge blocks stacked to appropriate height and slid between the receiver's optical rail and the flat spot on the bottom of the scope. No levels, range trips, special rifle rests/ clamps required. Obviously, you need a full rail and a flat spot on your scope to do this.
I had an aluminum plate that was once used as a rear rest. It had a carrying handle and 4 adjustment screws. I had a left over piece of bar stock from another project and decided to build a leveling mount for my scopes. I didn't do the work myself but told my gunsmith what I wanted.
The mounting device is placed on a table and by adjusting the 4 screws the base will be perfectly level. The scope is first placed on the rifle and I set the distance for my eye to ocular and get the rings set on the rifle.
The scope and rings are transferred to the leveling base. By using a vertical line, the vertical cross hair is line up with the line. The rings are tightened down and the unit is placed back on the rifle and it's ready to go.
It's really fast. I can level a scope in less time than it took me to write this up.
Have you ever noticed any leveling differences due to switching from the rail mounted on your device and the rail mounted on your rifles?
The Davidson barrel vice that is bolted to a bench.
I use the Tipton gun vice in conjunction with the Wheeler scope mounting kit. That kit contains 2 levels. I set the gun in the vice and use the magnetic level to level the scope rail or mounts. I then clamp the barrel clamp vice on and insure that both level are in agreement. Then I clamp the gun and tweak it until both show level again. Install the scope with the tube loosely locked down. Pull the gun and check for eye relief. Put back in and level according to the barrel clamp level. Then use the magnetic little level on the scope cap or the turret top to level the scope and tighten the scope clamps. Then check it. Not all scope caps and or turrets are level so sometimes you need to adjust scope level to suit the shooter.
I found this awhile ago and have been very happy with it, at least when mounting a scope on a rifle with a picatinny rail:
Amazon.com : TXTactical Scope Leveling Tool, Scope Leveler, Scope Leveling Wedge : Sports & Outdoors
www.amazon.com
Not a democrat
Gold $$ Contributor
Hunting rifles - bipod and wheeler leveling device - Final check is a plumb line at 100 yds. view on max power magnification.
B R rifles - front rest - rear bag and wheeler leveling device - Final check is a plumb line at 100 yds. view on max power magnification.
NRA Life Member
Gold $$ Contributor
These Fix It Sticks bubbles are nice when you have a pic rail:

Hired Gun Painting
Silver $$ Contributor
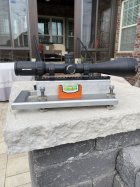
I used the coffee table and Wheeler levels Saturday to mount this Sightron.

Make sure when installing rings on rail base(s) the ring cross bolt or lug is all the way FORWARD in the slot before torqued.


