Follow along with the video below to see how to install our site as a web app on your home screen.
Note: This feature may not be available in some browsers.
This Forum is for adults 18 years of age or over. By continuing to use this Forum you are confirming that you are 18 or older. No content shall be viewed by any person under 18 in California.
I’ve followed Erik’s test protocol to a tee. Take a look at steps 5-10. The Cortina method is not to identify one specific group that is the tightest, but the entire node (consisting of multiple groups) that show the least vertical variance from the bottom powder charge to the top. In your set of pictures 43.5 looks like the tighest single group, but where does the center of that group line up with the 43.0 powder charge as well as the 44.0 powder charge? 43.5 centers 1/2” below your POI, while 44.0, 44.5, and 45.0 seem to center closer to your POI. I might therefore use 44.5 as the start of step number 7 below.
Did you chrono your shots to compare speed to your target results? This can provide confirmation that you’ve found a good node.
5. Shoot 3 shot groups starting from lowest to highest. All groups are shot over a chronograph.
6. Examine target and find the place where consecutive groups line up vertically and ES is the lowest and speed increases the least from one group to the next.
7. Load to the middle of the powder node and do a seating depth test.
8. Load 3 shot groups starting from Jam - 0.005" all the way out to Jam - .040" in .003" increments.
9. When you find the seating depth test that shoots the best, load towards the longest side of the node to allow more room for throat erosion.
10. Final step is to load the new seating depth and load 5 shot groups in 0.1 gr. increments 0.5 gr. on each side of node (if pressure limits are not reached). This will cover an entire grain of powder and you will be able to pinpoint where the powder node starts and ends. In the summer, load towards the low end of the node, and do the opposite in the winter.
43.5-40.0 You want the holes to be on a horizontal plane with as little vertical as possible. I would be looking in the 43.7-43.9 range. Once it lays down adjust seating depth. A chrono would help but you can get away without it.
So I went with 41.3 for my seating depth test and here's the results. There were a couple of decent groups but I don't really see any sort of consistency from one to the next. Not sure if I should reshoot some of these groups to see if they repeat or not. Opinions welcome!
Or perhaps more to the point, nothing with much statistical significance can be gleaned from the results. It's worth understanding what's required to have a chosen level of confidence that your sample set results depict the thing you are testing and hence whether you can forge a strategy based on your results. The maths is well understood. A good primer here and in subsequent blog articles:
Even if you don't agree with the author's particular hypothesis regarding the impact of seating depth versus powder charge on results on paper, the statistical analysis remains the same and is worth understanding. The strategies for gleaning more from lower sample sizes are worth exploring also.
Can you properly execute this last step of the load development procedure using a Chargemaster. Every load can be +\- .1gr.
10. Final step is to load the new seating depth and load 5 shot groups in 0.1 gr. increments 0.5 gr. on each side of node (if pressure limits are not reached). This will cover an entire grain of powder and you will be able to pinpoint where the powder node starts and ends. In the summer, load towards the low end of the node, and do the opposite in the winter.
First time I've known anyone claiming a specific velocity is best for any bullet. And without mentioning the rifling twist needed. A 300 Weatherby Magnum will shoot one much faster than a 300 Savage at each ones peak pressure spec.
First time I've known anyone claiming a specific velocity is best for any bullet. And without mentioning the rifling twist needed. A 300 Weatherby Magnum will shoot one much faster than a 300 Savage at each ones peak pressure spec.
It was told a range that has been commonly found with my given rifle spec (308 win 10 twist 30" barrel varget 185 jug) I have deleted this comment to refrain from any side topics
with that aside what are your thoughts on the given results
Velocity and other chrono data is in my pdf attachment
It was told a range that has been commonly found with my given rifle spec (308 win 10 twist 30" barrel varget 185 jug) I have deleted this comment to refrain from any side topics
with that aside what are your thoughts on the given results
Velocity and other chrono data is in my pdf attachment
The muzzle velocity shooting the bullet to get a 1.4 stability factor with JBM stability software is best. In my opinion. Higher velocity for slower twists with the same bullet.
It was told a range that has been commonly found with my given rifle spec (308 win 10 twist 30" barrel varget 185 jug) I have deleted this comment to refrain from any side topics
with that aside what are your thoughts on the given results
Velocity and other chrono data is in my pdf attachment
Your avg point of verical impact is very similar across your range of powder looks like you have a pretty rigid barrel is a 1.25 straight? Anyway I would pick one that isn't too hard on the brass and play with seating depth to see if you could tightening up the groups but the difference in charge weight is not much.
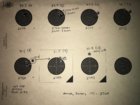
Hello guys, could you please give your opinions on the following groups.
Howa .308 Varmint barrel 1:10
GSC 130g monolithic copper with drive bands
Lovex 73.5 aka Accurate 2460
Federal magnum primers
Lapua brass
The last round on the 50g group had a VERY small raised crater around the primer indentation
The second from last group should read 49.7g
So I ran a test on my 6.5 CM. I have been shooting Hornady Factory 147 ELD Match with 7 twist and getting amazing results at 2760 fps. See below for H4350 on 147 ELD. I am thinking 39.7 or 39.9 grain is best in vertical. I did not get a flattening of the Velocity until 40.7 and 41.1 but the vertical dispersion is greater. Unfortunately the 39.9 is running 2694 fps. The 2760 fps of factory would have come in around 41.3 grains.
Had a couple of oops. at 39.9 I ended up with the second round at 2716 so I shot a 4th to bring it back to the average. The high hole is the 2716. The other 3 are in the small group.
This Forum's expenses are primarily paid by member contributions. You can upgrade your Forum membership in seconds. Gold and Silver members get unlimited FREE classifieds for one year. Gold members can upload custom avatars.
This site uses cookies to help personalise content, tailor your experience and to keep you logged in if you register.
By continuing to use this site, you are consenting to our use of cookies.