Install the app
How to install the app on iOS
Follow along with the video below to see how to install our site as a web app on your home screen.
Note: This feature may not be available in some browsers.
You are using an out of date browser. It may not display this or other websites correctly.
You should upgrade or use an alternative browser.
You should upgrade or use an alternative browser.
Induction brass annealer redux
- Thread starter Gina1
- Start date
No joy.
I've tried a bunch of different heights in the coil without an appreciable difference.
Putting the neck dead centre in the coil for 8.0 seconds (the longest the MGNZ firmware will allow) isn't glowing in the dark at all.
Max current (at around 43v) was 10.0 A
I'm stumped.
Bad video (sorry) here:
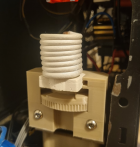
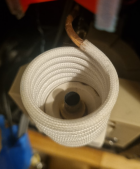
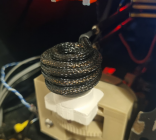
Pics of the setup here:


I've tried a bunch of different heights in the coil without an appreciable difference.
Putting the neck dead centre in the coil for 8.0 seconds (the longest the MGNZ firmware will allow) isn't glowing in the dark at all.
Max current (at around 43v) was 10.0 A
I'm stumped.
Bad video (sorry) here:


Based on my past experiencing with coils, you need more power to get results.
The norm is 14-15 amps, 48 volts, provided that you use original Erik's coil design.
750 watts Mean Well power supply will do the job.
The norm is 14-15 amps, 48 volts, provided that you use original Erik's coil design.
750 watts Mean Well power supply will do the job.
Do they recommend coil configuration for 600 watts PS?
Now days, I use coil with Fluxeon ferrit core. It is very efficient - .284 Winchester brass starts glowing for 2.1 sec at 9.5 amps.
Now days, I use coil with Fluxeon ferrit core. It is very efficient - .284 Winchester brass starts glowing for 2.1 sec at 9.5 amps.
Do they recommend coil configuration for 600 watts PS?
Now days, I use coil with Fluxeon ferrit core. It is very efficient - .284 Winchester brass starts glowing for 2.1 sec at 9.5 amps.
Induction Coil | Mgnz
 www.mgnz-makes.com
itchyTF
Gold $$ Contributor
I found this calculator to be helpful.
I think 600 watts is borderline. 750 would be better and 1,000 optimal.
Coil Inductance Calculator
Use this online calculator to determine the inductance of single-layer and multilayer air-core coils. Both metric and English units of measurement are supported.
www.66pacific.com
I think 600 watts is borderline. 750 would be better and 1,000 optimal.
How many microhenries do I want for my coilI found this calculator to be helpful.
Coil Inductance Calculator
Use this online calculator to determine the inductance of single-layer and multilayer air-core coils. Both metric and English units of measurement are supported.www.66pacific.com
I think 600 watts is borderline. 750 would be better and 1,000 optimal.
I get 1.3 according to the calculator
Much as the AMP Annealer is the easy button for annealing. But the point of this thread is to explore cheaper, hobby versions that might get reasonable results.Not sure I understand what you meant by that last line, but the AMP Press is the easy button.
It isn't for everyone and isn't as cheap as a force pack, but when folks use my AMP Press they are usually enlightened.
Some folks go as far as to create their own from scratch, and those work too.
I agree that one needs to jump to consistency of seating force to assess annealing rather than relying on an ill-defended formula off the net.
Designing and creating a hobby version of the AMP Press might be a fun project, especially for someone well-versed in Arduino. Load cells aren't expensive (although I have no idea of their quality) and Arduino modules to interface with them seem to be readily available. And it is winter after all and some of us need fun in-door projects to keep the grey mater ticking over.
EDIT: I think the very interesting part of the AMP Press which would be much more difficult (impossible?) to replicate by retrofitting a load cell to an (existing) in-line seating press is that force vs distance is captured. A simple load cell on a hand-powered inline press can measure the force at any point in time but not versus the position of the bullet in the neck. Inconsistent application of pressure via the press arm would lead, presumably, to incomparable results. So any 'hobby' solution needs to include the electronic ram and a positioning sensor for it. Quite quickly the cost of the AMP Press becomes very reasonable...
Last edited:
While I agree in theory with all that you have said, I would think that a simplified automatic press that outputs peak force only would be sufficient for most of our needs.
So, further refining the parameters of the project...automatic ram for consistent seating pressures, load cell for measuring seating force, an arduino/simple display to keep track of max force since last cycle start (the one that initiated the current seating cycle).
Edit:
The difficulty with that last one, to me, is separating the peak seating force from the climb in force after the seating die is fully compressed (some value of which could be used as a trigger to signal the end of the cycle).
According to vids I've seen on the AMP Press, the seating force peaks, then drops off some, then ramps back up as the die is fully 'closed'. You would have to define some maximum pressure that the unit would compress to (say 120psi for cycle end), and after starting a cycle, track max peak force until there is a defined drop off in pressure (say max-30psi) that would stop the recording of max peak and then only use current force to determine when to discontinue the cycle at maximum allowable pressure and withdraw the ram.
Last edited:
If you have a load cell you can output the pressure on it at any moment (and plot it). You get that for free with a digital load plate. The "automatic press" with a consistent force from that is key. Then the variable is the pressure on the load plate created by the resistance of the neck tension. It's not distance traveled by the seater, per se, that's important but the consistency of that drive from one seating to the next. It you prefer, you can plot load vs time (or just leave the x axis unlabelled). (The Amp Press tutorial on the AMP website is educational in this regard as they go to lengths to demonstrate the consistency of the press itself.)
On a manually driven press is "peak force" dependent on how hard I pull/push the arm of the press? If I have a sore arm or I'm tired might I pull the level more slowly/steadily and thereby effect less peak force?
On a manually driven press is "peak force" dependent on how hard I pull/push the arm of the press? If I have a sore arm or I'm tired might I pull the level more slowly/steadily and thereby effect less peak force?
RegionRat
Gold $$ Contributor
Because we can't always guess at how much neck interference a user likes, and also if they will want to run a flat based bullet that works the brass in the neck with a sharp crease as it seats, there will often be a speed-dependent term due to the damping loss in that brass. It happens any time we work brass material in yield.On a manually driven press is "peak force" dependent on how hard I pull/push the arm of the press? If I have a sore arm or I'm tired might I pull the level more slowly/steadily and thereby effect less peak force?
Brass modulus isn't clean. The Young's Modulus of brass is made up of a shear-storage, and shear-loss terms. We model it like springs, but there are also little dashpots. There is always some yield.
I have to mention that a lot of the seating force is Coulomb friction, which is not speed dependent. That part of the friction stays roughly the same no matter how fast or slow you run the test, but the shear-loss work in the necks is like a damping term and that is speed dependent.
You will not want to run crazy fast or crazy slow, but you would want to focus on consistency.
Also... The AMP Press does not run a position transducer on the ram, it assumes the displacement based on the step size/count. So to make up for displacement measurement, you will want to make sure your stepper has margin. That way, you can assume the displacement based on the steps.
Remember, we only anneal to drop the hardness value because that acts as a proxy for the properties we care about, like the modulus and the yield strength. The only reason to mention all of this, is to tell you that the modulus of our favorite material is really made up of a shear-storage and a little shear-loss term.
That should keep you busy. Good Luck and in for the press project reports.
I made a 3x3 turn coil which also triggered the overcurrent limit on the MGNZ board.
I then swapped the power supply to the 1200w one, and upped the current limit to 19A.
It now idles at about 11.1A, and draws around 16.8A max with a case.
Now it's causing the Arduino to intermittently reset (sigh) so I might try running that off a separate power supply

I then swapped the power supply to the 1200w one, and upped the current limit to 19A.
It now idles at about 11.1A, and draws around 16.8A max with a case.
Now it's causing the Arduino to intermittently reset (sigh) so I might try running that off a separate power supply

Similar threads
- Replies
- 74
- Views
- 47,299
- Replies
- 0
- Views
- 1,573
Upgrades & Donations
This Forum's expenses are primarily paid by member contributions. You can upgrade your Forum membership in seconds. Gold and Silver members get unlimited FREE classifieds for one year. Gold members can upload custom avatars.

Click Upgrade Membership Button ABOVE to get Gold or Silver Status.
You can also donate any amount, large or small, with the button below. Include your Forum Name in the PayPal Notes field.
To DONATE by CHECK, or make a recurring donation, CLICK HERE to learn how.

Click Upgrade Membership Button ABOVE to get Gold or Silver Status.
You can also donate any amount, large or small, with the button below. Include your Forum Name in the PayPal Notes field.
To DONATE by CHECK, or make a recurring donation, CLICK HERE to learn how.


