• This Forum is for adults 18 years of age or over. By continuing to use this Forum you are confirming that you are 18 or older. No content shall be viewed by any person under 18 in California.

Induction brass annealer redux

Why not add a 555 timer in a one shot configuration? The case would trip the timer (555) and the output pulse can be set for as long as you want.

Would work. So would two or more long lever snap switches wired in series inside the drop tube. Anything one can think of to insure the stop signal duration is over 100mS.
 
Drop tube mounted optical switch works great, as long as the cases aren't very short (5.7x28 would not trip start) and its near the top where velocity is lowest. The test tube was a chunk of opaque hard vinyl, a clear tube would increase sensitivity.

Sensor I used is an Optek OPB716Z. For it to work with the timer input you need a 5v supply and an NPN transistor to flip the signal, with a 5v pullup on the sensor output. Hook the timer stop circuit to the NPN collector and emitter.

There is a model with an internally inverted signal OPB718Z, but was on backorder and they never indicated what the signal output was to begin with, its possible this model could be a direct wire-in without the external transistor, didn't matter to me since I need to build a small sub-board for the 5v VR and whatnot.

Auto case feed operation-

Timer set to one shot mode.

START signal- optical or mechanical switch detects case on trapdoor.
Timer A is inductive coil time, also increments counter.
Timer B delay.
Timer C operates both trap door and trips relay to start case feeder motor, time is set long to allow time for case feeder to drop a case.
STOP signal via optical signal in drop tube.(Hope trap door closes fast enough)
New case trips START signal.

When counter set value is not 0, increments until it has reached setpoint, counter holds timer STOP signal and timer START signal no longer works until counter is reset.

http://vid163.photobucket.com/albums/t313/GrocMax/1612020001_zpsfd5ypehe.mp4

Looks like a good optical switch to try for the START signal (case present on trapdoor)
is the OPB100Z which will work with the LED and phototransistor 36" apart.
 
Last edited:
Not looking at a schematic but for this purpose there is one usually in parallel with the coil. Cathode (the band on the diode) connected to +.
 
Looking at the schematic, the diode is parallel with the solenoid. Is this correct?

Yes, commonly called a recirculation diode or flyback diode in this application. When the coil field collapses a large voltage spike is induced, the recirc takes care of that.

Some solenoids will have a recirc diode in already, you can tell by either it being polarized connection or a simple resistance/diode test.
 
Last edited:
Ok finally got mine up and running! Take a look. These are my old Dasher brass at 4.5 seconds. You'll see that the third from left hasn't been annealer yet. Does it look like I'm going far enough down?

MANY THANKS to Gina and Hollywood!

Without them sharing their work I wouldn't have an induction annealer. I simply couldn't justify the cost of a commercial unit. Mine isn't as pretty as I'd like, but it gets the results.

20161206_203613.jpg
 
Last edited:
Same case size, different brass, different annealing times
Had an interesting experience annealing some of the new Norma 6mm Dasher brass on the GinaErick annealer. I shoot 6 Dasher and of course up until the new Norma brass showed up, I never had to change any settings on the annealer, with fire formed Lapua brass. For what ever reason (different bass formula or different case thickness) my anneal time has gone from 5.4 seconds to 6.6 seconds (using tempilaq).
Just thought I would pass this on
Gina

Same here. My old brass looks good at 4.5 seconds. I went up to 5.0 with my new lot and they don't look annealed at all.
 
Last edited:
Hi Taltom

Thank you for the kudos, and I'm sure hollywood, thanks you also.

As you saw from my original post, it took a little more than a full second to anneal the Norma dasher brass, and that was using tempilaq to get the case to the 750 degree point.
Not sure why, thicker brass, different metal formula ? just is.... Try it a little longer and you should see a change in the color of the case below the shoulder. Did for me.

BTW your annealed Lapua cases look great. Very consistent !

Gina
Just ran 83 Dasher cases through mine. No problems and coil only got 112 degrees Fahrenheit
 
Just ran 83 Dasher cases through mine. No problems and coil only got 112 degrees Fahrenheit

Interesting...Just ran 50 of my new lot Lapua Dasher brass up to 5.0 seconds with no color change of the brass. I turned off the lights, ran one at 7 seconds, got a very pretty glow. Let it cool and still essentially no color change to the brass. Found 4.9 seconds makes the neck just slightly glow with the rim a little brighter.
 
Interesting...Just ran 50 of my new lot Lapua Dasher brass up to 5.0 seconds with no color change of the brass. I turned off the lights, ran one at 7 seconds, got a very pretty glow. Let it cool and still essentially no color change to the brass. Found 4.9 seconds makes the neck just slightly glow with the rim a little brighter.

Procedure wise, I think personally, looking for a glow is subjective. The one really big advantage of induction annealing is Vs flame annealing is that the Tempilaq (750F) is not burned off from the flame.
Hence, it is easy to see when you reach the annealing temperature, and how far down the case you want it. Granted Tempilaq is a little expensive for such a small bottle. But like a proper tool to get the job done right, it's needed. IMHO

I do agree with you. I ordered a bottle a while back, but ordered 450 by mistake.
 
bit of a rough set up to check the timer, just trying to set up the sensor to work the on signal for the timer ( been more of a pain then i was expecting )
 

Attachments

  • 20161211_131414.jpg
    20161211_131414.jpg
    234.4 KB · Views: 664
Drop tube mounted optical switch works great, as long as the cases aren't very short (5.7x28 would not trip start) and its near the top where velocity is lowest. The test tube was a chunk of opaque hard vinyl, a clear tube would increase sensitivity.

Sensor I used is an Optek OPB716Z. For it to work with the timer input you need a 5v supply and an NPN transistor to flip the signal, with a 5v pullup on the sensor output. Hook the timer stop circuit to the NPN collector and emitter.

There is a model with an internally inverted signal OPB718Z, but was on backorder and they never indicated what the signal output was to begin with, its possible this model could be a direct wire-in without the external transistor, didn't matter to me since I need to build a small sub-board for the 5v VR and whatnot.


Looks like a good optical switch to try for the START signal (case present on trapdoor)
is the OPB100Z which will work with the LED and phototransistor 36" apart.


Any chance of a circuit sketch ??
 
I think it is wonderful that someone would go through the difficulty of developing an annealer that uses no flame and is as consistent as this. More power to you! I will continue to use the one I built that cost me $50 dollars to build and is so simple yet it does use a flame but the cases feed from a hopper/magazine and allows me to do other things while the annealer does its job. It will anneal 700 cases an hour but the hopper only holds 200. That is more cases than I can load before I have to refill the hopper.
Your induction annealer is a wonderful step away from using fossil fuel and I hope you help many people with your work. Good job!
 
Any chance of a circuit sketch ??

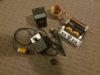
Yeah. I'll work on it but here's the verbal version- this sensor is a 3 wire reflective sensor, when a reflection from a case within about .5" of the lens occurs the output activates. You'll need a 5v supply (5v board mount VR's are cheap you can probably find one pre-made for less than 5 bucks). If you are going to drive BOTH LED's with the 5v recommend a 1A VR.

This sensor, the one I could get (OPB716Z) requires a PNP 2N4401 transistor to drive the Timer switch circuit.

5v goes to the sensor 5v pin
1K pullup from 5v goes to the 2N4401 collector
2N4401 collector also goes to Timer pin 1 0v
2N4401 emitter goes to either your start or stop input Timer pin 11 or 12
2N4401 base goes to sensor output pin 'out'
sensor 0v goes to your 5v supply 0v which also needs to be tied to the Timer pin 1 0v.

Your manual start or stop switch can be wired parallel and still function.

A better one for the start switch to detect a case on top of the trapdoor is the OPB100Z, this is an interrupt style sensor, and does not require a 5v supply. It is two units, a tuned IR LED and a phototransistor. It needs to be aligned as close to axial suggest a drilled hole in the base plate.

For 12v operation-
LED black wire- ground
LED red wire 120-150 ohm 1 watt resistor to 12v

PT white wire- 12v thru 10K resistor, then tap after the resistor and put this to the base of an NPN 2N4401 transisitor
PT green wire to 0v
2N4401 emitter to Timer pin1 0v
2N4401 collector to start or stop pin 11 or 12

For 5v operation of the OPB100Z change the LED supply resistor to 39 ohms.

The pullups can be SMD or small watt the LED resistors need to be 1w.

It is important to drive the LED to as much current as you can get away with the more power the LED has the greater the distance apart the two units will work. At these LED drive currents (80mA, 100mA MAX constant) its good for 4"-5" of distance.

And these are true infrared units, no visible light, if you aren't sure they're working put your finger on the LED voltage supply resistors ;)
 
Last edited:
Already annealer almost everything I've got!

Very nice... Goes by fast. That's why I did not try to build a self feeding system. Heck I come home from the range with 50 to 100 cases, first thing I do is anneal them. No set up, just flip on the power switch. 7 minutes and 50 cases are done, 15 for a hundred.
On top of that it's sort of relaxing, feeding them into the coil one at a timel, hearing the "klunk" of the power relay, watching the ammeter, hearing the trap door soleniod click and the final clink of the anneaded case as it hits the collection box.
Talton, glad it's working out for you

Gina
 

Upgrades & Donations

This Forum's expenses are primarily paid by member contributions. You can upgrade your Forum membership in seconds. Gold and Silver members get unlimited FREE classifieds for one year. Gold members can upload custom avatars.


Click Upgrade Membership Button ABOVE to get Gold or Silver Status.

You can also donate any amount, large or small, with the button below. Include your Forum Name in the PayPal Notes field.


To DONATE by CHECK, or make a recurring donation, CLICK HERE to learn how.

Forum statistics

Threads
165,374
Messages
2,194,334
Members
78,863
Latest member
patrickchavez
Back
Top