• This Forum is for adults 18 years of age or over. By continuing to use this Forum you are confirming that you are 18 or older. No content shall be viewed by any person under 18 in California.

Need Advice on Finishing my Wood Stock

@joshb how do you inlet for the action. I've got my stock down to a 320 grit (didnt wipe it with anything). but figured this is the time to get the inlet/barrel channel finished and bedded (that's another first for me and giving me some worry, :D )

What do you use to check the inletting? How do you mark the action to see where it's hitting? How do you check that it's level or whatever with the stock?
 
I refinished a Rem. 40xBR stock back in the spring, i started with 220 grit paper, then went to 500 grit, finished sanded with 1000 grit, now slick as a baby's but rubbed on 2 coats of Min Wax Tung oil, then put on a coat of Howard's Feed & Wax, it turn out wonderful!

Pure Tung oil?

Pictures?
 
@joshb how do you inlet for the action. I've got my stock down to a 320 grit (didnt wipe it with anything). but figured this is the time to get the inlet/barrel channel finished and bedded (that's another first for me and giving me some worry, :D )

What do you use to check the inletting? How do you mark the action to see where it's hitting? How do you check that it's level or whatever with the stock?
Just read thru the stock building thread.
Page 5.
 
Last edited:
Working on it, I'm thru 40 some pages. I haven't found anything in detail on inletting. I see you router yours but thats about it. I'll keep reading.
Start back at page 5.
I use the action to check the fit. Given that my cuts are accurate to 1/32”, I let the bedding do it’s job.
Add: I just read thru it. It’s all covered between page 5 and 10. You just have to read it carefully, then ask any questions.
 
Last edited:
So, I've been wanting to try doing this myself for a while and I'm finally going to tackle it. The stock is rough shaped, lots of tool marks and such. Inletting should be close, I'm sure I'll have to finish that a touch or two.

I've read a LOT online and here on steps and how to get to the actual finishing stage. One of my many questions will be what finish? I have TruOil, Arrow, Gloss Wipe-On Poly. But open to getting what I need to do it right. I'm leaning towards a glossier finish. But I realize I'm a long way off from this stage.

Guess my first steps will be to start sanding. 120 or 220 grit to get to the shape I want it? Being careful not to create ridges and go with the grain as much as possible. Any other tips at this stage?

Here is the before picture of my stock. Wood is walnut with rosewood (?) grip cap and tip.

View attachment 1457571
With wood grain like that I'd go for the ol' fashioned English gunstock finish method. Raise the grain 'n sand, repeat (320 is considered coarse, down to 2000 grit), pop the grain with "red oil" (linseed oil steeped for months with alkanet root) burnished with "rotten stone" and then finish with a slacum. Requires a good deal of work but you'll end up with a 'Purdey' finish that will be absolutely stunning.

For an overview of the process of this type of finishing, watch from the 1 hour 20 minutes mark (although the whole video is great):


There are various recipes for slacum but commercially available Napier Gun Stock oil does a good job.
 
been messing around with the inletting a bit, getting the action sitting right (or at least I hope it is), barrel channel sanded.

I just bought some lamp rod to make my own pillars, need to cut them to size and determine a way to drill out the stock for them, I don't own a drill press. So that's next and then bedding, that'll be another first for me as well.

And if all that goes well, I'll start to finish sand it, got all kinds of sandpaper ready, 400/600/800/1000/1500/2000 and Arrow oil.
You can drill it by hand. If your lamp rod is 1/2” outside, make a 5/8” hole. That will give you some wiggle room. Drill half the depth from the top and finish it from the bottom. Bed the pillars first. Do the action later.
 
Alkanet root is a red dye and will give you a dark finish. I have done stocks sealing the poors with spar varnish and sanding down, then using linseed or linspeed oil to finish. I tried sanding with fine sandpaper and oil then sanding that off to seal the poors. It is hard on checkering tools though. Tru oil does a good job and I'm sure there are other oils that do similar but it takes a long time and the coats you put on are hand rubbed in very thin and allowed to dry before putting on another. The method is pretty much the same with any finish. Seal the poors then finish. Any way you do it, to do a good job on a fine stock is time consuming and laborious.
Most people these days use various sprays of polyurethane or something similar to get a durable finish.
 
Alkanet root is the root of a wild weed. It is steeped for many months in linseed oil (aka flaxseed oil) and, often, walnut oil to create the dye. It will darken principally the grain and thereby enhance contrast. It doesn't normally contain driers and is intended to penetrate deeply. While a deep red it doesn't mean the final stock is red.

You would (normally) do the checkering prior to 'finishing' the stock. At the end the checkering can be cleaned out to the extent it has become clogged. That's not hard on the checkering tools.

The repeated sanding, raising of the grain (with oxalic acid), and sanding again (right down to the final buffing with leather) deposits considerable dust in the wood pores as things go along.

Finishing, with this 'English method', is done with a 'slacum'. It's basically a concoction of (refined) flaxseed oil, driers, wax and/or sometimes filler like Plaster of Paris, vinegar and Venetian Turpentine (an extract from Larch trees). The process often involves cutting the finish periodically with rottenstone. Some of these slacum formulae are closely guarded secrets. Here's one recipe:

Raw linseed oil – 16 oz
Spirits of turpentine (best you can find, e.g. Diamond G Forest Products) – 2 oz
Carnauba wax – 200 grains (13g/0.5oz)
Venice/venetian turpentine - 2 teaspoonfuls (the real stuff, not imitation or the gunk made for horses hooves and incorrectly labelled)
Mix together and heat until it simmers. Simmer for ten minutes then allow to cool. Be careful it does not catch fire -!!!!

Here's another old recipe (with some ingredients that are hard to find these days, some for good reason) that has been attributed to Purdey:

1/2 pint of Raw Linseed Oil
2 ozs of Plaster of Paris (Type II Dental Quality)
1/2 fluid oz of butter of antimony (this is a grain darkener and can be skipped)
1/2 gill (1/4 of imperial pint) Spirits of Wine (rectified Ethyle Alcohol)
2 teaspoons of Vinegar
1 teaspoon of Venice Turps.

(all measurements imperial)

I understand 'spar varnish' is rather soft (given its original intended purpose). The English slacum method provides a very robust and easily-repaired finish. You can do 'spot repairs' on things like dents without having to redo the entire stock.

I'm in the process of redoing the finish on my Beretta over 'n under shotgun using the English method. I agree many people seek the faster and simpler processes, but to my mind nothing beats a well-executed slacum finish on well-grained wood. It's a labor of love but not nearly as much as designing and shaping the stock to begin with. On that I'd be totally lost. Great kudos to CjC73!

EDIT: IMHO the stock finishing oil recipes above would benefit from a drier component. Before mixing up a batch it might be worth touching base with me.
 
Last edited:
You can drill it by hand. If your lamp rod is 1/2” outside, make a 5/8” hole. That will give you some wiggle room. Drill half the depth from the top and finish it from the bottom. Bed the pillars first. Do the action later.

These are 0.385" OD so I'm thinking a 1/2" hole will be plenty.
 
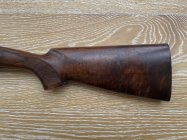
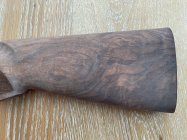
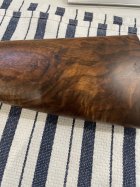
Thoughts? I wiped it down with some thinner, hence the darker areas.
I think it looks great, and over time you will know that grain as being your rifle. XLNT!:cool: I have a piece of redwood I'm saving for a stock, but it's gonna be a while before I get my shop setup so I can work on it and/or get time.

Sand it until it's smooth as a baby butt!
 
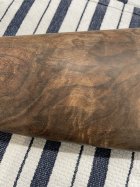
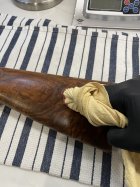
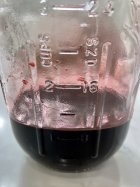
I thought I'd illustrate what 'red oil' (flax/linseed and walnut oil steeped in alkanet root does to walnut). This isn't a great piece of wood but it will give you an idea. The 'red oil' is a deep Bordeaux color. First pic is the original stock dents 'n all, even electrical tape residue from a Holland and Holland fitting session. Second pic is with the original finish stripped off. (It didn't show the promise I had hoped for. A lot of dark and little light to contrast. I think Beretta may have even soaked the entire stock in stain.) Third pic is it sanded down to 3000 grit (raising the grain with oxalic acid between sandings). The fourth pic is burnishing with a chamois leather and a little red oil. This immediately shows any areas where one wasn't as meticulous as one should have been earlier on.) The next pic is after a VERY liberal coating of the red oil was allowed to soak in overnight. It's amazing how much oil (it has no driers) can soak into the wood. (By liberal I mean the full amount that will hold on the wood without it running everywhere. Including the checkering.) Last one is a pic of the red oil itself. Click on the thumbnails for a better view. I will likely do another chamois burnishing and another liberal coating of the red oil and then let the stock sit for a couple of weeks before starting the finishing oil process (I need to cook some up). CjC73, if you want to head down this route I could send you some red oil. LMK.


IMG_6253.jpegIMG_6257.jpegIMG_6268.jpegIMG_6269.jpegIMG_6270.jpegIMG_6276.jpeg
 
Last edited:
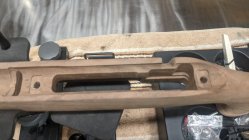
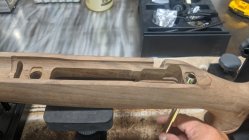
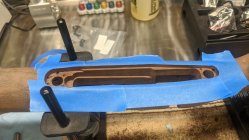
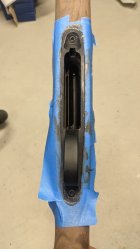
finally got around to drilling out the action screw holes. used a step drill bit, then finished off with a 1/2" drill bit. Cutting the pillars (lamp rod) straight and at correct height was a pain. Still not sure if they are the right height. But the pillars are in and bottom metal is bedded, just finished, so crossing fingers big time, my first time. I had to use the action screws into the action to keep the pillars centered in the hole. I taped the action screws so they fit snug in the pillar to make them stress free.

I've watched numerous videos on pillar install and nobody mentions how they keep the pillars centered and the ones I watched, none used the action or action screws. ?????

Anyhow.... going to be a long 15 hours. I might unscrew the action screws and remove the action after 5 hours, using JB Weld and the set time is 5-6 hours, full cure time is 15-16 hours.

Fingers crossed!

PXL_20230825_191059414.jpgPXL_20230825_191903757.NIGHT.jpgPXL_20230825_221142482.jpgPXL_20230825_223147597.jpg
 
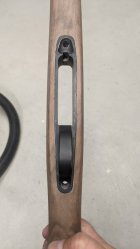
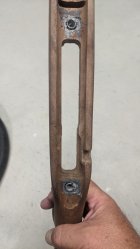
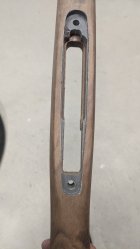
Not too bad for my first attempt at bedding. Bottom metal popped out with just a little tap on the front. Trimmed out the excess and looks decent.

The top side is a different story, not sure what happened as I filled the holes in good, or so I thought. Not super worried as when I do the top it should fill in and clean up.

PXL_20230826_153904739.jpgPXL_20230826_153832493.jpgPXL_20230826_153814772.jpg
 

Upgrades & Donations

This Forum's expenses are primarily paid by member contributions. You can upgrade your Forum membership in seconds. Gold and Silver members get unlimited FREE classifieds for one year. Gold members can upload custom avatars.


Click Upgrade Membership Button ABOVE to get Gold or Silver Status.

You can also donate any amount, large or small, with the button below. Include your Forum Name in the PayPal Notes field.


To DONATE by CHECK, or make a recurring donation, CLICK HERE to learn how.

Forum statistics

Threads
165,878
Messages
2,205,050
Members
79,174
Latest member
kit10n
Back
Top