Then you are much more qualified with this stuff than I. My emphasis was on computer hardware design, but I have been out of that field and practicing medicine for the last 25 years. I appreciate your insight and comments.Mr. Reese numerically clarified temperature-time relationship. At least he showed us the exponential trend of the annealing process. Mr. George F. Vander Voort did the same (see my post 3,245). His 30 minutes @ 1200 F experiments gave me the idea to "excommunicate" the 1.88 sec Reese gospel.
My Arduino based ** closed loop temperature control algorithm ** was modified to extend the Reese formula time. to 2.5, 3.0, 3.5 and 4 sec. The only barely noticeable difference was the size of the coloring under the shoulder.
The closed loop temperature control allows you to safely change power level, temperature, and overall production time to certain limits, in order to keep lower temperature at the case's lower body.
** When the temperature of the neck reaches 1000 F, the program enters a loop for a set time. During this time, the power to the ZVS is switched (several hundreds times) ON and OFF between 1000-1200 F.
P.S. To VenatusDominus - For the record, I'm a retired Professional Engineer, licensed in several states with advanced degrees in EE (majoring in Industrial Automation), First Class Marine Engineer, author of financial solutions software and I hold several patents regarding telemetry in the oil industry.
Install the app
How to install the app on iOS
Follow along with the video below to see how to install our site as a web app on your home screen.
Note: This feature may not be available in some browsers.
You are using an out of date browser. It may not display this or other websites correctly.
You should upgrade or use an alternative browser.
You should upgrade or use an alternative browser.
Induction brass annealer redux
- Thread starter Gina1
- Start date
Thank you very much, Doc. If we don't keep pushing the envelope and have doubts of everything we use and read, we'll end up with a simple replacement of the propane torch with an induction coil.Then you are much more qualified with this stuff than I. My emphasis was on computer hardware design, but I have been out of that field and practicing medicine for the last 25 years. I appreciate your insight and comments.
Last edited:
You mentioned the 36v 27amp if I remember right my induction board only rated for 20amps I see I can get a 48v 800w for like 80 and 1000 for 110 and 36v 1000w is about the same cost as 48v just lookin at Amazon.. only issue I’ll have is to revamp how I have stuff setup inside because my old psu is only 2” and these are 2.5 but it’s doable just have to drain system and move stuff aroundHigher max amp. 1,000 watts should provide what you need with reserve. 36v would provide more current (27A).
I got a few of these.. both I had to fix.. came with components broke off.. but it says max 1000w max currant 20amps Yosoo 1000W ZVS Low Voltage Induction Heating Board Module Tesla coil 12V-48V Flyback Driver Heater DIY https://a.co/d/aYnex0NDon’t know which zvs you got but I thought the common ones mentioned in this thread were 12-48v and 1,000 watts.
Yea lol I guess lol like most of the stuff they sellIt also says - Although this circuit can tolerate 20-30A………. Their English is not the best.
Not exactly. The closed loop control system wipes out all your doubts about the Tempilaq and the flame sensor. By extending the annealing time at maintained high temperature the system guarantees complete and consistent annealing/hardness (see the video that you presented it as "Case Study", or the experiments of a scientist). As a mater of fact, if your built can do same as mine, you do not need Tempilaq or sensor. Just compare the brass glowing with a good table, as I do, and continue from there.No. We can each do exactly the same thing. As I have noted previously, I have implemented VenatusDominus's version as well. The technique is still dependent on accurately reading Tempilaq to "calibrate" a sensor ill-suited to the task (albeit the most economical solution we've found so far). None of our implementations include a hardness tester to verify results.
Your are looking for guidance from AMP and NORMA regarding the desired level of hardness. I'm interested, what exactly are you looking for - level of hardness before resizing or after or what? Do those leading manufacturers recommend hardness before resizing or after seating the bullet? Keep in mind that not all resizing change the hardness equally.
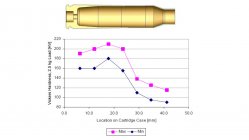
As long as the hardness of every case is between the minimum and maximum and we assure consistency we'll be happy shooters and reloaders. AMP - annealing made perfect in our neck of the woods. Yes!Here is a suggestion for hardness targets that always seems to work out for small arms cartridges of many types. It is based on regular C26000 brass.
View attachment 1393710
Thanks pal
Last edited:
Not exactly. The closed loop control system wipes out all your doubts about the Tempilaq and the flame sensor. By extending the annealing time at maintained high temperature the system guarantees complete and consistent annealing/hardness (see the video that you presented it as "Case Study", or the experiments of a scientist). As a mater of fact, if your built can do same as mine, you do not need Tempilaq or sensor. Just compare the brass glowing with a good table, as I do, and continue from there.
I don't think it guarantees anything at all. It's no more consistent than a simple one-stop target and still does not guarantee the brass has been annealed enough or too much. It's no more "closed loop" than a simple build using 750F Tempilaq, regardless of what you call it. One can be very consistent and have consistent results touching, for example, 750F only to be told that those results aren't soft enough...
In annealing we are trying to figure out if we have reached our goal. That requires first of all having a goal. A potentially useful interim goal is reaching the levels quality brass manufacturers produce to. It's highly likely that they've spent a good deal of time figuring out their manufacturing process including that final anneal. If they thought their product could be substantially improved with, for example, a longer anneal to achieve a softer level of brass perhaps they'd do it.Your are looking for guidance from AMP and NORMA regarding the desired level of hardness. I'm interested, what exactly are you looking for - level of hardness before resizing or after or what? Do those leading manufacturers recommend hardness before resizing or after seating the bullet? Keep in mind that not all resizing change the hardness equally.
That doesn't mean with investigation one couldn't improve things further. That would require considerable shooting tests to determine whether a softer anneal led to better accuracy. However, I think most people are concerned with maintaining their brass (for as long as possible) in a 'factory new' condition. So looking at what that 'factory new' condition is probably is time well spent. Hence the usefulness of the Norma study and my suggestion to Reese, given he has access to a hardness tester, to test some new Lapua brass.
Here is a suggestion for hardness targets that always seems to work out for small arms cartridges of many types. It is based on regular C26000 brass.
View attachment 1393710
Thanks. Source? Worth comparing with the study on Norma brass which IIRC was a tighter range within that zone.
(Compare also with Reese's results at the case neck. 1.9s produced a figure of 66.)
RegionRat
Gold $$ Contributor
The results of many years worth of studies and ammo making were used in the specifications, and several of those have leaked out into public domain.Thanks. Source?
Well, it is your thinking vs my doing. I did not see any technical matter, worth discussing, in you post.I don't think it guarantees anything at all. It's no more consistent than a simple one-stop target and still does not guarantee the brass has been annealed enough or too much. It's no more "closed loop" than a simple build using 750F Tempilaq, regardless of what you call it. One can be very consistent and have consistent results touching, for example, 750F only to be told that those results aren't soft enough...
@RegionRat presented the minimum and maximum hardness levels for different section of the cartridge. This reminded me, as I mentioned before -Tuning the extended annealing time (see previous discussions) , at constant temperature (provided by the closed loop control), it is possible to achieve the hardness of the shoulder, as per the chart.
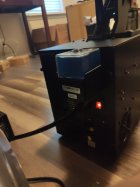
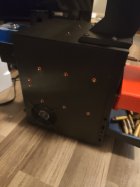
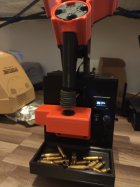
Finally all together and working. Motorized up and down works great. Anneals great.
Still needs a little tweaking. 80mm radiator fan is too weak. Long annealing sessions the coolant gets hotter than I'd like.
Need to paint on the side elevation notches for different brass type annealing heights.
Overall I like it. Not making any more though...1 was enough for me


Still needs a little tweaking. 80mm radiator fan is too weak. Long annealing sessions the coolant gets hotter than I'd like.
Need to paint on the side elevation notches for different brass type annealing heights.
Overall I like it. Not making any more though...1 was enough for me


I like your enclosure and the fasteners. It will be perfect for my new build. My new build will feature changing the inductors on the fly between the coil and the ferrite. Please provide, if possible, specs (W, H, D) and vendors. For the inductors (ferrite and coil) I'm planning to build cooling enclosure (idea from 3D printers ) in order to create consistent lighting environment for the flame sensors. Sensors is plural in purpose - there is a majority voting technique to flag malfunctions of the sensors.Finally all together and working. Motorized up and down works great. Anneals great.
Still needs a little tweaking. 80mm radiator fan is too weak. Long annealing sessions the coolant gets hotter than I'd like.
Need to paint on the side elevation notches for different brass type annealing heights.
Overall I like it. Not making any more though...1 was enough for me
View attachment 1394799View attachment 1394800View attachment 1394801View attachment 1394802
Thanks
Happy New Year
So I did finally assemble my parts and to start with the PSU would just shut down when I press the button for the ZVS to start (without any case in the coil). I use a "1000W" 36V PSU which I tried to put to 34v. Well success it would start without any case in the coil but draw 12A @ 34V before it just shut down.
Coil is 5mm turned with an inside diameter of ~18mm and 8,5 turns.
Used the formulas and calculators available, got 5x0,33µF at the ZVS and aimed for 95KHz. Would get about 1.6µH with that coil.
I use a chinese 80A SSR, but I doubt that's where everything fails since the PSU shuts down? Question would be what is bad, PSU or ZVS? Would 12A without anything inside the coil be right? It's not insulated and it's not making contact (shorting).
Hopefully someone might got a clue what's wrong here
I'm not sure if the coil is right due to other factors?
*EDIT* Coil is getting fairly hot without anything in it *EDIT*
Last edited:
I have pretty much the exact same experience you have. My current draw at 48V is 13.5A with nothing in the coil. Tried multiple coils, 3.16mm copper pipe 18mm ID 9 turns (inside layer 5 turns, outside layer 4 turns). Same pipe, 20mm ID, 8 turns (4turns 2 layers). The one coil was running at 101kHz the other at 105kHz. My power supply would trip when trying to anneal large cases like .375 H&H. The only reliable way I found to reduce the idle current and thus giving more headroom when actually placing something in the coil, was to reduce the oscillation frequency. Mine is now running at 83kHz and the idle current now is 11.5A and I am able to anneal the .375 cases without the power supply tripping. The coil I now use is 20mm ID, 10 turns (5 turns x 2 layers). All coils were insulated with high heat sleeving.So I did finally assemble my parts and to start with the PSU would just shut down when I press the button for the ZVS to start (without any case in the coil). I use a "1000W" 36V PSU which I tried to put to 34v. Well success it would start without any case in the coil but draw 12A @ 34V before it just shut down.
Coil is 5mm turned with an inside diameter of ~18mm and 8,5 turns.
Used the formulas and calculators available, got 5x0,33µF at the ZVS and aimed for 95KHz. Would get about 1.6µH with that coil.
I use a chinese 80A SSR, but I doubt that's where everything fails since the PSU shuts down? Question would be what is bad, PSU or ZVS? Would 12A without anything inside the coil be right? It's not insulated and it's not making contact (shorting).
Hopefully someone might got a clue what's wrong here
I'm not sure if the coil is right due to other factors?
*EDIT* Coil is getting fairly hot without anything in it *EDIT*
According to this page (https://spaco.org/Blacksmithing/ZVSInductionHeater/1000WattZVSInductionHeaterNotes.htm) at 100kHz the current draw will be 12A and at 80kHz the current draw will be 6A. So I expected mine to be a lot lower as I am close to 80kHz.
My coil also gets hot even when nothing is in the coil. Make sure you water cool as the heat from the coil is transfered into the board and the caps which causes the caps to fail.
I was also hoping someone can give some insight as the current draw I am experiencing seems excessive compared to what others in the forum are seeing.
Last edited:
I haven't tried to connect it directly to the PSU but I highly doubt SSR would be the issue.I would check that the SSR is wired correctly. The lead from the PSU should be on the 1# post and the lead going too the ZVS board on the 2# post. My board would get warm this way with out the relay tripped.
Similar threads
- Replies
- 74
- Views
- 47,356
- Replies
- 0
- Views
- 1,576
Upgrades & Donations
This Forum's expenses are primarily paid by member contributions. You can upgrade your Forum membership in seconds. Gold and Silver members get unlimited FREE classifieds for one year. Gold members can upload custom avatars.

Click Upgrade Membership Button ABOVE to get Gold or Silver Status.
You can also donate any amount, large or small, with the button below. Include your Forum Name in the PayPal Notes field.
To DONATE by CHECK, or make a recurring donation, CLICK HERE to learn how.

Click Upgrade Membership Button ABOVE to get Gold or Silver Status.
You can also donate any amount, large or small, with the button below. Include your Forum Name in the PayPal Notes field.
To DONATE by CHECK, or make a recurring donation, CLICK HERE to learn how.


