• This Forum is for adults 18 years of age or over. By continuing to use this Forum you are confirming that you are 18 or older. No content shall be viewed by any person under 18 in California.

Indicating Barrels to chamber


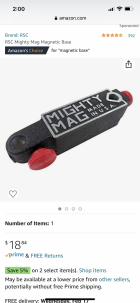
Handier than a pocket on a shirt. I also agree with dnellans the small noga is almost worthless, I bought one thinking smaller out of the way but I can move it around even with the magnet turned on. It’s not very sturdy at all...love the profile but it needs more holding power.
 
Ok I called MSC and they found the right one with the long stem.


Cheaper than Amazon and in stock and tax exempt.

So, you are saying DON'T get the one with the fine readout to start?
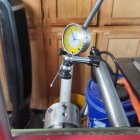
If youre talking about the mitutoyo then no. Alex talked about it above. One interapid like i listed is all you need for dialing in the throat. You will need a .001 indicator on a base for everything else- i use a plunger type. You also may find one of these handy for apron movement. I use a .250 range .001 plunger type for that. This is the most used indicator i have 16C5E760-D470-4807-9773-233EC0E13E54.png
 
For headspacing - I've been using the DRO on my carriage with the .0005 interapid touching the flat face of the reamer holder. That way i can actually unlock the tailstock and slide it back rather than having crank the barrel in and out many inches for each ream and chip clear.

I see a lot of guys putting a caliper setup on their tailstock so they can measure barrel travel more easily without worrying about backlash, but that only works if you never move the tailstock (which I find convenient).
You're complicating this. Why do you even need to keep track of the depth until you get to the last few passes? Throw a gage in occasionally and do a visual check as you approach the depth. I might take a measurement when there's about .100" to go. Then touch with the reamer and get .080" of that .100". Clean it up and take a final measurement. Touch with the reamer, zero whatever you're using and go to the last number.
 
I'll probably get boiled in oil for this but that's OK. I use a gage pin .0005" under nominal bore diameter on the muzzle. A little oil and debris and they fit tighter than the .0005". 20+ inches away from the throat and a couple of tenths are going to make or break it. I don't think so. I use a plunger style 001" on the muzzle.
 
You're complicating this. Why do you even need to keep track of the depth until you get to the last few passes? Throw a gage in occasionally and do a visual check as you approach the depth. I might take a measurement when there's about .100" to go. Then touch with the reamer and get .080" of that .100". Clean it up and take a final measurement. Touch with the reamer, zero whatever you're using and go to the last number.

I've had best luck predrilling (but not boring afterwards) and then straight to a finish reamer. But for a case like a 6 creed, the length is enough that I actually have to drill then ream in 2x passes to keep the pilot engaged in the bore. So say a 1.45' to shoulder depth, i will drill ~700 (which still keeps the pilot in the bore), ream that, then drill again, then ream again until i'm close. so there are a couple of coarse measurements, but not a lot, to be made along the way.

I don't have a through coolant system, so do it the way us poors have to with multiple pulls of the the reamer or drill in and out. If you want to get oil up in there well and/or blow it out with air you have to have the reamer pilot fairly clear of the chamber to get the chips out. 1.9 inch reamer +pilot is more than the barrel will travel on mine without pushing the MT3 stem out.
 
Last edited:
I'll probably get boiled in oil for this but that's OK. I use a gage pin .0005" under nominal bore diameter on the muzzle. A little oil and debris and they fit tighter than the .0005"
Not by me- exactly how I do it. I have a set in popular bore sizes in half-thousandths from Meyer.
I let an inch or so stick out of the muzzle, make sure it's less than a thou runout over it's length.

If I'm doing a recessed crown I'll cut it manually. 11 degree target, I commit blasphemy by using a piloted cutter. I don't know how I can sleep at night with such shoddy workmanship...:eek:
 
I've had best luck predrilling (but not boring afterwards) and then straight to a finish reamer. But for a case like a 6 creed, the length is enough that I actually have to drill then ream in 2x passes to keep the pilot engaged in the bore. So say a 1.45' to shoulder depth, i will drill ~700 (which still keeps the pilot in the bore), ream that, then drill again, then ream again until i'm close. so there are a couple of coarse measurements, but not a lot, to be made along the way.

I don't have a through coolant system, so do it the way us poors have to with multiple pulls of the the reamer or drill in and out. If you want to get oil up in there well and/or blow it out with air you have to have the reamer pilot fairly clear of the chamber to get the chips out. 1.9 inch reamer +pilot is more than the barrel will travel on mine without pushing the MT3 stem out.
Why would you need to have pilot engaged on a drilled and bored hole? I hardly ever use a bushing on the reamer once ive drilled and bored the chamber. Chambers come out straight and throat’s concentric.
 
Why would you need to have pilot engaged on a drilled and bored hole? I hardly ever use a bushing on the reamer once ive drilled and bored the chamber. Chambers come out straight and throat’s concentric.

I've wondered the same thing while chambering. I drill and then set my compound to the same angle as the body on the reamer. I bore just short of the body/shoulder junction before going in with the reamer. I haven't done a ton of chambers but they all have came out great when checking them with my long reach indicator and looking at them with a bore-scope. Maybe next time I'll try it without the bushing on the reamer but so far I've been scared to try it since my results have been good the way I've been doing it.
 
Why would you need to have pilot engaged on a drilled and bored hole? I hardly ever use a bushing on the reamer once ive drilled and bored the chamber. Chambers come out straight and throat’s concentric.

You do and you dont. On a 4 or 6 groove you dont, and I dont. On a 5 groove theres a tendency for the push off to start a chatter if you don't run a bushing. I have tried some methods to reduce this recommended to me, but with a long throated reamer especially when combined with a long case, the reamer is quite flexible and that throat area needs support from a pilot in my opinion on a 5 groove. Its not for guidance, its to reduce flex.
 
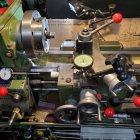
Of the lathes I have in the garage, I still love this 90s vintage Taiwanese made Jet 1024.

Indicators are us.. I run the finish reamer deeper, adjust final headspace with the tenon shoulder, then thread.

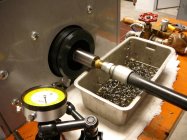
Picture is s repurposed 700 in 7-08 into a 280AI in a Howa for fireforming. Outboard indicator mounted on a barrel drop and screwed on to a stud on the headstock lid


20210206_161201.jpg
20210212_170859.jpg
 
You do and you dont. On a 4 or 6 groove you dont, and I dont. On a 5 groove theres a tendency for the push off to start a chatter if you don't run a bushing. I have tried some methods to reduce this recommended to me, but with a long throated reamer especially when combined with a long case, the reamer is quite flexible and that throat area needs support from a pilot in my opinion on a 5 groove. Its not for guidance, its to reduce flex.
That’s a gem post. If you’re checking your work what Alex is saying will make sense.
 
You do and you dont. On a 4 or 6 groove you dont, and I dont. On a 5 groove theres a tendency for the push off to start a chatter if you don't run a bushing. I have tried some methods to reduce this recommended to me, but with a long throated reamer especially when combined with a long case, the reamer is quite flexible and that throat area needs support from a pilot in my opinion on a 5 groove. Its not for guidance, its to reduce flex.

Alex do you bore after drilling? Would you still skip the pilot if you didn’t?

I haven’t been boring so don’t trust the drill to not have walked a bit. Having the pilot in the bore is extra insurance for me that any walk in the drill wine translate to the reamed hole
 
I run the finish reamer deeper, adjust final headspace with the tenon shoulder, then thread.
Guessing you mean just a tad deep...else counterbore and breech clearances would be out of tolerance, no?
I still like the micrometer reamer stop, impossible to eff it up.

I've been tempted to build a rigid setup like they use at Area 419. Tooling block bolted to the cross, block bored out via direct setup in the spindle. How can it ever be anything but perfectly aligned to the bore axis that way? And, enables the Z axis DRO/carriage stop for idiot proof depth control.

At least, seems that way to me. Haven't read of anyone else using a similar setup.
 
Last edited:
Alex do you bore after drilling? Would you still skip the pilot if you didn’t?

I haven’t been boring so don’t trust the drill to not have walked a bit. Having the pilot in the bore is extra insurance for me that any walk in the drill wine translate to the reamed hole
I would never rely on a pilot for alignment. Theres many reasons why. You should start boring after drilling. It will improve your consistency. You can lean on the tail stock quill early on to straighten things out if you do not bore, but you have to leave enough depth to tighten the chamber up as it will be fat. You have to establish a hole in the barrel thats concentric to the bore before you finish ream. Theres multiple ways to do that.
 
Last edited:
Guessing you mean just a tad deep...else counterbore and breech clearances would be out of tolerance, no?
I still like the micrometer reamer stop, impossible to eff it up.

I've been tempted to build a rigid setup like they use at Area 419. Tooling block bolted to the cross, block bored out via direct setup in the spindle. How can it ever be anything but perfectly aligned to the bore axis that way? And, enables the Y axis DRO/carriage stop for idiot proof depth control.

At least, seems that way to me. Haven't read of anyone else using a similar setup.

I have a set of reamer stop that I have not used the last 4 years. In the case of bolt guns (which I only do for my own projects and for my brother's glued 30BR VFS), I cut the counterbore using a boring bar after headspace is set. Sometimes the last step after threading.

Differences is what makes the world interesting, we do the things we are comfortable with and get consistent results.

Nez, you are very sharp for a rookie! chuckle chuckle You are an engineer with an open mind and willing to listen.
 
I have a set of reamer stop that I have not used the last 4 years. In the case of bolt guns (which I only do for my own projects and for my brother's glued 30BR VFS), I cut the counterbore using a boring bar after headspace is set. Sometimes the last step after threading.

Differences is what makes the world interesting, we do the things we are comfortable with and get consistent results.

Could you please outline your steps?
 
I've been tempted to build a rigid setup like they use at Area 419. Tooling block bolted to the cross, block bored out via direct setup in the spindle. How can it ever be anything but perfectly aligned to the bore axis that way? And, enables the Y axis DRO/carriage stop for idiot proof depth control.

At least, seems that way to me. Haven't read of anyone else using a similar setup.
I've come across multiple people using a rigid setup (CNC). Chad/Long Rifles may have been the first, Rubicon Precision has posted his up many times over the years, both of those well before A 419 even existed.
 

Upgrades & Donations

This Forum's expenses are primarily paid by member contributions. You can upgrade your Forum membership in seconds. Gold and Silver members get unlimited FREE classifieds for one year. Gold members can upload custom avatars.


Click Upgrade Membership Button ABOVE to get Gold or Silver Status.

You can also donate any amount, large or small, with the button below. Include your Forum Name in the PayPal Notes field.


To DONATE by CHECK, or make a recurring donation, CLICK HERE to learn how.

Forum statistics

Threads
165,825
Messages
2,204,324
Members
79,157
Latest member
Bud1029
Back
Top