Install the app
How to install the app on iOS
Follow along with the video below to see how to install our site as a web app on your home screen.
Note: This feature may not be available in some browsers.
You are using an out of date browser. It may not display this or other websites correctly.
You should upgrade or use an alternative browser.
You should upgrade or use an alternative browser.
Do it yourself Stock making thread
- Thread starter joshb
- Start date
hoz53
Gold $$ Contributor
ok lests see some recoil pad fitting.I love Gibson’s Hardware! Fixed it.........and yes Kim.....I’m still wearing the same boots.
View attachment 1410969
joshb
Gold $$ Contributor
Do you want me to explain how I do it or are you yanking my chain?ok lests see some recoil pad fitting.
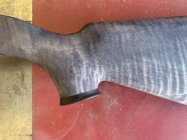
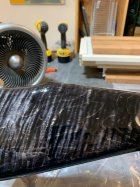
On maple with for sanding back, try wiping the wood with water first. It may help with the blotching. Also, I think you could dilute the black a lot more and do more coats where the figure looks ok.Finished shaping, cut the bolt slot and first coat of black. I got frisky and tried a little flair on the grip cap. I think I’m going to do a rotisserie epoxy coat on it. The grain in this piece doesn’t warrant sending it to Bc’z.
View attachment 1411408View attachment 1411409
Sometimes, doing a different color for the sandback like red or brown and then a dilute black can work out nice and bring out different tones.
Check out Charles Neil on YouTube and also how Paul Reed Smith dye their guitars. PRS uses a combo of oil and alcohol based dyes.
If you used alcohol dye, try wiping with straight alcohol and sanding the blotches. It probably won't do much but it may strip the dye a tiny bit.
hoz53
Gold $$ Contributor
Do you want me to explain how I do it or are you yanking my chain?
i really was interested how you do it as you do a nice job on them and i have been doing a few lately but i get them pretty good so i dont want you wasting a bunch of time on itDo you want me to explain how I do it or are you yanking my chain?
Thanks
Finished shaping, cut the bolt slot and first coat of black. I got frisky and tried a little flair on the grip cap. I think I’m going to do a rotisserie epoxy coat on it. The grain in this piece doesn’t warrant sending it to Bc’z.
View attachment 1411408View attachment 1411409
Looking good Josh!!Thanks. I’m going for just black on this one. I sanded to 320 and put on that coat with plans to sand 400 and 600. I’ll check out those vids.
Put a STRONG coat of black on then knock it back really good with 320, dilute with water for next coat, repeat, after doing this 3 times, I go to 400 grit diluting the dye with each subsequent coat.
I like my 1st coat really strong to set in the soft grain well.
This rootbeer dye job had a mix of 70%black 30% medium brown to get the ball rolling.
This side doesn't have the figure at the opposite side, but still good character
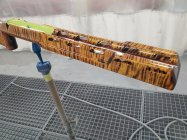
Test on some scrap. You'll probably find the higher sanding grits have a big effect on your dye penetration. You might be able to use finer grits to limit some of the dye overwhelming the endgrain.Thanks. I’m going for just black on this one. I sanded to 320 and put on that coat with plans to sand 400 and 600. I’ll check out those vids.
joshb
Gold $$ Contributor
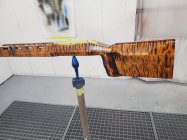
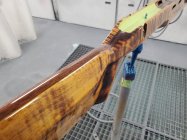
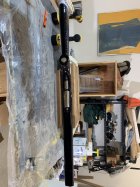
Well, I hit the shop early and got started. Put on a dark black coat and sanded. OK, still blotchy. Tried a couple more times with lighter coats. Sanded it down to 600 and tried again. Worked up a pretty good sweat along with a headache. I broke for lunch and some Tylenol. I took a moment to reflect. I wanted a black stock, I’m not Bc’z and I’m running out of time. I went back out to the shop, hit it with a dark coat of black and called it good. I set it up in the rotisserie and put a coat of epoxy on it. It’ll spin until tomorrow, get a light sanding and a second coat.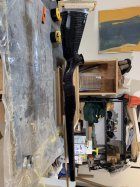



joshb
Gold $$ Contributor
Ok! I used to rough grind them using a template, then finish after they’re glued on. These days I screw and glue them on when my butt is formed, but not final sanded. Then, I sand them off to match the butt. I bolt my angle sander to a table, use 80 grit until I’m close, then switch to 120 to finish. Hold the stock parallel to the disk and slowly work your way around the butt. Capiche?i really was interested how you do it as you do a nice job on them and i have been doing a few lately but i get them pretty good so i dont want you wasting a bunch of time on it
Thanks


Last edited:
Dusty Stevens
Shiner
I like that! What action are you putting in there with that drop belly? If i missed that im sorryWell, I hit the shop early and got started. Put on a dark black coat and sanded. OK, still blotchy. Tried a couple more times with lighter coats. Sanded it down to 600 and tried again. Worked up a pretty good sweat along with a headache. I broke for lunch and some Tylenol. I took a moment to reflect. I wanted a black stock, I’m not Bc’z and I’m running out of time. I went back out to the shop, hit it with a dark coat of black and called it good. I set it up in the rotisserie and put a coat of epoxy on it. It’ll spin until tomorrow, get a light sanding and a second coat.View attachment 1411741View attachment 1411742View attachment 1411743View attachment 1411744
Nailed it !!!I’m not unhappy with it. The grain still flip-flops in the light.
It’s for a Surgeon actioned 6.5 x 47 with Atllasworx bottom metal for AICS magazines. Hence the tactical look.
I just went to check on it. Here are some pics:View attachment 1411792View attachment 1411793
joshb
Gold $$ Contributor
That’s nice of you to say. After the last coat of dark black, I let it dry then wiped it down with alcohol soaked paper towels. I think that’s why I got the highlights of light brown grain.Nailed it !!!
Thanks for telling me to go dark!
I think that looks pretty dang cool! The light grain lines over the black fiddleback is a nice surprise. I like it and I think what you were a little dismayed about earlier is not even there anymore. Very cool!I’m not unhappy with it. The grain still flip-flops in the light.
It’s for a Surgeon actioned 6.5 x 47 with Atllasworx bottom metal for AICS magazines. Hence the tactical look.
I just went to check on it. Here are some pics:View attachment 1411792View attachment 1411793
hoz53
Gold $$ Contributor
i see — thanks for that infoOk! I used to rough grind them using a template, then finish after they’re glued on. These days I screw and glue them on when my butt is formed, but not final sanded. Then, I sand them off to match the butt. I bolt my angle sander to a table, use 80 grit until I’m close, then switch to 120 to finish. Hold the stock parallel to the disk and slowly work your way around the butt. Capiche?View attachment 1411746View attachment 1411747
joshb
Gold $$ Contributor
A bit off topic for me but I got bored.
I was in the shop watching the stock spin. Having some free time, I pulled a mahogany 40x copy out of the pile and started sanding it. Another week of free time ahead involved with this next project after the last week long project, I decided to go for some quick satisfaction. Instead of heading to the local Pawn shops to look for a new old gun, I decided to just use what I had on hand.
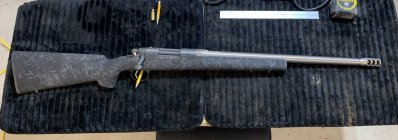
I gathered up the parts I needed and got to work on a 30br hunting gun I’ve been planning to build. Putting the wood stock off for later, I opened up the barrel channel of a factory stock I had leaning in a corner. Last summer, I bought a Lilja 10 twist nutted barrel on “leftover, client backed out” sale, half price. I had him chamber it in 30 br, .330 neck and threaded for a suppressor. I put it on a Remington SA, added a Timney trigger from the bin, found a brake to protect the threads and put it together. Total time was just under 3 hours. I’ll bed it when my bottom metal parts come in. It’ll work for single feed with the 308 box and follower in there.

Last edited:
Dusty Stevens
Shiner
What did you paint that with?A bit off topic for me but I got bored.
I was in the shop watching the stock spin. Having some free time, I pulled a mahogany 40x copy out of the pile and started sanding it. Another week of free time ahead involved with this next project after the last week long project, I decided to go for some quick satisfaction. Instead of heading to the local Pawn shops to look for a new old gun, I decided to just use what I had on hand.
I gathered up the parts I needed and got to work on a 30br hunting gun I’ve been planning to build. Putting the wood stock off for later, I opened up the barrel channel of a factory stock I had leaning in a corner. Last summer, I bought a Lila 10 twist nutted barrel on “leftover, client backed out” sale, half price. I had him chamber it in 30 br, .330 neck and threaded for a suppressor. I put it on a Remington SA, added a Timney trigger from the bin, found a brake to protect the threads and put it together. Total time was just under 3 hours. I’ll bed it when my bottom metal parts come in. It’ll work for single feed with the 308 box and follower in there.
View attachment 1412241
joshb
Gold $$ Contributor
Nuthin. It’s an old factory stock that came that way. I think it’s an HS Precision.What did you paint that with?
Similar threads
- Replies
- 2
- Views
- 576
- Replies
- 2
- Views
- 518
Upgrades & Donations
This Forum's expenses are primarily paid by member contributions. You can upgrade your Forum membership in seconds. Gold and Silver members get unlimited FREE classifieds for one year. Gold members can upload custom avatars.

Click Upgrade Membership Button ABOVE to get Gold or Silver Status.
You can also donate any amount, large or small, with the button below. Include your Forum Name in the PayPal Notes field.
To DONATE by CHECK, or make a recurring donation, CLICK HERE to learn how.

Click Upgrade Membership Button ABOVE to get Gold or Silver Status.
You can also donate any amount, large or small, with the button below. Include your Forum Name in the PayPal Notes field.
To DONATE by CHECK, or make a recurring donation, CLICK HERE to learn how.


