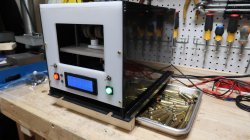
• This Forum is for adults 18 years of age or over. By continuing to use this Forum you are confirming that you are 18 or older. No content shall be viewed by any person under 18 in California.

Induction brass annealer redux

So far testing the annealer has worked out great just working through one issue that i am not sure on and maybe someone can provide any insite. No matter where in the coil I put the case with tempilaq 750 the same results happen just times are either longer or slower. So when i start the heating cycle and you can see the tempilaq disappearing from the top of the case mouth downward to the shoulder which i believe is normal. My concern is that if i run it so that you see annealing marks maybe 1/4" below the shoulder (most pics i see on the net) the case mouth heats up and glows red which i believe is over the 750 degrees and maybe over annealing it. what i have done to not heat up the case is if i turn off the lights and run the cycle till it just barely turns red then reduce the time by 1/2-1 sec the annealing seems to only reach the shoulder or 1/16-1/8" below the shoulder. Is this ok or something else i should be looking at? i have tried this mainly on Military LC, Herters and Prvi brass.

also here is my Arduino code as well as the Nextion LCD firmware/Design file.

thanks
James
GREATING James,
Thank you for posting your code and sharing your build.

I had all my programming flow charts on how I would do it, and it is the same vision from yours... So, you have saved me a tons of time!! thank you!!

May I ask how did you overcome the SoftwareSerial.h ? since the Due seems not "supporting " it.
I've added all the extra libraries noted from your Readme.txt, but all compilation fails at the same point; from the Nextionupload.cpp that is looking for the SoftwareSerial.h

I'm working on the different version of the Arduino IDE from 1.8.5 to .13 and none of them works.
The Nexion editor is V0.53, that I had it from couple years ago. so all good from there.

Hoping to hear back form you or anyone that may have the solution or a pointer to the right direction, all are welcome!!!

only missing the Main Power supply, the 100A SSR and the SD card reader extension.
I’m not sure why you need Software Serial on a Due. It has 4 hardware serial ports.
 
I’m not sure why you need Software Serial on a Due. It has 4 hardware serial ports.
Hello Dskogman
Yes. The Due has HWserial.
the Nextion used is based on 8bit processor like Mega and Uno.
Keeway used Due and Nextion touch screen as his combo.
There, when the Nextion is calling for the SWSerial, the compilation through fatal error. Hence, my search to the solution.
 
Last edited:
Goss gee willerkers.....

This is so far removed from my original post for the basic GinaErick annealer.

Wow you kids shaking my head in admiration. Way to go :))
Gina1
And all goes back to you for posting a great solution and still helping out after!!! Thank you very much!
The solution from Keeway is one step to the commercial grade product.
it allows you to save in the memory (SD card) all your timing and high of the cases!
Unfortunately, I’m still no able to bring his code alive.
hopping someone has done it before could share their insight and get my unit a step closer to be an annealer and not a pile of “junk” as my wife state... lololol
 
Last edited:
Well, I will be testing and uploading the compiled code... hopefully it will not brick my Nextion..
I end up :
NextUpload.cpp =>replacing the #include <SoftwareSerial.h> with <SPI.h>
NextConfig.h => disabled the debug and assigned to the Serial.

will advise how things goes tomorrow.
Cheers
PS: code uploaded to DUE correctly, NEXTION LCD code (tft) uploaded correctly, but since, I haven't mounted anything else, couldn't see if serial comm is working between the two. definately, will post the update here once I have mounted everything. cheers

PS2 Jan 25th
: so received my SD card reader and I do have serial comm. But, not sure why I can receive the info but I can't write new file nor other functions. need to investigate more.
 
Last edited:
Chuck,

17 amps at 24 volts on your multi-meter show typical short in your coil circuit.
On the other hand, the 6-7 amps on the ammeter with no load is puzzling.

I suspect the ammeter and the shunt resistor have different ratings (50 or 100 millivolts) If this is the case , the no-load should be 12-14 amps, which suggests a short in the coil circuit.

If not the two above, then your ZVS is not working properly.
How would you chase down a short in the coil circuit? thx
 
Last edited:
If you're referring to the coil itself just run a piece of paper between the coils. There should be no binding.
 
Hello
I have buy a new PS, the Mean well RSP 1000-48. But i have see , too late, there is no current limit on this model.
Someone has already tried this model successfully?
 
This is my third -- and I'm not sure my last -- built:

I use Fluxeon cores - 5/8" gap for .284 Winchester, 7mm mag and 1/2" core for 260 Rem and 6mm BR. Changing the cores takes only a few minutes. The 48 VDC Power Supply is only 480 W.

One of the key factors for quality annealing is positioning the brass in regards to the magnetic field. To achieve that, I'm using
two-step motors running in synchrony. They are moving the case platform up and down with 1/14" step at the time. The motors stop at a programmed caliber. This is the Z coordinate of the positioning of the brass (the selector switch on the right controls the motors).

The Y coordinate is determined by another step-motor which moves the bras to the magnetic field and after annealing - to the tray underneath. The X coordinate is achieved by positioning the core.

The Selector Switch on the left determines Mode Of Operation - TEST, AUTO or ONE SHOT annealing. The green and yellow LEDs are "traffic" lights for feeding the brass. They determine the duty cycle in AUTO mode.

I gave up using Tempilaq. The final parameters (volts, time, position) are determined by the colors of the annealed area of the brass and by observing the heat waves up and down from the cartridge shoulder to the neck and bellow.

A friend of mine uses an "Annealing made perfect" Mark III machine and after the machine analyzed and destroyed a case, I annealed 5 cases in accordance with the code that the machine produced. As you can see in the picture, my annealed brass is between Lapua new and Mark III in terms of colors and I'm happy with the results.

I started as a rookie Arduino programmer but I found it not so difficult to learn and by this third model of mine (the first one was PLC based) I feel pretty comfortable with it and even enjoy it.

HAPPY ANNEALING, EVERYBODY!
 

Attachments

  • Ann_1.jpg
    Ann_1.jpg
    621.1 KB · Views: 229
  • Ann_2.jpg
    Ann_2.jpg
    240.2 KB · Views: 223
  • Ann_3.jpg
    Ann_3.jpg
    463.1 KB · Views: 228
This is my third -- and I'm not sure my last -- built:

I use Fluxeon cores - 5/8" gap for .284 Winchester, 7mm mag and 1/2" core for 260 Rem and 6mm BR. Changing the cores takes only a few minutes. The 48 VDC Power Supply is only 480 W.

One of the key factors for quality annealing is positioning the brass in regards to the magnetic field. To achieve that, I'm using
two-step motors running in synchrony. They are moving the case platform up and down with 1/14" step at the time. The motors stop at a programmed caliber. This is the Z coordinate of the positioning of the brass (the selector switch on the right controls the motors).

The Y coordinate is determined by another step-motor which moves the bras to the magnetic field and after annealing - to the tray underneath. The X coordinate is achieved by positioning the core.

The Selector Switch on the left determines Mode Of Operation - TEST, AUTO or ONE SHOT annealing. The green and yellow LEDs are "traffic" lights for feeding the brass. They determine the duty cycle in AUTO mode.

I gave up using Tempilaq. The final parameters (volts, time, position) are determined by the colors of the annealed area of the brass and by observing the heat waves up and down from the cartridge shoulder to the neck and bellow.

A friend of mine uses an "Annealing made perfect" Mark III machine and after the machine analyzed and destroyed a case, I annealed 5 cases in accordance with the code that the machine produced. As you can see in the picture, my annealed brass is between Lapua new and Mark III in terms of colors and I'm happy with the results.

I started as a rookie Arduino programmer but I found it not so difficult to learn and by this third model of mine (the first one was PLC based) I feel pretty comfortable with it and even enjoy it.

HAPPY ANNEALING, EVERYBODY!
Very clean design Oliver!
 
All my research indicates that you should not have any red glow at all. Generally, the advise is to use a sacrificial case of the same brand and calibre and annealit, as you have, in the complete dark until you get that slight red glow that you mention for a split second. Then crank the timer back 0.2s and you theoretically have your ideal temp. Tempilaq 750 seems to support this. It is great to try to get the shoulder annealed too, but not if it is going to degrade the neck of the case by over heating it. A solid red glow is, by all advice, far too much heat.
Advice to me from several very experienced annealers is to use Tempilaq 750 on the neck, and when the neck is done that is it. If the shoulder is not 750 that is fine as it will be getting close, and the annealing effect starts at somewhere around 450, but 750 is the ideal and is also the max. Beyond 750 is said to excessively soften the neck of the case and there is no recovery from over annealing brass.
It is a fine balance between over cooking the neck and under cooking the shoulder. My personal preference, and I encourage all to work things out for themselves, is to concentrate solely on the neck, and then the shoulder gets what it gets. Last box of Lapua 6.5 Creedmoor were reloaded 24 times without losing a case to splitting and maintaining good neck tension throughout. I only replaced them then because I got a new barrel.
Anyway, we all have our own ideas and our own sources and advisors, so if it works for you, whatever you are doing, keep doing it. My thought is that the ultimate test is case life. If you are not splitting necks or shoulders then you are OK. Works for me.

Keep doing whatever works for you.
Hello
I'm not sure that 750 F is the right temperature for annealing the necks. I could find great information on you tube with videos from a metallurgist shooter. All diagrams about brass annealing give a 1 hour annealing, sometimes less.
We can't go on those times cause body would be annealed too.
If you want to have a full recristalisation, you must go at higher temps in a very short time.
Next week I'll take my annealer to university and I'll conduct hardness test (vickers) on my annealed cases.
Like this I'll be able to calibrate it.
The goal is to get a 98 HV on the neck (so from 95 to 105, let's say). This is the only way to know if brass is fully annealed.
Give a look to those videos and about his scientific experiments.
You can also consult "AMP" experiments they made into laboratories.
I'll upload my test results and later I'll see if I can find a correlation between laboratory tests and the use of tempilaq. I'll use 750F, 850F,950F, 1100F, 1200 and 1300F
Patrice
 
"This is the only way to know if brass is fully annealed."
Not right, a microscope can be used also but I don't have.
I only have access to vickers hardness tester.
 
View attachment 1065053 View attachment 1065052

I just received some cool parts

I reckon I got the "fit" with the Amazon cake tin hopper almost perfect. The sleeve fit over the 20mm OD tube was another question. I was advised by the guy who made the drop shoot parts to have 0.5mm extra diameter. I reckon this could have been lowered to 0.25mm or perhaps even less. Even so the fit is very good.

Now to place the three holes in the "hopper" to attach it. Plus get the base cut.
I take it you paid someone to 3D print those parts for you? If so do you have a contact so I could have 2 sets made for me? Thanks
 
I used a company called Jaws-Tec. They need to be printed via an SLS or MJF printer. 'Regular' FDM 3D printers can't handle the structure.

 
Hello
I'm not sure that 750 F is the right temperature for annealing the necks. I could find great information on you tube with videos from a metallurgist shooter. All diagrams about brass annealing give a 1 hour annealing, sometimes less.
We can't go on those times cause body would be annealed too.
If you want to have a full recristalisation, you must go at higher temps in a very short time.
Next week I'll take my annealer to university and I'll conduct hardness test (vickers) on my annealed cases.
Like this I'll be able to calibrate it.
The goal is to get a 98 HV on the neck (so from 95 to 105, let's say). This is the only way to know if brass is fully annealed.
Give a look to those videos and about his scientific experiments.
You can also consult "AMP" experiments they made into laboratories.
I'll upload my test results and later I'll see if I can find a correlation between laboratory tests and the use of tempilaq. I'll use 750F, 850F,950F, 1100F, 1200 and 1300F
Patrice

Looking forward to the results. Remember, most target a color change in Tempilaq from green to grey-green (i.e. hits 750F) well below the shoulder-case wall junction. Everything above that - including the neck - gets MUCH hotter because it is materially thinner.
 
I'm sorry, I'm a French, I translate with google. Hello everyone, I came to seek information in the year 2019 , Since then I have progressed on my own machine. I recommend this (look at the whole aliexpress page) maximum 68 Volts 45 Amps
The temperature of 65 ° c (T ° MOFSET) stops the current. A short circuit cuts off the current. An external switch is possible (on/off). I added 26x0.27uf= 6,50uf. My winding is 6 turns + 5 turns (2 layers) not the work coil black it is too wide, the whiteIMG_20210116_143934.jpg
My actual work coil is 6tours + 5tours (2 layers) The inside diameter is 32 mm. I get a frequency of 28Khz The machine gives 1000w with a 20A 40V power supplyIMG_20210129_151426.jpg


I added a radiator, two fans but it is possible to put your finger in the water (down 50 ° c)

IMG_20200703_173254.jpg
A product seller site (read the whole page)


I'm going to do another work coil, but as the weather is nice, I'm going to go back and shoot. Between Belleau woods and Argonne where the boys came in 1917
IMG_20210117_103530.jpg
 
Hmm. Sorry. Let me investigate. When I did this from my home computer there is an option to download the file. I will need to check when I get home this evening.
SGK, I'm encountering the issue of not being able to open your designs in Fusion360...would you export and attach a .stl file for sharing? Thanks in advance.


* Disregard the upper message...I figured it out.
 
Last edited:
Hi Gina & Erick, Hi All,

Phew!
I made it to the finish line. What a marathon.
I've had this thread bookmarked to read for months.
I'm in Melbourne Australia and we've started a brief 5 day lock down to help ensure that the nasty little virus doesn't take hold in our State, so I thought I may as well take the opportunity to read this thread, all 115 pages.
With a couple of breaks here and there, I did get through it in the day, taking notes along the way, but was sore and uncomfortable in my chair by the end. I had planned to stop, first around page 30, then page 60 and onto 80, and leave the rest for another day, but I just couldn't stop. There would be no tomorrow. I would climb this mountain. Ha ha.
Awesome contributions by everyone and a big thank you to all for sharing your experiences, with a special thanks to Gina and Erick who started this thread and so, the journey for so many people.

I had originally found the short 8 page thread on snipers which then lead me here.
I did consider just buying one of the Propane torches as I need to get some 308 brass annealed fairly quickly, but I think I'll abandon that and instead make a very basic induction annealer with a minimal build to get me going fast, then improve and expand on it over time.

Now to mentally collate the information, hope that I absorbed enough of the shared knowledge and try to source some (hopefully reliable) parts, starting with the main components like PSU, Induction board & switching.

Cheers,

PS: Oh, I just wanted to say a quick hello to whoever is reading this 5 years from now in 2026.
It's 230 pages long now and you're half way through. Congratulations but don't give up. Put on some more coffee, order a pizza and settle in for the long haul.
 

Upgrades & Donations

This Forum's expenses are primarily paid by member contributions. You can upgrade your Forum membership in seconds. Gold and Silver members get unlimited FREE classifieds for one year. Gold members can upload custom avatars.


Click Upgrade Membership Button ABOVE to get Gold or Silver Status.

You can also donate any amount, large or small, with the button below. Include your Forum Name in the PayPal Notes field.


To DONATE by CHECK, or make a recurring donation, CLICK HERE to learn how.

Forum statistics

Threads
165,250
Messages
2,191,727
Members
78,761
Latest member
Mattgg
Back
Top