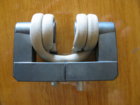
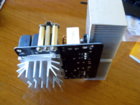
Experimenting with different coils and the Flux concentrators has been very interesting. I found that these open Ferites only draw about 3 amps with no case in the path and 7 amps at 30 V with a case such as a 223 -308 size. The 223 was annealing in about 2.5 seconds and the 308 in 4.5 seconds. Only doing a few at a time there is no appreciable increase in temperature on either the coil/ferite or on the induction board. this is all air cooled as well. Draw back is that the case is very close to the ferite so more care is needed also the case must be held in place well as when the induction starts it pushes the case out of the field. In comparison I made the 8 turn 1 /8 using 1/8 copper tube this maxes out my current power supply (while waiting for the 48V unit.) Also this coil really heats up without any water. I have it all plumbed for water but again waiting on a more suitable reticulation water unit. The time it takes to anneal is also longer.

Induction brass annealer redux
- Thread starter Gina1
- Start date


")

Upgrades & Donations
This Forum's expenses are primarily paid by member contributions. You can upgrade your Forum membership in seconds. Gold and Silver members get unlimited FREE classifieds for one year. Gold members can upload custom avatars.

Click Upgrade Membership Button ABOVE to get Gold or Silver Status.
You can also donate any amount, large or small, with the button below. Include your Forum Name in the PayPal Notes field.
To DONATE by CHECK, or make a recurring donation, CLICK HERE to learn how.
Click Upgrade Membership Button ABOVE to get Gold or Silver Status.
You can also donate any amount, large or small, with the button below. Include your Forum Name in the PayPal Notes field.
To DONATE by CHECK, or make a recurring donation, CLICK HERE to learn how.