• This Forum is for adults 18 years of age or over. By continuing to use this Forum you are confirming that you are 18 or older. No content shall be viewed by any person under 18 in California.

Induction brass annealer redux

My first annealer was built with the help of hollywood. He worked long and hard on finding the right coil size. He also came up with the water cooled coil and the radiator/pump system for it.


I added the timer system, trap door, and voltage/current monitor meter. Together we came up with what I think is a really great annealer. Since Mod1 (the first one) I've added a few improvements, this is Rev2.

If you were thinking of building one, I hope this helps.


Making the coil.... See photos. Note... Inside diameter of the coil is about 1 1/8 inches. BTW PVC pipe is schedule 40 3/4" pipe.

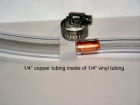
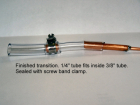
Since the power connections from the annealer board to the coil are set up for ¼ “ tubing, we must transition from 1/4” copper tubing to the coil's 1/8 size.

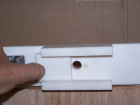
See the 4 pictures on this. Remember to leave enough of the 1/8 tubing to reach the trap door location from the inductor PCB from the 1/4” tubing. Easier to move the 1/8 tubing than the 1/4” tubing

After your coil is complete, slightly separate the coils so they do not touch and dunk in shellac or varnish to insulate them.

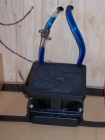
One of the things I've run into with the latest build was that the radiator and the coolant pump both had 3/8” inch fittings, but I had 1/4” tubing coming from and going to the inductor PCB.

See the 3 pictures on how to deal with this.

Hint..... After cutting the copper tubing, (using a pipe cutter) ether the 1/8” or 1/4”, ream out the opening, as the cutting process tends to partly close the opening.

Parts list

Items that were bought through Amazon

(1) SainSmart1000W ZVS low voltage induction heating board. $36.99

(2) Yosoo SC-300TDC12V water cooling pump tank $22.04

(3) Thermaltake 1000cc Liquid coolant $15.99

(4) Refigeration Copper Tubing 1/8” x 50' $30.88

(5) AGPtek 12 Pipe Aluminum Heat Exchanger Radiator $16.99

(6) Packard C230 2 Pole 30 Amp Contactor, 120 Volt Coil $ 9.00

(7) DROK Digital V/C measurement DC 0-100V/50Amp meter $16.42

(8) uxcell 5 Pcs, 6 Position screw terminal strip. $ 5.89

(9) Sestos Digital Quartic Timer Relay Switch 100-240V B3S $29.96

Items bought through Jameco www.jameco.com


(1) 2125931 Fan, 120VAC 2 each @ $13.95 $27.90

(2) 196817 Fan Guard & filter 2 each @ $2.19 $ 4.38

(3) 323337 12V@3A power supply $12.95

(4) 295929 48V12.5A 600 Watt Power Supply $76.95

(5) 34462 Varistor 130VAC $ .39

(6) 69439 Fuse, Fast Acting 3A .25”x1.25” (3) $ 1.05

(7) 69570 Fuse Slo Blow 10A .25”x1.25" (1) $ .59

(8) 317825 Switch, Toggle on/off $ 2.55

(9) 1711947 Fuse Holder .25” 1.25” (4) $ 3.96

(10) 2202335 Solenoid Tubular-pull 12VDC $ 7.95

(11) 2153705 Wire, hook up kit $16.95

(12) 36011 1N4007 Diode (min order 10 @ 5 cents) $00.50

(13) 315432 SPST Momentary contact switch 2 @ $1.09 $ 2.18

Note... not all parts were ordered from on-line. Numerous items were purchased from my local hardware store ie vinyl tubing, 1/4” copper tubing, tube clamps, etc.


makingCoil.JPG wind1.JPG wire2.JPG wire3.JPG wire4g.JPG wire5.JPG tube1.JPG
 

Attachments

  • tube2.JPG
    tube2.JPG
    118.8 KB · Views: 6,040
  • tube3.JPG
    tube3.JPG
    106.2 KB · Views: 5,326
Last edited:
Continuing......

See Rev2 schematic attached file

So how does does this all come together.??

The timing heart of this annealer is the Seatos digital quartic timer relay switch.
It is in fact 4 timers in one unit Timers A, B, C, and D. Timers A and C have SPDT relays controlled by the timers. In this annealer timer "A" is used to set up the amount of time a case is being annealed. it controls the 30 amp contactor/relay and the power (48 volts) going to the inducter annealing PCB.
Timer B, is not used and is set to "zero" time.
Timer "C" is usually set to .5 seconds and controls the trap door solenoid. Dropping the newly annealed case in the collector pan.
Timer "D" is usually set to 2.5 to 3.0 seconds. and is used for a delay to allow the operator time to insert another case into the annealing coil.
In recycle mode, this A, B, C, D runs continually. Annealing one case right after another.

More later today.. Breakfast awaits :)Rev2 Schematic.jpg
 
Continuing again

The cooling system uses a really neat pump. The Yosoo SC-300T 12V pump has a built in coolant storage tank. Once the system is filled it is a "closed" loop cooling system. This pump gives good pressure and you can see the coolant circulating through the storage tank. The fill cap/screw has an "O" ring, so there is no spillage if the annealing unit needs to be turned on it's side. I decided to use a pre-packaged coolant because when I was using just water, alge started to form in the warm water

The main reason for the voltage/current meter is to monitor the amount of current the inductor PCB board is pulling. It needs to be limited to 12 amps.
In Rev2 the trap door assembly can be raised and lowered, to handle different size cases. As more of the case is raised into the coil, the amount of current will increase. This will set the annealing current point. With the trap door assembly secured at that point, timer "A" will be used to set the annealing time. A case is painted with"tempilaq" (a temperature indicating liquid @750 degrees). As the case hits 750 degrees the paint will change color. the longer the annealing time, more of the paint, down the case, will change color. In my case I like to anneal down to 1/4" below the shoulders.
Once the time is set, continues annealing can be done.

I noticed that when I was doing continues annealing, the inductor PCB would get hot. To prevent possible problems, I added a fan and fan guard over the PCB to add additional cooling to the board. The PCB is mounted on a 1/4" piece of plywood. On this plywood I have 3" 8x32 screws coming through it to support the cooling fan (see photo's) All fans are 110VAC

The varistor and the diode used in conjugation with the contactor/relay and solenoid coils are used to prevent arcing across the timer relay contacts.

BTW this a "left" handed annealing machine o_O... Say what !!! Being left handed, it is easier for me to make changes to the timer. Bet you right handed folks don't think about that. A right handed machine would have the timer on the right side of the front panel.

When wiring up the 48 volt line to the shunt, or to the contactor, or from the contactor to the inductor PCB, use at least 14 gauge stranded wire to avoid a voltage drop in the wire. Any voltage drop will throw your current readings off..

The material I used to make the trap door with is called "Corian" . It is used to make hi-end counter tops. It's easy to work with and handles heat well.
Check with your local counter top shops, as they most likely will have scraps you can get.

If you have any question, feel free to PM meBack view.JPG Back view.JPG 300 ultra mag.JPG
 

Attachments

  • 100_2207.JPG
    100_2207.JPG
    115.4 KB · Views: 7,123
  • 100_2207.JPG
    100_2207.JPG
    115.4 KB · Views: 6,693
  • Radiator & fan.JPG
    Radiator & fan.JPG
    248.7 KB · Views: 6,167
Last edited:
Outstanding write up Gina. I do hope our work can help others who want to build there own annealer. Much more gratifying buidling a piece of equipment yourself. While reading this a name for the unit popped into my head the "GinaErick" (generic) induction annealer. Your electronics input brought my basic idea to a hole new level, thanks for all your help.

Erick
 
Erick....
Thank you for all your help in getting this off the ground. GREAT name GinaErick "A generic induction annealer. To tell you the truth I was wondering what to call it. Perfect.... So be it, it is now the GinaErick !!!!
Roughly I figure it can be built for under $400 dollars. As the parents, I don't think you can find a better brass case annealer. I do hope it catches on.
Yep... We did work at it.

Gina :)
 
This is so cool! I need to start buying these things up!

Jason
If you have any questions or need some help on anything, please feel free to ask or PM me.
Just keep this in mind. How you build it physically is up to you. In my case I gave myself a large foot print with lots of room for the build. One way to reduce the foot print is to mount the 48 volt PS on its side. Any other options are possible. Just watch your heat dissipation and air flow.
Gina
 
Last edited:
Hopefully the Youtube upload worked

See the GinaErick annealer in action ;)


Still working out the bugs in youtube video. Can't seem to get rid of a deleted file :oops:... Just hit recycle to replay.
The total cost to build the GinaErick is between $350-$400

Gina
 
Last edited:
This thing is fucking awesome !

I'm too stupid to build anything like this. I only wish.

Maybe I can get my brother to do it :D

Thank you for taking the time to share this.

Thank you :) . Every one has their own special talents. Maybe you and your brother can work this out. Feel free to PM me if you have any questions.

Gina
 
Last edited:
Missed....

Once you get going on this, it will take on a life of it's own. Feel free to PM me if you have any questions. Think about it, you come home from the range, you've got 100 spent rounds. You flip on the "on" switch, put your first case in the trap door, hit the "start" button, and 10 minutes later your done !!
Exact annealing.. no open flame to adjust, each case repeated time wise as every other case.
IMHO a really neet annealer

Gina
 
Gina

A couple of questions,

What is the shortest case length that can be annealed?
Can shorter cases, meaning 1.250" or shorter in length be annealed?

I see that the trapdoor can be adjusted to any height,
If the trapdoor is raised to just below the bottom of the coil,
not touching the coil.

Where does the annealing take place,
in the center of the coil, top half, or bottom half etc.

Tia,
Don
 
Hi Don...Glad you asked.

So far the shortest case I've annealed is the 6mm dasher., which is 1.54" in length.. The trap door assembly can be brought up to touching the coil.
The screws holding the trap door slide are made of nylon, so there is no induction interaction..The total depth of the coil from the bottom of the slide to the top of the coil is about 1 3/4" (trap door full up) I don't think you would have a problem with a shorter case, for the very reasons below, as long as the neck and shoulders are in the coil. What case did you have in mind.?

Annealing takes place, starting in the neck (the thinnest amount of metal) and the longer the time that the case stays in the energized coil the further down the case the heating takes place. Using Tempilaq (temperature indicating liquid, 750 deree) will show how long to set the annealing time for.
Im my case I like to anneal 1/4" just down from the shoulder, so my anneal time is 5.4 seconds.

Hope this helps

Gina
 
Last edited:
Missed....

Once you get going on this, it will take on a life of it's own. Feel free to PM me if you have any questions. Think about it, you come home from the range, you've got 100 spent rounds. You flip on the "on" switch, put your first case in the trap door, hit the "start" button, and 10 minutes later your done !!
Exact annealing.. no open flame to adjust, each case repeated time wise as every other case.
IMHO a really neet annealer

Gina


I have to get my powder dispenser done first! Down to working some bugs out, its getting close and much faster. I want to set my annealer up so I can deprime and drop them in the annealer and it will handle them automatically from there. I will hit you up when I get to it.
 
Hi all...

I had a PM requesting information on how the coolant system is connected to the inductor PCB and how it is used to cool the annealing coil.
Since a picture is worth a 1000 words, I drew out a pictorial schematic. I guess I should have included this with the earlier post.
So here it is

CoolantSys1.jpg
 

Upgrades & Donations

This Forum's expenses are primarily paid by member contributions. You can upgrade your Forum membership in seconds. Gold and Silver members get unlimited FREE classifieds for one year. Gold members can upload custom avatars.


Click Upgrade Membership Button ABOVE to get Gold or Silver Status.

You can also donate any amount, large or small, with the button below. Include your Forum Name in the PayPal Notes field.


To DONATE by CHECK, or make a recurring donation, CLICK HERE to learn how.

Forum statistics

Threads
165,020
Messages
2,188,124
Members
78,639
Latest member
Coots
Back
Top