• This Forum is for adults 18 years of age or over. By continuing to use this Forum you are confirming that you are 18 or older. No content shall be viewed by any person under 18 in California.

Traditional Oil Stock Finishing

I’ve seen some fantastic posts on these forums of incredible gunstock work. I can only dream of being that capable working with wood. I know I’d be useless at it. Despite the use of some wonderfully figured wood there seems in large part a tendency to spray a varnish finish or if oil is used, to not take it to its fullest potential. Personally, I have always preferred the finish I see on fine guns done in the “best London oil finish” be they shotguns or rifles. Most of these produce a gun with a mirrorlike finish on the wood and with maximum contrast in the figuring. And so, I thought I’d create a thread which shows the process I am using to redo the finish on my Beretta shotgun.

This isn’t a ‘fine’ shotgun by any means. It’s a Silver Pigeon S which I purchased back in 2006. It’s had many years of solid use in the field driven-bird shooting and shooting simulated-bird clays. At one point, it had a rubber cheek rise ‘fitted’ by the chief instructor at Holland and Holland shooting grounds just outside of London. I say ‘fitted’ but it was attached simply with electrical tape! The gun had suffered a number of dents over the years, including some from being hit by pieces of a clay shot by a friend while I stood well behind – on the very first day I used the gun!

Nonetheless, I felt the wood perhaps showed more promise than its production finish (and use) allowed. (Beretta have no doubt reduced the quality of their base model guns since I purchased mine.) And so, I decided to embark on the process of stripping off the previous finish, fixing any dents and scratches, and trying to bring the best out of the wood with a traditional oil finish.
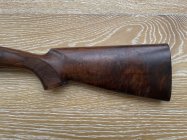
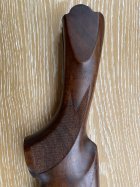
IMG_6253.jpeg

IMG_6254.jpeg

A lot of what I’m doing is summarized excellently in a video made by the folks at James Purdey and Sons and posted on their Instagram account. The video series is well worth watching and the stock finishing part begins at about the 1 hour 20-minute mark in the one linked to below. I should say from the outset that I’m not at all a professional at this stuff. I’m very much an amateur following the processes outlined in that video and tutorials provided elsewhere. Prior to this stock I did another a couple of years ago although not to the same level of quality. For this project, I had to relearn some of what I had done before and learn a few new things this time, largely from trial and error. Were I to do another stock, I think I’d be much more efficient than this time.

https://www.instagram.com/tv/CIoPydLnsWk/?igshid=MTc4MmM1YmI2Ng==

I should also say that this isn’t a process for those seeking instant gratification and quick results. The fellow from Purdey noted in their video that they make a minimum of 40 applications and up to 50 depending on the grain of the wood. And they’re using the best quality wood available. Mine is far from that with likely more marked grain, at least in places. They also have the benefit of considerable experience. (Their apprenticeship takes 5 years.) This is a process that requires time and patience. Expect to be doing a little of this for one to two months depending on your commitment. At most, you will do two applications per day else later applications simply undo prior ones which haven’t had time to cure sufficiently.


Wood Preparation

The first step was to remove the butt pad, action and fore-end metal work and strip the old finish off. I used MinWax Antique Furniture Refinisher, some 0000-steel wool and a new toothbrush for the checkering.
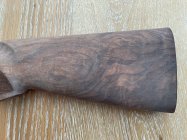
IMG_6257.jpeg


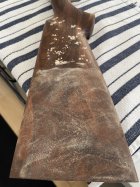
To be honest I was a little disappointed with the stripped wood. It was still quite dark and didn’t have the extent of figuring that I’d hoped for. (Maybe it had been soaked in stain at the factory and perhaps there would have been a better finish stripper to use.) Even so, it was clear that there was enough there for the end-product to be substantially better than before.

Next came raising the dents. I made up a solution of Oxalic acid (using the mix ratio recommended for wood) which was used for this and during papering (see below), dipped a rag into the solution and, laying it down over the affected area, brought a hot iron to bear over the dent being careful to not singe the wood. The dents rose quickly to the level of the rest of the stock. (Don’t breathe the fumes of the evaporating vapors!)

Next came papering (sanding) the stock. In hindsight, I might have paid greater attention to how the head of the stock fitted the metalwork of the action. Beretta doesn’t do an aesthetically good job of this on their cheaper guns with the head largely over-sized for the action by several millimeters in places. It would have been a good opportunity to tidy this up. However, I didn’t notice beforehand and, since I had the metalwork off while sanding, I didn’t notice it until the metalwork was refitted prior to starting the finishing process.

Papering was the simple process starting at 180 grit and moving up through paper grades all the way to 2000 grit. (Actually, I did a light sand at 2500 grit, but I think this isn’t needed given all that follows.) All sanding was done dry even though wet ‘n dry paper was used. Between grades of paper, I ‘raised the grain’ by dampening the stock (excluding the checkering!) with the oxalic acid solution and then immediately drying it off with a heat gun. (See the Purdey video for a demonstration of this process.) The more we can lift the grain by doing this the smoother the wood will be once sanding is finished. The most tedious part of this entire process is filling in the remaining grain with finish and so the more we can do to make that easier the better. If you don’t want to use oxalic acid for this process (or raising dents) a solution of 75% ethanol alcohol/25% water will work.

Here’s a pic of what the wood looked like once papering was completed:
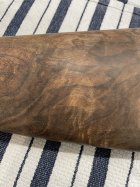
IMG_6268.jpeg


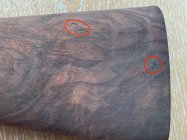
You must be absolutely meticulous throughout this preparation phase. Imperfections will come to haunt you later. Ask me how I know… Clean off the wood and give it a very close inspection. If there are spots or areas that you think can benefit from additional grain raising deal with them now. Here’s a couple of examples that should have been better dealt with early on. 40+ slacum applications later and they were still issues. I thought I had properly raised the dent at the top but a chip of damaged wood came out during sanding. The bit on the right looked deceptively innocent. Even more deceptive was the grain on the other side of the stock. Unfortunately I didn't photograph that.
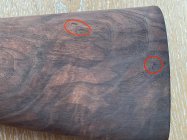
IMG_6257.jpeg


The final part of this stage is to burnish the wood with a small amount of ‘red oil’ (more on this shortly) and a chamois.

IMG_6269.jpeg


Grain Filler

I don’t use a specific grain filler that would be sanded once dry. Instead, I use rottenstone combined with slacum to create a sort of dark cement in the grain. (See below.) This provides great local contrast. There exist, however, products that you can use at this stage – particularly if your wood has very open grain. I resisted the temptation to “cheat” but if you can’t fix difficult areas via raising and sanding then perhaps a grain filler has merit (particularly I troublesome areas). A grain filler will save a lot of work later but you may not get the ‘micro contrast’ of a grain that’s been filled with rottenstone and slacum.

Trade Secret (see below) make a grain filler intended for this process.
 
Last edited:
Coloring the Stock with ‘Red Oil’

There are many stains of old but perhaps the most common one used in gunstock finishing is Alkanet root. Alkanna tinctoria or, more commonly, Alkanet is a weed common to Europe. Its roots have long been used as a red dye.

https://en.wikipedia.org/wiki/Alkanna_tinctoria

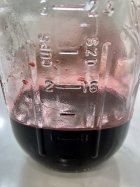
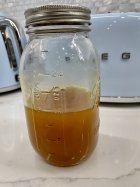
‘Red Oil’ is made by steeping chopped Alkanet root in linseed (aka flaxseed oil) and, sometimes, walnut oil for many, many months and then straining off the dyed oil.

IMG_6862.jpeg

I had made a batch of this stuff about 7-8 years ago when I did another stock. The process was simple, but the time required long. Simply add chopped alkanet root to a large jar with a screw top lid (e.g., a mason jar) and cover with a 50:50 solution of food grade linseed oil and walnut oil. (Don’t use boiled linseed oil.) Place this jar in a pot filled with water enough to rise to the level of the solution in the jar but not enough to float the jar. Heat until the water begins to simmer. The oil and alkanet root mixture will be heated. (I think it safer to use this water bath approach rather than heating a pot of oil directly.) Let things simmer for twenty minutes or so, remove from heat and allow to cool. Seal the jar and place in a dark space for about as long as you can handle, agitating it every now and then when you remember. The longer you leave it the better, but plan on a minimum of six months. Finally, strain off the liquid from the root and you’re done. Just remember at the start that you will lose a lot of liquid volume to the root unless you have some sort of press. This oil can always be diluted to taste later, or you can add a colorant like a small amount of Vandyke Brown artist oil paint.

IMG_6276.jpeg

IMG_6274.jpeg

Alternatively, you can buy Red Oil from the likes of Trade Secret in the UK. https://tradesecretstockcare.com They don’t ship to the U.S., but I think some retailers of their products do. (Note they also have some tutorials, albeit very basic, on their website.) I’d be quite keen to see the color of their red oil versus the batch I made.

In line with the example provided in the Purdey video I made two heavy applications of Red Oil (full-strength and without any colorant) to the entire stock and fore-end, including the checkering.

IMG_6270.jpegIMG_6272.jpeg

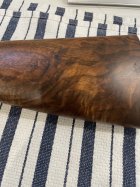
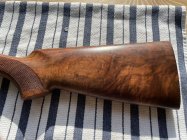
As you can see, Red Oil doesn’t stain walnut bright red but rather brown/auburn and enhances the figuring of the wood deepening contrast. Now the stock was left for a week to 10 days to allow the oil to cure.
 
Last edited:
Drying Oils and ‘Slacum’

‘Slacum’ is the name given to the concoction of drying oil, varnish, wax, dyes, filler and other ingredients that is used to ‘finish’ a gunstock. Each gunmaker of old had their own recipe for this finishing oil and guarded it closely. But first, a little background from the world of oil painting.

Flaxseed aka linseed and walnut oil are ‘drying oils’ – over time they will dry to a hardened structure. However, they don’t dry in the sense of evaporation of solvent or water. Rather, they autoxidize. "Linseed oil is a triglyceride, like other fats. Linseed oil is distinctive for its unusually large amount of α-linolenic acid, which oxidises in air.” "Having a high content of di- and tri-unsaturated esters, linseed oil is susceptible to polymerization reactions upon exposure to oxygen in air. This polymerization, which is called autoxidation, results in the rigidification of the material.” Wikipedia

There’s a good overview here: https://www.naturalpigments.com/artist-materials/choosing-drying-oil-for-your-art You can see the high iodine value of linseed oil is what gives it its ‘drying’ property.

“Varnishes can be prepared with natural resins (tree saps, also called gums) such as dammar, mastic, copal, Venice turpentine, Canada balsam, Strasbourg turpentine (made from Silver Fir balsam), elemi, amber (historically), and others, by dissolving the resin in a strong solvent such as turpentine. A standard ratio would be three parts solvent to one part resin. In that sense, the resin can be thought of as a concentrate.”

https://www.jacksonsart.com/blog/2022/03/10/larch-venice-turpentine-a-resin-not-a-solvent/

Combine a drying oil and a varnish and you get what artists call a ‘medium’.

Unsurprisingly, at its heart, a slacum is a medium made from linseed oil, with a varnish component and a few other ingredients. A recipe will likely contain a filler such as a wax or even plaster of Paris and, to speed things along, a drier. These driers speed up the autoxidation process. https://en.wikipedia.org/wiki/Oil_drying_agent

A slacum recipe may also contain a colorant such as Red Oil or, in days past, things like ‘butter of antimony’.

You can either make your own slacum (as I did) or purchase a product like Trade Secret’s ‘Rapid Oil’.

https://tradesecretstockcare.com/product/trade-secret-rapid-oil/

Napier also makes a finishing oil. I used this on the previous project.

https://www.napierusa.com/products/stock-finish-100ml-43-ounces-1

I will have more to say later regarding the slacum I made. See posts below.

IMG_6357.jpeg

A slacum oil finish has a number of advantages in addition to its beauty. The finish penetrates deeply into the stock. It repels water naturally and is very durable. Importantly, it can easily be repaired. With a spray varnish finish, a dent or even a chip likely requires a complete redo of a large area, if not all, of the stock. With a slacum finish a dent can be steamed out, buffed with a little papering and then with a few coats of slacum it will be as good as new.


A note regarding checkering

Unsurprisingly, the ‘finishing’ of a gunstock is done towards the very end of the gun making process. Checkering will have been done beforehand. It is better to tidy up the checkering post the finishing process than to attempt to cut the checkering on a finished stock and undoubtedly risk unwanted damage to its surface. Hence, you will see in the Purdey video they do all the finishing sanding and oil application with the checkering in place and then, once that is finished, do a pass over the checkering to clean it up.

I’ve never done checkering and, frankly, it scares me. I did my best to keep the checkering clean, even if the finish at the edge of the checkering ended up less than perfect. I grabbed a new toothbrush (which I cleaned often by wiping it on a rag between strokes and tossed in the dishwasher every now and then) and a fine scribe (actually, I used a fly-tying dubbing picker) for running down the border line. Of course, it is almost impossible to keep the border line clear of slacum and rottenstone and so some cleanup of that border line was needed in the end. In contrast, the Purdey guys can work with less caution both while sanding and applying slacum and rottenstone, knowing they can readily tidy the full checkering with ease.
 
Last edited:
Applying the Finishing Oil

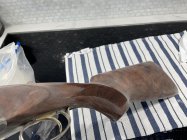
For the finishing oil process, I returned the metal to the wood. This gives me something to hold onto when the wood is covered in oil and, also, something I can clamp to my work surface. Ideally this finishing is done in a low humidity environment. As I live in Miami and, as it’s still stinking hot and humid in my garage, I was working in my kitchen.

As mentioned earlier, rather than using a grain filler prior to final sanding I’m doing things the traditional way and filling the grain thin layer by thin layer with a mixture of slacum and a fine material called rottenstone. I think this often goes by the name of Tripoli pre-polish in the U.S. For this project, I purchased some from NorthernWestStuff on Etsy. Of course, as soon as I did so I found the rottenstone I had purchased in the U.K. a number of years prior and so now I have a ton of the stuff.

IMG_6464.jpeg

The rottenstone I bought here has a slight pink color to it while the stuff I got in the U.K. was basically white. Each work fine and end up black in the grain.

Since the grain of my stock was reasonably open, I decided to take a slightly more aggressive stance in the opening applications than is shown in the Purdey video. I adopted an approach outlined by Ernie Sealey aka “Damascus” in an old thread on the DoubleGunShop forum. There are several old threads there that have a wealth of information on making red oil and slacum, their history and the process of finishing a gun in this manner.

https://www.doublegunshop.com/forums/ubbthreads.php?ubb=showflat&Number=415289&page=1

Damascus uses talcum powder (Hydrated Magnesium Silicate) as the ‘filler’. It isn’t abrasive like rottenstone and so is easier on the hands. (That said, it has received a bad rap given its purported potential to be contaminated with asbestos.)

I followed the procedure he describes for about the first 10-12 applications, but with rottenstone. The rottenstone slurry is brutal on the hands and especially the skin on the tip of the index finger which, given its dexterity, is often relied upon to do the work in tight places and next to the checkering. Use the palm and heel of the hand as much as possible as well as the middle finger to share the load on the index.

The process involves sprinkling rottenstone or other filler onto the stock and then creating a slurry with slacum. Steadily the rottenstone slurry is worked into the pores of the wood. After a while (not too long) it becomes clear the wood won’t take any more rottenstone this application. At this point it’s good to wash any excess rottenstone and oil off one’s hands. Keep working the remainder of the slurry into the wood, wiping your hand on a rag intermittently and occasional washing your hands to remove the oil from them. Keep going until there is no oil left on the surface of the stock. With clean hands you can now buff the surface of the stock to ensure nothing is left. Set the stock aside until the next day. Repeat. Ernie continues this process until ALL the grain is filled in. (When it’s filled in some areas you can focus on where it isn’t.)

IMG_6293.jpeg
IMG_6294.jpeg

IMG_6295.jpeg

Since I was using rottenstone, my hand and particularly fingertips had had enough after about 12 applications. How much of a head start, if any, I got from Ernie’s method I don’t know. There’s a lot of burnishing of the stock surface going on (and hence no buildup of surface finish) and the oil isn’t given a lot of time to soak in heavily to the wood. But no doubt a good deal of rottenstone filler ended up in the grain. That said, I think there’s something to be said for working rottenstone into very tacky slacum that’s sitting in the grain waiting for it rather than using the wetter slurry. And so, I moved to the process illustrated by Purdey in their video. (I should note that I returned to the more aggressive ‘slurry’ approach a couple of times to deal with more difficult areas.)

Apply a ‘decent’ amount of finishing oil to the wood, avoiding the checkering. If you are too scrimpy, all the oil will disappear into the stock rather rapidly. If you’re too generous it will run all over the place including the checkering. A drop here and there goes a long way. (As a surface finish builds on the stock you’ll need less and less slacum.) If you have a narrow-mouth container of finishing oil, you can simply place your index finger over the top and quickly invert it momentarily. You will have more than plenty on your fingertip.

Once you’ve oiled the stock with slacum set it aside in a manner which doesn’t amplify the risk of oil running into the checkering. You now need to wait for the slacum to go ‘tacky’. Again, this is described in the Purdey video but essentially you want the onset of a setting toffee apple. If it isn’t tacky enough, you’ll simply lift everything out of the grain. If it’s left too long, you’ll have a much harder time lifting all the slacum off the surface. On reflection, I think I was always tempted (at least until I recognized the issue) to not wait long enough, to get on with the next stage of the process. The chap in the Purdey video says to not wait too long. He’s right in that if you do, you’ll have real trouble lifting off the excess. But don’t be tempted to take it off too early like I was. Keep a very close eye on it as it begins to go tacky and let it go ‘toffee’ sticky. You should need the small amount of boiled linseed oil to cut it off.

The first few applications almost all the slacum will disappear into the wood and there’ll be little on the surface to go tacky. Eventually, however, more will settle on the wood. In the case of my stock, it wasn’t really until the 7th or 8th application that slacum really began to settle on the surface even with relatively heavy application.

Once you can feel the slacum has dried enough that it is tacky to the touch but can still be pushed a little with your finger it’s time to lift it all off. Grab a non or very finely woven rag. (In the end I was using these https://www.amazon.com/dp/B08P2KWC42?psc=1&ref=ppx_yo2ov_dt_b_product_details ) Use a very small amount of boiled linseed oil (flaxseed oil with driers in it) to aid removal of the slacum. (I used a small bottle of BLO and, with my fingertip over the mouth, I flipped it momentarily upside down. I then dabbed the fingertip on a paper towel to remove the excess BLO.) Work across the grain if possible. Basically, you want none left on the surface, but a fine layer sitting in the grain.

Ready to come off:

IMG_6469.jpeg

IMG_6468.jpeg

I think I made a few mistakes early on here. As mentioned previously, I was often tempted to take the slacum off too early. Also, I was eager to see the shine of the stock once the slacum had been rubbed off and buffed the residual linseed oil off with the palm of my hand. After a while I realized this wasn’t necessary and in fact risked pulling the slacum out of the grain. Once you’re confident you’ve removed the excess slacum move straight onto the next step.
 
Last edited:
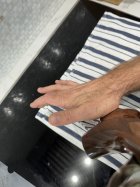
At this point I take a very clean rag and wipe down the checkering to make sure there’s no slacum/linseed oil sitting on the surface. Now we get out the rottenstone. Sprinkle it on the stock (avoiding the checkering) and gently work it over the surface with the palm and heel of the hand on larger areas and fingertips in finer places (across the grain). The rottenstone will find any excess slacum left behind. Once the stock is covered in rottenstone, wipe the surface clean with a clean rag. Brush out the checkering as much as possible. Very gently buff the stock and give it a close inspection to make sure no slacum or rottenstone residue is sitting on the surface. Set the stock aside to let it dry – at least 5-6 hours or better yet overnight.

In essence, you repeat this sequence until all the grain is filled in completely. Apply slacum. Wait for it to go tacky. Wipe it all off. Add rottenstone. Wipe off the excess. Let it all rest to cure. Repeat.

IMG_6473.jpeg

IMG_6360.jpeg

As more and more of the grain is filled in and ultra-thin layer upon layer of slacum builds on the surface, the stock will begin to shine. Really focus on whether you are filling in the grain in the less obvious areas of the stock such as the top, underside and around the metalwork and checkering.

IMG_6510.jpeg

IMG_6511.jpeg

IMG_6513.jpeg

Cutting back the surface early on helps difficult grain areas ‘catch up’. My first few cuttings back were more aggressive than shown in the Purdey video for this reason. If you have difficult grain and haven’t used a filler it likely makes sense to cut things back relatively hard a few times earlier in the process. I used 2000 grit wet ‘n dry for the early cutbacks (of which I did two).

In the Purdey video, the finisher mentioned he cuts the surface back lightly after every 10 applications with fine grit wet ‘n dry paper. I was skeptical when I heard him talk about the wave that can develop as the slacum follows the nature of the wood. He was, however, dead right. 2000 grit is too coarse for these fine ‘flattening’ of the finish (as opposed to the cutting back to allow the grain filling). 3000 grit is a better choice. You’re not trying to cut back the finish as in my early ones but, rather, just lightly skim the major high points. Using too heavy a grit means more applications before the dullness of that cutting back disappears again, likely counteracting the purpose of these in the first place.

A lot of perseverance is required through this process. Cutting the surface back early on is like taking a few steps backwards in order to go forward. Difficult areas not addressed early (or in raising the grain and sanding) will still be there many, many applications later. As you progress, you’ll have to be more focused and gentler in the application of rottenstone.

Eventually, the grain will be completely filled in and there will be nowhere for the rottenstone to go and so we switch to using slacum alone. From here you need to be very careful. As there’s no longer any burnishing with rottenstone any smears of slacum left behind will become embedded under the next fine layer. Apply the slacum as before, wait until it’s tacky and then wipe off with a little BLO. Then burnish the stock with the heel of the palm. Wipe your palm on a clean rag frequently as it lifts any residual slacum. Rub firmly and let the friction generate some heat. Carefully inspect the stock to ensure you haven’t missed any areas or left smears behind. Set the stock aside to dry as before. Keep going until you’re completely satisfied with the finish. If you’ve missed some grain you’ll have to choose between cutting the surface back again or, perhaps, making a compromise as to the quality of the end result. As the saying goes, “it’s done when it’s done.” The highly experienced folk at Purdey do 40-50 applications. Novices (like me) can expect to do more.
 
Last edited:
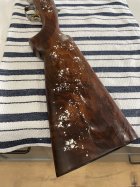
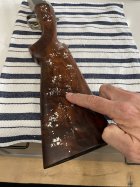
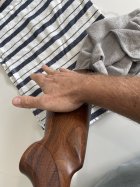
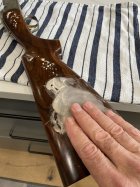
Burnishing with the heel of the palm:

IMG_6818.jpeg

IMG_6819.jpeg


Remember those difficult areas? Fix them early because chasing them by cutting back the finish is painful:

Initial

IMG_6257.jpeg

Part way through

IMG_6475.jpeg

Cutting back with 3000 grit to pursue the residual

IMG_6804.jpeg
 
Last edited:
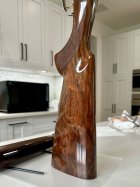
Getting there:

(that shine is a dry stock)

IMG_6808.jpeg

I took this video about 3/4 of the way through the finish. You can see where I did a poor job with some open grain on one side of the stock. Another cutting back helped but I'm likely to have to accept that I need to do a better job earlier on in the process.


I will post some pics of the final result at some point but to finish off describing the process...

When you are happy with the finish it’s time to set the stock aside for at least a couple of weeks before coming back and tidying up the checkering. (It will cut cleaner if the slacum spill has hardened.) Clean the checkering with a toothbrush and wiping with some red oil. Finally reassemble the gun.

It might be tempting to use your newly finished gun rather quickly. However, the finish will remain fragile for some time yet. Place the gun in a safe place and let that finish fully cure, ideally a couple of months (!!) You can buff the finish with a soft cotton cloth every now and then while waiting.
 
Last edited:
Making Slacum

As noted above, there are many recipes for slacum and some are closely guarded. I used a recipe (with some modifications) that was shared by Diggory Hadoke, a dealer/enthusiast/restorer/etc of vintage guns in the U.K.

https://www.vintageguns.co.uk

His recipe, posted in a thread over at the Double Gun Shop forums, called for:

“Raw linseed oil – 16 Fl Oz (Imp)
Spirits of Turpentine – 2 Fl Oz (Imp)
Venice Turpentine – 2 teaspoonfuls (Imp)
Carnauba Wax – 200 grains
Mix together and heat until it simmers. Simmer for ten minutes then allow to cool. Be careful it does not catch fire -!!!!”

https://www.doublegunshop.com/forums/ubbthreads.php?ubb=showflat&Number=215&page=1

(I will make recommendations as to a slightly modified recipe below.)

So, we have a varnish made from Venice Turpentine (Larch tree resin) and spirits of turpentine, a Carnauba wax filler (which also acts as a water repellant), and a base of linseed oil. Here you can read about Venice Turpentine:
https://www.jacksonsart.com/blog/2022/03/10/larch-venice-turpentine-a-resin-not-a-solvent/

Carnauba wax is one of the hardest waxes you can get.

In the above form, the slacum would take 2-3 days to ‘dry’. It doesn’t have a drier to speed the autoxidation process. Dig later suggested swapping out the spirits of turpentine for ‘terebine drier’. Terebine drier, in the U.K., is a blend of metallic driers formulated to speed up the oxidative drying of solvent-based oil and alkyd-based paints, stains and varnishes. The U.S. equivalent would appear to be ‘Japan drier’, another generic term, which is largely naphtha plus cobalt and other metallic components. The name comes from the 17th century European practice of "Japanning," a process designed to imitate Asian lacquerwork.

https://www.facebook.com/UtrechtArt...ht-japan-drier-is-a-/10154485032236704/#

However, I read that:

"With an alkyd resin base and the tendency to alter the appearance of oil colors over time, Japan Drier is not recommended for fine art use. When left to dry to a high tack, Japan Drier can, however, be used for gold and silver leafing.”

"Driers made from lead, manganese and other proprietorial mixtures that do not wholly contain cobalt driers are to be avoided as they promote darkening and loss of flexibility."

And, so, I chose to use a cobalt siccative from the art world. Cobalt siccative is generally regarded as the most powerful drying agent for a drying oil such as linseed oil. According to Langridge, a cobalt siccative can accelerate the drying time of linseed oil from 2-3 days to 1 day.

http://langridgecolours.com/cobalt-driers/#:~:text=Cobalt driers made from cobalt,embrittlement of the paint film

I purchased a product from Grumbacher:

https://www.dickblick.com/products/grumbacher-cobalt-drier/?fromSearch=/search/?searchword=cobalt drier

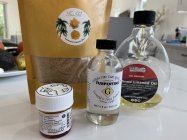
Here’s a pic of the slacum ingredients:

IMG_6283.jpeg


Handling the Venice Turpentine requires warming it. It’s like a sticky, very thick honey. (It’s tree sap after all.) I warmed it in its container in a water bath of boiled water. I then mixed the Gum Spirits of Turpentine and Venice Turpentine together in a small container with a lid. (Use a container with a mouth wide enough to allow you to place your Venice Turpentine measuring teaspoon fully into the measured Spirits of Turpentine else you’ll struggle to get the former off the spoon. Clean the spoon before dipping it back into the resin.) Once the Venice resin and turpentine have combined thoroughly after some vigorous shaking, I added this varnish solution to the linseed oil and added the wax flakes. Note: no siccative at this stage!

I then heated it all. (Make sure you do this in a well-ventilated area. My extractor fan was on full speed.) It didn’t really simmer as water would, but the solution was extremely hot and well past the melting point of the wax (apparently that’s 82-86 degrees Celsius or 180-187 Fahrenheit). (Note that the wax will not dissolve in the turpentine alone.)

IMG_6281.jpeg

IMG_6286.jpeg

This vigorous heating was important. Later, I dabbled with some of the leftover ingredients and if I only heated the linseed oil and wax in a water bath enough to melt the wax and then stirred in the varnish as it cooled, it separated later. Also, heating after the cobalt siccative is added is a disaster.

Now things got ‘interesting’. For art use, the recommended addition of cobalt siccative is 1% of the oil. But we need more drier to achieve a ‘time to tackiness closer to 1 ½ to 2 hours. Nonetheless, I started adding siccative slowly.

I didn’t realize, however, as Langridge advises:

“When initially mixed together, the driers will impart a blue/green cast to the oil or medium with which it is mixed. Exposed to indirect sunlight for a few days will remove this colour difference (Exposing the oil or medium to indirect sunlight will not sun bleach or thicken the material). If used in correct proportions, the colour of the cobalt drier will not interfere with oil paint brightness or colour saturation.”

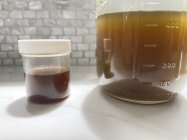
When I saw the green cast, I panicked a bit and decided to counteract it a little with Red Oil. Red + Green = Brown. I also added the balance of the linseed oil. It worked and I got a nice brown slacum, but dry time was still slow. As the color lightened, however, I had the confidence to add further drier. At this point it was a case of experimenting with slow increments of the cobalt drier to speed ‘time to tackiness’ while not resulting in an undesirable color. Of course, as the slacum is exposed to air it begins to thicken. My final result:

IMG_6357.jpeg

I have about 480 mL of slacum left and so have no need to buy additional ingredients (I’m out of linseed oil and Venice Turpentine) to try another batch from scratch. If anyone wishes to make some of this slacum I’d suggest the following:

Refined linseed oil 250 mL
Gum Spirits of Turpentine (best you can find) 2 tbsp (US) / 30 mL
Venetian Turpentine 2 tsp (US) / 10 mL
Carnauba wax 110 grains / 7 g

Prepare as described above and allow to cool thoroughly. Then slowly add Cobalt siccative, maybe ½ tsp at a time. I’d estimate my current batch of slacum has circa 4% cobalt siccative to oil base. That would be a bit over 2 US tsp with the above recipe. Mine takes about 2-hours to reach a sticky toffee surface. Quite likely it could take more siccative without color detriment (staying a nice brown).

Make a batch up well in advance of intended use so that you have time to use indirect sunlight to offset the initial color shift of the siccative. To test how long it takes to go tacky just spread a bit across a piece of plastic and check it periodically. Somewhere between 2 US tsp and 2.5 US tsp is likely right. If you want, you can color the slacum with a little red oil (say, a couple of tsp) but wait until you’ve worked through the siccative process. It may not be necessary. In short, a bit of experimentation is required. You can always add siccative a few drops at a time with an eyedropper to a bottle as needed. Plus, you’ll likely have plenty of spare materials to play around if you choose to. Once you’re happy with your mix transfer it to small bottles with a narrow neck. These are perfect: https://www.amazon.com/dp/B0C3CTXBPJ?psc=1&ref=ppx_yo2ov_dt_b_product_details

There's also a siccative called siccatif de courtrai blanc which isn't as powerful a drier as cobalt but which doesn't affect color. I was not able to source this in the US however. I did purchase some in the UK and added several drops to the small bottle of slacum I was using to finish this stock.

The above recipe would likely be considered a relatively 'light' formulation - note the percentage of varnish (resin plus turpentine) and filler (wax) to oil base. If you wanted to, you could try a 'heavier' formulation by lowering the amount of raw linseed oil.

Another recipe was posted in the DoubleGunShop forums by Peter Harris aka ‘Salopian’ was attributed to Purdey (although I'm skeptical that this is what they use today):

½ pint (Imp) of Linseed Oil
¼ pint (Imp) of Spirits of Wine (Ethanol)
1 tsp of Venetian Turpentine
1/2 oz Butter of Antimony (a colorant to darken the wood)
2 tsp vinegar (an acidifier)
2 oz Plaster of Paris (dental grade)

Here again we see a thin varnish, a colorant and a filler in a base of linseed drying oil. There’s no specific siccative in this formula of old.

It’s worth contrasting a slacum with ‘Tru-Oil’. I understand Tru-Oil comprises 56% mineral spirits, 33% polyurethane ‘varnish’ and 11% linseed and other oils. So, we have a synthetic solvent, a plastic in liquid form and a very low percentage of linseed oil. In my view, it’s a quick ‘n dirty solution only to finishing a gunstock.

I expect that formulations such as Arrow Oil are essentially slacums but with much heavier filler and varnish components. Since I don't understand its exact composition and haven't used it I can't make any recommendation as to its use.
 
Last edited:
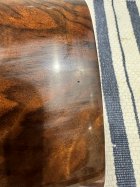
When I was happy with the finish - or at least decided it was enough! - I removed the receiver/action and other metalwork from the fore-end and gave it a thorough clean with acetone to remove any dirt and slacum.

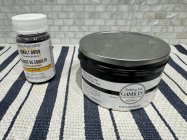
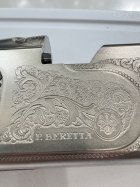
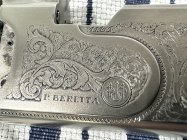
I then tried my hand at accentuating the (albeit very basic) engraving using the same method as described in the Purdey video linked to above. It's a subtle change but worth it I think. For this I used some drops of the Cobalt drier (mentioned above) mixed into a little black etching ink.

IMG_6867.jpeg

You'll never come close to using the ink in the product above so it's likely much more sensible to use a little artist's oil ink (like Winsor & Newton) which come in much smaller tubes. The process is described well in the video so take a look there. You're dealing with black ink so wear gloves, have a mess-proof work surface and plenty of clean rags available. Also, have some acetone handy in case you need it for cleanup. I'd advise doing it piecemeal as opposed to attempting to do all the engraving in one shot even though it will cost you a bit of waste ink etc. Essentially you mix the ink and drier, smear it into the engraving (with a cotton bud) wait a couple of minutes and then clean off the surface, leaving just a small amount in the engraving to dry. Use multiple passes if necessary.

Here's a quick before and after shot. Hopefully you can see the subtle difference (as well as the bits I should do again).

IMG_6869.jpeg


IMG_6872.jpeg
 
Last edited:
As noted above, stock finishes/slacums are closely guarded secrets. A little story about Purdue's finishing oil:

I happened to be in London the other week and called in at Purdey. (Not that I could afford to buy one of their guns!) During a discussion with the gentleman in charge of the gun room we turned to stock finishes and techniques. He pulled out a copy of Lt Col. Peter Hawker's book "Instructions to Young Sportsmen in all that Relates to Guns and Shooting" from 1859 and flicked to Manton's recipe for finishing oil. He went on to recount the story behind the Purdey finish. Apparently a very long time ago they employed a gentleman by the name of Harry Lawrence. Over time they noticed that the finish on the stocks he did lasted a lot longer than those of others in their workshop. It turned out he was using his own formula. Purdey tried to buy the recipe, however Lawrence refused. He did, though, agree to sell the bottled finish to Purdey. This continued until his son, on his retirement, agreed finally to sell the formula to Purdey. To this day it remains a closely guarded secret with just a few trusted people knowing the formula which is locked up in a safe. Apparently they make it in batches and various batches develop a reputation within the company for greater or lesser quality. Those in the know at Purdey, when shown the recipe in Hawker's book, responded "no, that's not it."
 
FYI here is a video Purdey made regarding taking care of an oil finished stock:


Finishing a stock with boiled linseed oil would be extremely suboptimal, but once it is finished BLO can be used to maintain the finish.

(Note: you don't want to get boiled linseed oil - linseed oil with various driers - in the checkering. When I mention cleaning the checkering in the posts above use red oil or raw linseed/flax oil.)
 
Last edited:
Looks good so far. I take issue with your statement that you'd be useless at woodworking stocks. Finishing is much more difficult than making things out of wood. You've done your research and show the patience for finishing.
Stocks are especially easy because there are not really many straight lines that make mistakes look bad. Action to stock fit is something I don't have experience with but that seems to be largely a matter of patience, diligence and attention to detail.
I look forward to seeing how it turns out and I appreciate you sharing what you learned about past finishing techniques.
 
Give us a "guess" at how many hours you think you have in this project, please. I am certain it is "many", as I have done stock work and finishing, myself.
 

Upgrades & Donations

This Forum's expenses are primarily paid by member contributions. You can upgrade your Forum membership in seconds. Gold and Silver members get unlimited FREE classifieds for one year. Gold members can upload custom avatars.


Click Upgrade Membership Button ABOVE to get Gold or Silver Status.

You can also donate any amount, large or small, with the button below. Include your Forum Name in the PayPal Notes field.


To DONATE by CHECK, or make a recurring donation, CLICK HERE to learn how.

Forum statistics

Threads
165,158
Messages
2,190,740
Members
78,721
Latest member
BJT20
Back
Top