Follow along with the video below to see how to install our site as a web app on your home screen.
Note: This feature may not be available in some browsers.
This Forum is for adults 18 years of age or over. By continuing to use this Forum you are confirming that you are 18 or older. No content shall be viewed by any person under 18 in California.
Once I either find a Ferrite around the size I want, preferably a U or C ferrite, or glue one together from straight pieces of ferrite. I want to design a holder for it in CAD, 3D print it and start testing. Everything I have read proves they are much more efficient and you could easily anneal 50 BMG with a 600W set up with a Ferrite core. I already know what Litz wire I want to use. I just need the Ferrite Core. Another thing is I really want to get away from the water cooling since I have already had 3 of those pumps leak on me.
I did some testing on 223 cases today with the Ferrite core taking it through to the melting point. What I found was that at normal heating Annealing process the current was 7.8 A then it increased momentarily to 9.? A and then dropped. I really need to take a video of it as it all happens so quickly. Fully melted is within 5 seconds.
it would take a very sophisticated computer controlled driver circuit and not a tank circuit to control the frequency then fed into driver Fets. It would also require a fast measuring circuit and mathematical equation to use any of this information.
IMHO using the change in colour is the hobbyist best indication of the stage in the temperature curve and physical change of state of the material. Keep it simple. With the use of Tempilaq and the look of the brass whether change in colour after heating or the slightly matt finish rather than the shine on the brass. It is easier to extend from no change to a slight pink a small increase in time than to try and work backwards from melted. I now have a dozen cases that have no sholder just a straight wall case and a neck the shoulder melted out and when dropped into a jar just splattered out.
Could potentially use an Arduino or better yet a raspberry pi 4 for computing to test things out. If I ever get that far, I’ll probably start a whole new thread incorporating the Raspberry Pi into the wiring diagram and just sell the coded Pi’s for a very reasonable price. Call it GinaErick annealer Gen 2.
So I finally did it. I managed to 'cook' my ZVS induction heater board. I put 100 x 6.5 Creedmoor cases through for 8.6secs each with only about 0.5sec delay between cases. At around the 75 cases the watts and amps dropped off significantly. I checked absolutely everything and even re-wired a few runs that I was not happy with, but nothing fixed it. But being an amateur electronics guy had no idea how to check the main board. Anyway, as luck would have it I had an identical spare board in my workshop. Swapped them out and all is good and operating on full power again.
No complaints from me though, I have put 5,408 cases through it (I have fitted a counter which is cycled by the trapdoor solenoid) and this is my first real drama. I blame my reliance on the auto feed to some extent as it is just too easy to load it up with cases, hit the 'go' button and sit back and watch it all happen. I will ensure there is at least a 1 sec delay between cases from now on and I will look at improving the positioning/efficiency of that cooling fan and attaching it directly on top of the board. The fan currently blowing onto the board from the back and the board has a heat sink attached, but it looks as if that was not enough. I am sure that these things all have a life span too, and I didn't expect a $40 board to last forever. On a positive it was a good excuse to get into the workshop and mess around with 'gun stuff'.
I think I have solved the problem of my recently 'cooked' ZVS board. I annealed 50 x 6.5 Creedmoor a few days ago and decided that I wouldn't use the auto feed, but instead hand feed the cases. As the cases are 'cooking' for 8.6s (probably a bit long and I think directly related to the internal diameter of the coil) I allowed a delay of about 10s after each case was completed. My auto feed on minimum speed is just on 10s between each drop, so that is only allowing about 1s of rest between cases for the ZVS board. This only applies to 6.5CM cases though, as the rest take less time - 243 about 6.4s. So, all good - but only 50 x 6.5CM cases done. There was almost zero heat on the components of the board when I finished, so I think I am on the right track. Fingers crossed.
ALRIGHT, I SURRENDER. I bought an AMP machine and it's money,,, I have pretty much everything electronic wise to make and annealer using the aurduino board, a display power supply and other odds and ends, induction board copper coil etc. if anyone is interested I'll take $300 paypal shipped if you're in the US. PM me.
Sorry too much money either way
I just got started on my annealer this week
I have it mostly wired up and I'm working on the case holder platform
I'm doing it in the KISS format
Should be able to start testing next week
Thanks Gina Thanks Hollywood
ALRIGHT, I SURRENDER. I bought an AMP machine and it's money,,, I have pretty much everything electronic wise to make and annealer using the aurduino board, a display power supply and other odds and ends, induction board copper coil etc. if anyone is interested I'll take $300 paypal shipped if you're in the US. PM me.
Nothing wrong with owning/using an AMP annealer. It's a one stop shop for your annealing needs. The set up work has been well done for the user, and its a good machine.
On the other hand, the GinaErick annealer (which the user builds)(basic unit) costs about 1/4th the price of an AMP machine. The down side is the user has to do the initial set up work for each type of cartridge (annealing time, height in coil). The up side is once it is set up the through put ( in recycle ) is much faster than the AMP, about 15 minutes for 100 cases. No pilots, no handling hot cases.
Not knocking the AMP.. JMHO
Get onto the seller and tell them you want it replaced. If they don't respond or put you off raise a dispute through e-bay.
The power supply I got was a 12-48V induction heater ZVS from Ebay Australia. If you copy the following description into the Ebay search bar and it should find it. Make sure you tag Australia only.
Mine was $43.88 but that was a while ago. Today they are $43.17. Click & collect was available but I had it delivered. Probably 2,500 cases through it so far with no dramas from the power supply.
Might be time well spent to check all your wiring. Make sure that none of the copper coils are touching and when you drop the case in it cannot touch to coils unless you have insulated the coils. A couple of coats of clear sealant/paint will solve that problem. Plenty of comments on this matter back in the thread. On mine I used a bit of sikkens that was left over from sealing the timber deck. Works fine.
Sorry to hear that your 1000 watt, 48 volt power supply died. Just for all of us to know, where did you get it from ?
Wishing you better success on your next one
Gina
Might be time well spent to check all your wiring. Make sure that none of the copper coils are touching and when you drop the case in it cannot touch to coils unless you have insulated the coils. A couple of coats of clear sealant/paint will solve that problem. Plenty of comments on this matter back in the thread. On mine I used a bit of sikkens that was left over from sealing the timber deck. Works fine.
I tried my Ginaerick annealer tonight and
It worked
I still have to finish the trap door and add the water cooling
I used a 30-06 case to test it
I wasn't concerned about the case just wanted to get it kinda close
I'm hitting 12.7 amps after 9.5 seconds and that seems to be about right for my coil
I used 1/4 inch tubing for a coil cause that's what I had on hand
I'll pick up some 1/8 inch at the auto store when I have time and I'll see if it lowers the anneal time
Just not sure how far to stick the case into the coil
Oh well that's just part of learning
Thanks Gina for starting this post way back when
Congratulations......
Nice feeling something "you" made. Once you get it fully done and running in auto-cycle mode, and you process 100 cases in 15 minutes.
You will say "WOW" There are very few like it across the globe, and you have one.
Just some pointers. Be.sure when you wind the coil out of 1/8th inch
tubing that the inside diameter is 1 1/8 inches. If your not going to use fiberglass insulating on the coil, make sure no coils are touching each other,
and dip the completed coil in shellac, or varnish to insulate the coils. (it will also keep the copper nice and shiny (do not run it without the water flowing thru the coil as the shellac will burn)
The amount of current, depends on how much of the case is in the coil. Doing just the neck and some of the shoulder (top of the neck slightly below the top of the coil is about the right sweet spot)
Your longer anneal time for the 30-06 maybe the larger coil your using (1/4"). My unit for 30-06 is about 4-5 seconds.
12.7 amps is about tops for mine and 8.6 amps when there is no case in the coil
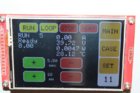
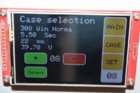
My build is nearly finished.
All functions are done by a ESP32 dual core microcontroller with wlan, bluetooth and a filesystem on board.
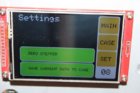
It is controlled by a 480x320 px touchscreen
The files (eg. configuration, cases-data) are editable via webbrowser.
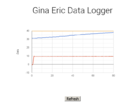
It also logs the data of the last annealing cycle (voltage, current ,temperature every 1/10 second) and displays it with google charts.
The height of the trapdoor is adjusted by a linear drive for each stored case
WOW you have taken it to a whole new level. Very nice !
I'm just an old electronic tech (remember vacuum tubes). How the basic GinaErick has changed thanks to you and other innovative builders.
My hat is off to you.
Just one question. What are the specs on the trap door solenoid your using and where did you purchase it ?. I get questions as my original solenoid
called out in the parts list is no longer available.
ALRIGHT, I SURRENDER. I bought an AMP machine and it's money,,, I have pretty much everything electronic wise to make and annealer using the aurduino board, a display power supply and other odds and ends, induction board copper coil etc. if anyone is interested I'll take $300 paypal shipped if you're in the US. PM me.
No biggie dude! I’ve had my induction annealer built for a while and have still been tempted to purchase an AMP. I need some incentive though right now. Personally having a lot of fun further developing the GinaErick annealer. I have a lot planned for it once I’m finally back state side again.
This Forum's expenses are primarily paid by member contributions. You can upgrade your Forum membership in seconds. Gold and Silver members get unlimited FREE classifieds for one year. Gold members can upload custom avatars.
This site uses cookies to help personalise content, tailor your experience and to keep you logged in if you register.
By continuing to use this site, you are consenting to our use of cookies.


")