Having read all the comments and viewed all the pictures, this thread motivated me to build my own GinaErick. Special thanks to Gina and Erick. Thanks also to GrocMax, Chet58, Dabeechman, Davexre, Dskogman, Fishingdog, Jthor, Skunce, and all the others who contributed.
My GinaErick will include the Mean Well RPS 750-48 Power Supply with GrocMax’s voltage divider and switch to set the current. I also ordered a Mean Well RD-65A power Supply with 5 Volt and 12 Volt outputs from Jameco for a few dollars more than the 12 Volt power supply.
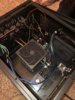
The parts have arrived, and I have mocked up and tested the induction board, standard 8-turn coil, power supplies, and voltage divider for the current control. As last tested, it resulted in currents of 16.7,14.7, 13.1, 11.6, 10.4, 9.3, and 8.4 amps. (Yes, I know 16.7 amps at 48 volts equals 801.6 Watts, so I only tested it for a few seconds). The ZVS induction circuit works; and the PCB, heat sinks, and capacitors did not get hot to the touch during testing. As expected, without the fans and water pump, the coil heated up, so I took it slow and easy.
Holding the case with forceps, at 11.6 Amps, it took about 3.8 seconds to anneal a LC .223 case to 750 degree per tempilaq.
While testing, I also annealed a 7.62X39 case, and it took 5.4 seconds at about 13 amps.
If I remember correctly, Gina anneals 6 Dasher cases for 5.4 seconds at 12.5 amps.
It would be interesting to learn other users’ annealing times and current for other cases, i.e., 22-250, 6X55, and 7mm Rem Mag.


")