You are using an out of date browser. It may not display this or other websites correctly.
You should upgrade or use an alternative browser.
You should upgrade or use an alternative browser.
Induction brass annealer redux
- Thread starter Gina1
- Start date
"I'm using an Arduino to control the SSR now so will modify that to control the board."
You will still need a switch eg MOSFET. You will need to make sure the switch can handle the current that will flow through it when you connect the gates to ground. (For the more common board this is about 200mA. I'm just guessing that you might need to sink twice that and the switch needs to handle that current at DC ie constantly. Or use two FETs.) Make sure the selected FET has a Vgs(th) comfortably below the 5V of your Arduino.
You will still need a switch eg MOSFET. You will need to make sure the switch can handle the current that will flow through it when you connect the gates to ground. (For the more common board this is about 200mA. I'm just guessing that you might need to sink twice that and the switch needs to handle that current at DC ie constantly. Or use two FETs.) Make sure the selected FET has a Vgs(th) comfortably below the 5V of your Arduino.
Can’t find a schematic anywhere but this guy did a lot of experimenting with the 1000w and 1800w boards and it looks like they are parallel pairs.
Help for people buying the "12-48 Volt 1800/2500 Watt ZVS induction Heater"
Help for people buying the "12-48 Volt 1800/2500 Watt ZVS induction Heater"
highvoltageforum.net
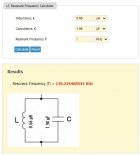
A little update from my side. I used this calculator to estimate the inductance required to have a 113kHz oscillation with 1.98uF of capacitance:

 goodcalculators.com
The answer was basically 1uH. I then used this calculator to 'design' a two layer coil wrapped around a 0.845" diameter coil former (0.5" schedule 40 pipe) with sheathed 1/8" copper tubing.
 coil32.net
Basically a 6 turn, 2 layer (2 x 3 turns) coil would be very close.
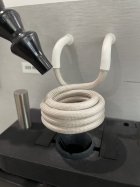
Here's a pic of the new work coil:

It is very tightly wound and it took a couple of attempts to get something I was happy with. (Also, annoyingly, I did not make it easy to change the work coil in my build!!)
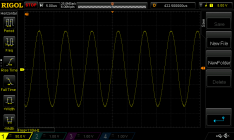
It basically did the trick. With a 308 case the board/coil is oscillating at 110/111kHz which is good enough for me.
Here is a scope screenshot with a 308 case in the work coil. (Bottom left corner for measured frequency of operation.)


Resonant Frequency Calculator | LC Calculator - Good Calculators
This resonant frequency calculator employs the capacitance (C) and inductance (L) values of an LC circuit (also known as a resonant circuit, tank circuit, or tuned circuit) to determine its resonant frequency (f)
The answer was basically 1uH. I then used this calculator to 'design' a two layer coil wrapped around a 0.845" diameter coil former (0.5" schedule 40 pipe) with sheathed 1/8" copper tubing.
Coil32 - Multilayer coil calculator
Multilayer air core coil inductance calculator by Maxwell's method.
Basically a 6 turn, 2 layer (2 x 3 turns) coil would be very close.
Here's a pic of the new work coil:

It is very tightly wound and it took a couple of attempts to get something I was happy with. (Also, annoyingly, I did not make it easy to change the work coil in my build!!)
It basically did the trick. With a 308 case the board/coil is oscillating at 110/111kHz which is good enough for me.
Here is a scope screenshot with a 308 case in the work coil. (Bottom left corner for measured frequency of operation.)

Last edited:
I've played around with this only a little so far but suffice to say the coil is MUCH more efficient and anneal times will be a LOT faster. Many thanks to @VenatusDominus for the inspiration. In my opinion, this work coil should be standard for even the most basic GinaErik design.
PS: add the sleeving before attempt to wind the coil
PS: add the sleeving before attempt to wind the coil
This might be completely bass ackwards, but using your numbers to get the calculator to come up with your solution, I inserted the actual measurements from my coil, and adjusted the uH down until it just came up with the same 6 coil, 2 layer result (my coil is that as well, but using 1/4" copper tubing).

Then, I used the inductance (uH) I came up with to back into a possible frequency for the circuit on my annealer...>>>140 kHz.
Note: 0.66 uH is the maximum value, that yeilds a 6/2 result, and 0.43 uH is the minimum. 0.43 uH results in a frequency of 172 kHz.

Does that seem to be a reasonable interpretation and extension of your testing, and is it even a probable/useful result?
Again, not an electrical engineer by any measure, just a curious bystander...

Then, I used the inductance (uH) I came up with to back into a possible frequency for the circuit on my annealer...>>>140 kHz.
Note: 0.66 uH is the maximum value, that yeilds a 6/2 result, and 0.43 uH is the minimum. 0.43 uH results in a frequency of 172 kHz.

Does that seem to be a reasonable interpretation and extension of your testing, and is it even a probable/useful result?
Again, not an electrical engineer by any measure, just a curious bystander...
Last edited:
How did you manage to wind 1/4" copper tubing? That must have been a pain. 1/8" is hard enough to manage.
The calculator is theoretical and expects perfect winding so it's all approximate in my view. The only way to tell for sure is to put a 'scope across the terminals of the induction board.
To wind a tight coil you need to wind with the 'wire' pulling back on itself so that the previous wrap forces the next tightly against it. This is hard when the sleeving isn't that strong. (I used Insultherm and couldn't get the tough version in thin enough diameter to have a snug fit on 1/8" copper tubing and so used the Insultherm Ultraflex. https://www.wirecare.com/category/s...nsultherm-ultra-flex-8-awg-natural-25-ft-cuts )
As for whether that freq is suitable I have no idea. I noted that Ambrell in their case study dealing specifically with ammunition casing annealing had listed a frequency of 113kHz and so that seemed like a sensible thing to work towards.
Winding the coil was a pain, but manageable.
Started by filling the coil tube with salt (or sugar, been awhile and I don't recall) and plugging the ends so the tube would not collapse when winding it. Placed the tube in fiberglass sheathing and wound it around a piece of 3/4" aluminum round bar wrapped in about 4 layers of paper towel for cushion.
Results...the fiberglass sheathing shredded during the process, but it DID provide for a uniform spacing between all of the coils after I carefully picked all of the pieces out...so no shorted coils for me! Then I soaked the new coil in water for a few hours to let the salt (sugar?) dissolve enough to blow it clear with compressed air. It may have taken more than one cycle in the water soak before it all came out.
Now I have a nice little 2-layer coil that has good coolant flow through it, and because its 2 layers, it focuses the magnetic field better on the part of the case I actually want annealed...the very top of the body, the shoulder and the neck.
I don't know what frequency it oscillates at, or how many micro-henrys it generates, or any of that, but it does anneal most all of the cases I need it to in the 3 to 4 second range...so not too fast as to be difficult to determine a good duration target, and not so slow that I have to worry about heat propagating down the case body.
That looks slick. Have you had any problems with the unit shutting off because it got too warm?I just followed this guy’s setup. Perfect timing, super easy and sort of cheap:
itchyTF
Gold $$ Contributor
The goal is not wire (tubing) temperature, it’s the case. The coil should be tubing with coolant. Otherwise, I believe, the coil life will be short.looks like it depends on the thickness of your wire and how many loops you have. The longer your machine has to run to warm up your wire the quicker it gets overheated. I watched some more videos about it.
None. The coils I wound anneal .223 in 1.4 seconds and 6.5 creedmoor in 1.8 seconds. That’s the time to get a neck visibly glowing in normal lighting. Since the on time is so short, I’m done doing what I wanted before it gets too hot.That looks slick. Have you had any problems with the unit shutting off because it got too warm?
I first used it without the timer setup and that way the fan runs continuously. But eventually I added the timer to improve consistency.
It wouldn’t be too difficult imo to open the unit and power the coil and fan on separate leads, but I’ve not found the need to.
I think a big part of my favorable experience has been the coils I wound. They are pretty tight to the case and wound from 14ga romex ground. This allows 6-7 turns in a compact space that produces pretty high intensity. It took a few coils to get one I preferred, but I can melt a LC 7.62 case in about 3 seconds with my most used coil.
You’d think that, but as the YouTube guy indicates in his video, the coils actually do last. He’s been using the same one for over a year, and I’ve had no issues with my coils either.The goal is not wire (tubing) temperature, it’s the case. The coil should be tubing with coolant. Otherwise, I believe, the coil life will be short.
The downside to tubing is the larger diameter. It means you can’t get as many turns in the same space. The coils with tubing are necessarily lower intensity unless you compensate with brute power. I’m only using 1000w, the coil does the work quite well as the short anneal times prove.
I personally wanted max intensity only in the neck/shoulder to prevent heat migrating down too much.
I can take a freshly annealed 6.5 case and hold it by the case head with bare fingers. Only after the heat moves down does it get a bit too hot to hold. That’s good intensity imho.
Doing some .223 with it.
No, it’s not an AMP or at all as sophisticated as the kind of build in this thread. But it works well, works fast, is super easy to make, and is only about $200.
I had to try for myself, it was so compelling. And it work well enough for me that I’m not looking to upgrade.
No, it’s not an AMP or at all as sophisticated as the kind of build in this thread. But it works well, works fast, is super easy to make, and is only about $200.
I had to try for myself, it was so compelling. And it work well enough for me that I’m not looking to upgrade.
Similar threads
- Replies
- 74
- Views
- 47,364
- Replies
- 0
- Views
- 1,576
Upgrades & Donations
This Forum's expenses are primarily paid by member contributions. You can upgrade your Forum membership in seconds. Gold and Silver members get unlimited FREE classifieds for one year. Gold members can upload custom avatars.

Click Upgrade Membership Button ABOVE to get Gold or Silver Status.
You can also donate any amount, large or small, with the button below. Include your Forum Name in the PayPal Notes field.
To DONATE by CHECK, or make a recurring donation, CLICK HERE to learn how.

Click Upgrade Membership Button ABOVE to get Gold or Silver Status.
You can also donate any amount, large or small, with the button below. Include your Forum Name in the PayPal Notes field.
To DONATE by CHECK, or make a recurring donation, CLICK HERE to learn how.


