All the differences between these dye jobs is the amount of black used in 1st coat, or lack thereof on Dan Muller's, the mauser having the highest concentration of black.
Having drops to play with is huge, here's a drop test panel for a ambrosia maple I'm starting on this week....
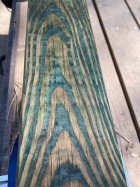
Customer wants green
1 side is green the other has a base of yellow followed with blue.
Dyes were applied undiluted using application techniques i spoke of earlier.
Damp rag for blending.
The drop...
View attachment 1656057knowing green and brown don't play well together I had my doubts...
You can see how muddled the color is in the green.
View attachment 1656058
Yellow was allowed to flash, damp rag to pull excess and rewet surface blue around edges, yellow dabbed onto WET towel to dilute worked from inside out followed with damp towels wiping 1 direction.
View attachment 1656059View attachment 1656060
Let's just say the customer ain't getting green. Lol


")