• This Forum is for adults 18 years of age or over. By continuing to use this Forum you are confirming that you are 18 or older. No content shall be viewed by any person under 18 in California.

Flame Annealing - almost perfect

Finally got together with my shooting buddy who has an AMP annealer to test what my hardness tester shows after a case has been anneal with the AMP. As a reminder, my goal is to have my cases at the same hardness when finished with sizing as the hardness of my virgin Lapua cases (as reading on this tool of 15). So, we took a case and sacrificed it to get the AMP's code, per AMP's instructions. Set the code and annealed 3 cases. Cleaned off the oxidation layer with some steel wool, ran a bore brush through the necks too and then measured the hardness. As I suspected, the hardness showed all three of them being right at 15. Great, huh? The problem is, we now have to size the cases, which will increase the hardness to 17 on this tool.

I guess 17 is not necessarily "bad", especially if it's consistent. My old flame annealing approach where I'd just drop the case out of the flame when the flame started to turn orange would essentially get me the same results (17 after the sizing process). To get my necks to the 15 hardness reading I have to anneal them to where I get a 13 reading and the sizing bring them back up to my target of 15.

Apparently, if one is using a AMP machine, one will have to customize a code to anneal the cases more than the code that's produced so that the sizing brings the hardness to that 15 reading I get on virgin Lapua brass.

Just thought I'd share this to show what the AMP machine is doing in comparison to what I've been doing with my flame annealing process.
 
Last edited:
Not certain if anyone has raised this issue but when you buy virgin brass you still size it to get the neck to your specifications so I would think annealing it below “15” is superfluous.
 
Finally got together with my shooting buddy who has an AMP annealer to test what my hardness tester shows after a case has been anneal with the AMP. As a reminder, my goal is to have my cases at the same hardness when finished with sizing as the hardness of my virgin Lapua cases (as reading on this tool of 15). So, we took a case and sacrificed it to get the AMP's code, per AMP's instructions. Set the code and annealed 3 cases. Cleaned off the oxidation layer with some steel wool, ran a bore brush through the necks too and then measured the hardness. As I suspected, the hardness showed all three of them being right at 15. Great, huh? The problem is, we now have to size the cases, which will increase the hardness to 17 on this tool.

I guess 17 is not necessarily "bad", especially if it's consistent. My old flame annealing approach where I'd just drop the case out of the flame when the flame started to turn orange would essentially get me the same results (17 after the sizing process). To get my necks to the 15 hardness reading I have to anneal them to where I get a 13 reading and the sizing bring them back up to my target of 15.

Apparently, if one is using a AMP machine, one will have to customize a code to anneal the cases more than the code that's produced so that the sizing brings the hardness to that 15 reading I get on virgin Lapua brass.

Just thought I'd share this to show what the AMP machine is going in comparison to what I've been doing with my flame annealing process.
Is there any data to relate Webster units to ASTM hardness units. Unfortunately there is no std ASTM unit to report hardness to. I would like to get an idea of what a spread of 15-17 relates to in HRB scale. Is it a trivial amount?
 
Is there any data to relate Webster units to ASTM hardness units. Unfortunately there is no std ASTM unit to report hardness to. I would like to get an idea of what a spread of 15-17 relates to in HRB scale. Is it a trivial amount?
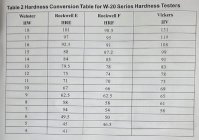
The tool I have came with a manual having a conversion table, which I think helps provide an idea of what those increments represent:

Webster Hardness Conversion.jpg
 
Not certain if anyone has raised this issue but when you buy virgin brass you still size it to get the neck to your specifications so I would think annealing it below “15” is superfluous.
How much one might work the brass will effect the amount of change in hardness. I for one, and I've heard many others too) don't size their virgin brass. It's not a typical thing to do, is it?

Because my Lapua brass has come packed as bulk in a blue box where some mouths are dented, I will run a mandrel through the all the cases in the box to be sure the necks are rid of any dents or out of roundness. I can tell you that doing so does not produce additional hardness that I can detect with this tool. But certainly if one is sizing the virgin neck down and expanding it back to a desired neck tension, then that hardness will definitely increase measurably. In fact, when I take a virgin .308 Lapua case and seat a bullet well into the neck, then pull it and measure the hardness, it goes from 15 to just shy of 16 (I estimate it at ~15.75).

Regarding annealing with an AMP, I meant to mention that there is another approach to keeping the result at the virgin brass hardness. That would be to do all the sizing process before annealing with the AMP. Then you'll get the same hardness as the virgin brass. :)
 
I have to thank you also Straightshooter 1. Very good information and a great tool to make sure we are doing it right and confirming for many of us that we are doing it right. At first I was also under annealing, but did learn what my brass needed to look like to be where it needed to be. But it took awhile. Your tester makes it a lot easier.
 
How much one might work the brass will effect the amount of change in hardness. I for one, and I've heard many others too) don't size their virgin brass. It's not a typical thing to do, is it?

Because my Lapua brass has come packed as bulk in a blue box where some mouths are dented, I will run a mandrel through the all the cases in the box to be sure the necks are rid of any dents or out of roundness. I can tell you that doing so does not produce additional hardness that I can detect with this tool. But certainly if one is sizing the virgin neck down and expanding it back to a desired neck tension, then that hardness will definitely increase measurably. In fact, when I take a virgin .308 Lapua case and seat a bullet well into the neck, then pull it and measure the hardness, it goes from 15 to just shy of 16 (I estimate it at ~15.75).

Regarding annealing with an AMP, I meant to mention that there is another approach to keeping the result at the virgin brass hardness. That would be to do all the sizing process before annealing with the AMP. Then you'll get the same hardness as the virgin brass. :)
Depending on your chamber neck dimension it may be necessary to turn your necks. For that you will mandrel your brass ID and turn the necks to your desired OD. How this affects the brass's hardness is a toss up.
 
Depending on your chamber neck dimension it may be necessary to turn your necks. For that you will mandrel your brass ID and turn the necks to your desired OD. How this affects the brass's hardness is a toss up.
When I'm ready to turn necks, which I do for all my brass, I turn my necks as the very last operation in my case prep. I've measured hardness before turning and afterwards and found no discernable difference in hardness. Though, no doubt, there's a change in the "neck tension" due to the thinner necks.
 
Last edited:
When I'm ready to turn necks, which I do for all my brass, I turn my necks as the very last operation in my case prep. I've measured hardness before turning and afterwards and found no discernable difference in hardness. Though, no doubt, there's a change in the "neck tension" due to the thinner necks.
So, do you anneal your brass...whenever you mandrel them? My (Lapua) brass ritual is to clean, anneal, size I've determined that @11sec. is just right for my brass with my motorized-cake pan torch annealer, flame tip at neck shoulder junction.
 
Yes, I had some concerns about that and why I first ran some range brass before my Lapua to see what I was gong to get. I did have to make an adjustment to how the flame was contacting the neck, especially since I use a swirl flame torch. My initial 5 second set up, the flame would bulge over and past the shoulder/body junction by about 1/16. For this 10 seconds, I changed the angle where so that the fame was only as far as onto the shoulder and not on the body to mitigate as much heat creep as possible. I'm sure there was more heat going down the body than before, but not enough for enough time to cause a problem. When I get them loaded up to fire, I'll be looking for any other changes. So now, I'm not really concerned about them working properly, but I do wonder if longevity is affected.

Here's a pic of two of the annealed cases: the top one is when the annealing process is after cartridge has been fire with no cleaning done; the bottom case is where the neck and shoulder has been cleaned with steel wool after the annealing and the case has been FL sized (cases will look better after dry tumbling with rice to remove Imperial Sizing Die Wax)
View attachment 1608631


While I have no doubt that more heat is going down the body, I don't think enough is going down for enough time to cause any problem. Though annealing discoloration is not an indication of how much annealing is being done or where, it can give one some idea of what the heat is doing along the length of the case. Rocketvapor made a good suggestion for sectioning a case at the shoulder/body junction before and after annealing to see what changes are occurring below that junction. I'll probably do that and report back.

I have the Benchsource unit, but I have not used it a lot out of fear of possible over annealing, but your posts have inspired me. I also was never a big proponent of aiming the cases straight at the case and as low as instructions might tell you to do out of fear of heat migration down into the case body, but what do I know?

Danny
 
So, do you anneal your brass...whenever you mandrel them? My (Lapua) brass ritual is to clean, anneal, size I've determined that @11sec. is just right for my brass with my motorized-cake pan torch annealer, flame tip at neck shoulder junction.
I anneal my brass after every firing. Right after my first step of decaping, I anneal first, then clean and size. Then a second cleaning to removed sizing lube followed with mandrel.

For annealing, I use a swirl flame instead of a pencil flame. I find it easier to get more consistent heating around the circumference. Though one can use two pencil flames to cover more uniformly, like the Bench-Source machine can do.
 

Upgrades & Donations

This Forum's expenses are primarily paid by member contributions. You can upgrade your Forum membership in seconds. Gold and Silver members get unlimited FREE classifieds for one year. Gold members can upload custom avatars.


Click Upgrade Membership Button ABOVE to get Gold or Silver Status.

You can also donate any amount, large or small, with the button below. Include your Forum Name in the PayPal Notes field.


To DONATE by CHECK, or make a recurring donation, CLICK HERE to learn how.

Forum statistics

Threads
166,616
Messages
2,221,977
Members
79,751
Latest member
jdoll1742
Back
Top