At this point I take a very clean rag and wipe down the checkering to make sure there’s no slacum/linseed oil sitting on the surface. Now we get out the rottenstone. Sprinkle it on the stock (avoiding the checkering) and gently work it over the surface with the palm and heel of the hand on larger areas and fingertips in finer places (across the grain). The rottenstone will find any excess slacum left behind. Once the stock is covered in rottenstone, wipe the surface clean with a clean rag. Brush out the checkering as much as possible. Very gently buff the stock and give it a close inspection to make sure no slacum or rottenstone residue is sitting on the surface. Set the stock aside to let it dry – at least 5-6 hours or better yet overnight.
In essence, you repeat this sequence until all the grain is filled in completely. Apply slacum. Wait for it to go tacky. Wipe it all off. Add rottenstone. Wipe off the excess. Let it all rest to cure. Repeat.
View attachment 1492479
View attachment 1492480
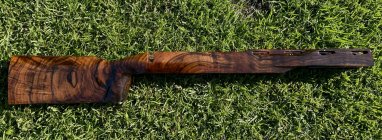
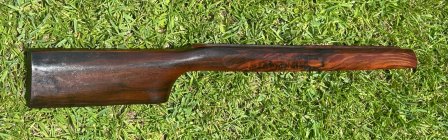
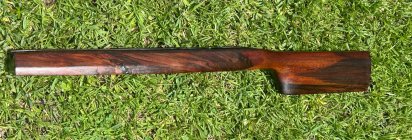
As more and more of the grain is filled in and ultra-thin layer upon layer of slacum builds on the surface, the stock will begin to shine. Really focus on whether you are filling in the grain in the less obvious areas of the stock such as the top, underside and around the metalwork and checkering.
View attachment 1492486
View attachment 1492487
View attachment 1492488
Cutting back the surface early on helps difficult grain areas ‘catch up’. My first few cuttings back were more aggressive than shown in the Purdey video for this reason. If you have difficult grain and haven’t used a filler it likely makes sense to cut things back relatively hard a few times earlier in the process. I used 2000 grit wet ‘n dry for the early cutbacks (of which I did two).
In the Purdey video, the finisher mentioned he cuts the surface back lightly after every 10 applications with fine grit wet ‘n dry paper. I was skeptical when I heard him talk about the wave that can develop as the slacum follows the nature of the wood. He was, however, dead right. 2000 grit is too coarse for these fine ‘flattening’ of the finish (as opposed to the cutting back to allow the grain filling). 3000 grit is a better choice. You’re not trying to cut back the finish as in my early ones but, rather, just lightly skim the major high points. Using too heavy a grit means more applications before the dullness of that cutting back disappears again, likely counteracting the purpose of these in the first place.
A lot of perseverance is required through this process. Cutting the surface back early on is like taking a few steps backwards in order to go forward. Difficult areas not addressed early (or in raising the grain and sanding) will still be there many, many applications later. As you progress, you’ll have to be more focused and gentler in the application of rottenstone.
Eventually, the grain will be completely filled in and there will be nowhere for the rottenstone to go and so we switch to using slacum alone. From here you need to be very careful. As there’s no longer any burnishing with rottenstone any smears of slacum left behind will become embedded under the next fine layer. Apply the slacum as before, wait until it’s tacky and then wipe off with a little BLO. Then burnish the stock with the heel of the palm. Wipe your palm on a clean rag frequently as it lifts any residual slacum. Rub firmly and let the friction generate some heat. Carefully inspect the stock to ensure you haven’t missed any areas or left smears behind. Set the stock aside to dry as before. Keep going until you’re completely satisfied with the finish. If you’ve missed some grain you’ll have to choose between cutting the surface back again or, perhaps, making a compromise as to the quality of the end result. As the saying goes, “it’s done when it’s done.” The highly experienced folk at Purdey do 40-50 applications. Novices (like me) can expect to do more.