• This Forum is for adults 18 years of age or over. By continuing to use this Forum you are confirming that you are 18 or older. No content shall be viewed by any person under 18 in California.

Testing shoulder bump with bolt and action

Removing spring loaded ejectors is to be avoided. Parts can go flying and get lost. In many cases the roll pin holding them is extremely tight. Proper punches are a must. When installing the roll pin, the tightness may mask misallignment of the ejector causing it to not work at all, or not as it should.
 
Why is it, the LR target and Bench shooters rules must apply to all other shooters!!

I'm an accurate shooter, but not a hot barrel target shooter!!! COOL BARREL LONG RANGE SHOOTER!! In my load prep, I file the base flat, eliminating cupping and pulling (mounting) from the the primer pocket punch operation!! Then, uniform the pocket!! With a flat base, once fire form at a pressure that creates slight heavy bolt lift on extraction! The elongation of all those cases will be more consistent in stretch compared to a multiple fire completion of headspace where random orientation will cause random stretching!!
Those Once and Done cases, when placed back into the chamber will have slightly heavy bolt drop!!!!

Back to press, adjust the sizing die to the point where the formed case is placed back into the chamber, there is a slight resistance at the tail end of the bolt drop!!! This is 100% head space setting of the die!!! Unlike target shooters, a little heavy bolt drop (clicker) is no big deal to the One shot, hit on target shooter!!! Plus, seting back a couple of thou work hardens the brass and fatigues the stretch!!!

Long range big game, long range plinking (steel), long range coyote and varmint!!! That's my competition!!!

And it is not SPRING BACK!! IT IS THERMO CONTRACTION THAT RELEASES THE BRASS FROM THE CHAMBER!!! The case actually shrinks from the the brass transfer the heat to the chamber mass after being heated by the combustion of the propellant!! Linear coefficient of thermal expansion for brass (close to cartridge brass) is 0.000019 in/F°!!!!! SHOW ME THE SPRING COEFFICIENT OF BRASS!!! It will be other brass and bronze alloys!!!! YOU WILL FIND THE COMPRESSABLITY FACTOR OF AROUND 0.0005" WHICH DIE MAKERS USE!!!! The formed case will recoil back 0.001" in diameter and 0.0005" in length!! Cylindrical coordinates!!

That is the best "thingy" to use as a bump comparator where the datum line is an area, not a single point contact datum or slight larger single point bump insert!!!

This is the method, I developed using physical properties of brass to improve accuracy, I've been using for over 40 years for finding maximum headspace and limits of the brass for adjust bump on the sizing dies!!! AND, THERE IS NO NEED TO REMOVE THE EJECTOR FOR THIS TESTING PROCESS!! This is for a 6.5 PRC, using virgin ADG brass!! Find the maximum safe range in rifle breaking in and test using demiled Nosler brass!!! In the process, I determined the bump on the new ADG brass by random factory bump measurement and set the sizing die to the datum number 1.622 where most of the cases were slightly bumped!!! Loaded 2 round of each powder intervals!!! The last 2 cases were 0.2 grains over reloading manual max pressure!!!

Take a caliper with attracted bump comparator to the range!!! Before firing each round, use the comparator and record that datum length!!! Fire the round, measure the new datum length after cooling to ambient temperature , record, and record the velocity!!! HERE IS THE KEY!! Wait for that rifle to cold down with the bolt open for 3 to 5 minutes!!! In the meantime, record any changes in felt bolt lift, look at the previous fired case for pressure signs, measure and record the next round!! Fire the next round and keep reaping and recording while looking for pressure signs and changes in bolt lift on extraction!! The attachment is the records from that range test!!!

There is the load number, powder load weight, with two sets of columns, where each set of columns were the before bump, after fire bump, and the velocity!! The top big arrow, pointing to 3089 was the 1st slightly noticeable heavier bolt lift, the start of compression of the brass which is at 1.6265"!! The brass was fire formed from #4 and up in the table!!! The last fired load at 3120 exceeded full brass COMPRESSABLITY (0.0005 compression on the shoulder and 0.0005 on the base) with noticeably heavy bolt lift and a very, very slight extractor imprint on the filed base which I filed off lightly!!! The starting point load of severe overall case deformation, pressure well exceeding the tensile strength of the base brass region (another physical property)!!! The DESIGNED base has higher tensile strength due to its hardness compared to the softer shoulder and neck with lower tensile strength!!! This is why I don't anneal without a coolant bath to avoid softening below the 1/4" region below the body/shoulder junction!!! IMPROPER ANNEALING CAN LEAD TO CASE HEAD SEPARATION, LOWER BODY BLOATING (Clickers), AND/OR PRIMER POCKET WALL SWELLING (Lose primers) IF HEAT IS ALLOWED TO FLOW TO THE LOWER BODY!!! OVER PRESSURE CAN CAUSE THESE SAME ISSUES!! Staying under 3100 will almost eliminate deformation at and under the stretch zone at 0 Bump!!! Find the minimum load to achieve full fire formation is needed with Bump >=1 town reduce deformation due to the hammering affect of the base slamming into the boltface!!! That is your max safe load for case longevity!!!

From the data, the slight compression (approximately 0.00025" on both the shoulder and the base) on the full length fire formed cases is my desired load at 62.9grains of powder to finish fire forming the rest ADG brass!! Now, I adjust the die till I have 1.6265 and have a slightly heavy bolt drop at the tail end of the bolt lug cam stroke and the case, under compression (firmly and rigid) which will center the base and the double centering of the two tapers, aligning the bullet, near perfect, to the rifling!!!! Once and done setting of the die for that rifle using the old Bonanza coax press!!! I put one case in the die box for checking the comparator because the chamber should not change under normal conditions!!! THAT ONE CASE IN THE DIE BOX IS THE CHEAP, FIXED BUMP GAUGE!! For you target and hunter shooters, set you bump by subtracting the desired set back of the shoulder and adjust the die using the CASE IN THE DIE BOX for a reference to the true headspace of the chamber!!

I will retest for the Lapau virgin 6.5 PRC cases due to their probable differences in physical properties!!!! Once I find the differences of tensile strength at the base, the higher tensile brand cases will be used for high pressure/velocity hunting loads!! The lower tensile brand will be used for lower pressure/lower velocity target and plinking!!! Just need to know the limits of the two brands!!!!
That's all well and good. But a datum point is the established measurement point for a reason. If you are interested in an accurate measurement it must be a specific point. Not a general area spread out over an undefined area with 2 potentially different angles.

That is because of multiple variables including the specific chamber, specific sizing die and the specific brass being used.

Not to say you can't define a spec for your specific circumstances that works for you.
 
Last edited:
That's all well and good. But a datum point is the established measurement point for a reason. If you are interested in an account measurement it must be a specific point. Not a general area spread out over an undefined area with 2 potentially different angles.

That is because of multiple variables including the specific chamber, specific sizing die and the specific brass being used.

Not to say you can't define a spec for your specific circumstances that works for you.

By definition, a datum point is a REFERENCE POINT not an established point!!! Measuring a point on the slop of an angle surface can very tricky!! SAAMI could set a standard diameter for making it an absolute and defined point. Same with curved objects like OGIVE!! Headspace is unique for each and every rifle!! The angle is the same for the thingy, because it is cut by the same reamers as the chamber!! The sizing die shoulder is the same angle!!! Sinclair bump inserts are cut to the same angle!!! I use to use COPPER bushing bought at the old Western Auto stores 40 years for setting bump!! As long as you use the same bushing, the reference distance will be uniform!!! 25 years of AutoCADD (version 4 to version 2000), REFERENCE POINTS ARE DUTUM POINTS!! Where is that datum point???? Any point along that angle is a datum!!!! Just like bullet ogive comparator ARE REFERENCE POINT CONTACT AND NOT TRUE OGIVE LENGTHS!!!!

When you use the comparators, You close the jaws for contact and ZERO the calipers!! You're are now measuring a reference length!!! Not the true length!!
 
Last edited:
By definition, a datum point is a REFERENCE POINT not an established point!!! Measuring a point on the slop of an angle surface can very!! Same with curved objects!! The angle is the same for the thingy, because it is cut by the same reamers as the chamber!! The sizing die shoulder is the same angle!!! Sinclair bump inserts are cut to the same angle!!! I use to use COPPER bushing bought at the old Western Auto stores 40 years for setting bump!! As long as you use the same bushing, the reference distance will be uniform!!! 25 years of AutoCADD (version 4 to version 2000), REFERENCE POINTS ARE DUTUM POINTS!! Where is that datum point???? Any point along that angle is a datum!!!! Just like bullet ogive comparator ARE REFERENCE POINT CONTACT AND NOT TRUE OGIVE LENGTHS!!!!
So if the datum point isn't the established measurement point, what is and who decides?

You?

And what is a 'thingy'?

I suggest you research what a datum point is for yourself.

I'll give you a hint. It's a circle of a specific diameter as applied to a circular cone, to simply it.
 
So if the datum point isn't the established measurement point, what it and who decides?

You?

And what is a 'thingy'?

I suggest you research what a datum point is for yourself.

You need to research the definition of a datum point!!! It is a REFERENCE POINTS!! When using comparators, you REZERO the calipers after closing the jaws with comparator between them!!! The measurements are now a reference lengths!! See post 33 for a thingy!!!! The reference point is a user point!! Your measurement will be different than my measure will different from for all others!!! It is your personal measurement and can only be accurately duplicate by someone else using your comparator, which will be somewhat unique with your chamber!!! Each chamber is unique, not universal!!! Even new brass is different!!!
 
Last edited:
The method you described was used by many of us old reloaders before bump gauges were widely available. It can work but it can be tedious. It also assumes that all cases in a lot will be the same head space wise and expand and size the same which often is not the case.

Using a bump gauge with a caliper makes the process of monitoring case headspace much more efficient and easier because you can measure several cases quickly. You also obtain a precise measurement of the fired and size case condition.

I full size all my cases every time but set my die for zero bump until the cases are fully fire formed to the rifle chamber and need bumping which is often after several firing and sizing cycles. What you are observing is that the cases are not fully fire formed yet. Therefore, there is no need to bump the shoulder which will over work the cases. This why a bump gauge is so important, it takes the guess work out of the sizing process. You know precisely how much, if any that the cases expanded.

Because the F/L die also sizes the radial dimension of the case, often that is all that is needed until you pass several firings. It is also prudent to spot check the size case in the rifle chamber like you have been doing. When the bolt drops without any resistance at all, the case was probably oversized. There should be some very slight resistance to bolt closure, usually exhibited by the bolt dropping halfway then requiring some very slight pressure to close it. Again, this is why I prefer a bump gauge, it's more precise.

For consistency, you should start with virgin cases, dedicate them to a specific rifle and rotate their use so they receive the same number of firings and sizing's.
 
Thanks. He says it better than I did. I agree with all he said except I do not remove the ejector. I still get useable information. If you don't take anything away from the video, pay attention to the fireforming advice.

Also, I don't sort the cases but don't disagree if you are after ultimate precision. I just set my sizing die on the longest case that chambers properly to zero bump. The others eventually catch up after a few firings. This is why I use zero to .001 bump until all cases are fully fired formed.

PS: I use the term "case head space" to describe the case fit in the rifle chamber. This is technically an incorrect term to describe case size, but I use it to try and simplify the discussion, but he is correct, head space is the rifle chamber dimension.
 
Last edited:
You should perhaps research who you are lecturing. He is a pro, you are not.

I think you insulted the wrong person since you don't know me!!!

As an engineer, I checked quality of designed parts!!! I've used 36" C-mics clear down to 1"; 24" calipers down to 4", sometimes with various jaw pin measuring attachments; 16" depth mics; snap gauges; inside mics; Hardness testers; various measuring devices used on a 4' x 6' x 12" thick Granite table with 16" Mitutoyo height gauge with different dial indicators, calibrated with gauge block and pins, in a climate controlled room; AIR GAUGE measuring with accuracy to 5/1,000,000 of an inch, video comparator, oh and the big one: programing and using a LASER POINT INDICATOR (accurate to 1/32" at 600 yards (radius), direction line of sight, just as good as GPS) using prism reflecters!!! The robotic laser head looks exactly like the laser turent heads on fighter jets, bombers, and rotary gunship. And, as a tool maker long ago (college life), I sharpened the gun reamers, with a diamond cupped precision grinder, used to gun ream production parts using the air gauges for quality control and set ups!!!

25 years of using CADD (converting some dwg files for CNC programming), 5 years of drafting on a mechanical arm, designing mechanical parts, assemblies, tooling, process, and designing computer controlled industrial machines!!!! I KNOW DATUM POINT AND LINES!! I USED THEM IN HUNDREDS OF MY DRAWING WHICH MULTIPLE VENDORS UNDERSTOOD! They are reference points and lines, not absolute dimensions!!!

Now, tell me who is a PRO at measurement and dimensional knowledge!!!!!

By the way, I gave away 2 of 3 secrets of accuracy in reloading in this thread!!! One is beneficial to all shooters!! The other is for ULTIMATE accuracy for the Cold Barrel, One Shot Shooter!!! The one hints, smooths the pressure curve, making the curve work efficiently and more consistent!!! I challenge you to find that subtle hint!!!!

Reply when you find it!!!

ENGINEERING IS BASED ON PRINCIPLES, NOT ANALOGY, ELON MUSK!!!
 
Last edited:
I think you insulted the wrong person since you don't know me!!!

As an engineer, I checked quality of designed parts!!! I've used 36" C-mics clear down to 1"; 24" calipers down to 4", sometimes with various jaw pin measuring attachments; 16" depth mics; snap gauges; inside mics; Hardness testers; various measuring devices used on a 4' x 6' x 12" thick Granite table with 16" Mitutoyo height gauge with different dial indicators, calibrated with gauge block and pins, in a climate controlled room; AIR GAUGE measuring with accuracy to 5/1,000,000 of an inch, video comparator, oh and the big one: programing and using a LASER POINT INDICATOR (accurate to 1/32" at 600 yards (radius), direction line of sight, just as good as GPS) using prism reflecters!!! The robotic laser head looks exactly like the laser turent heads on fighter jets, bombers, and rotary gunship. And, as a tool maker long ago (college life), I sharpened the gun reamers, with a diamond cupped precision grinder, used to gun ream production parts using the air gauges for quality control and set ups!!!

25 years of using CADD (converting some dwg files for CNC programming), 5 years of drafting on a mechanical arm, designing mechanical parts, assemblies, tooling, process, and designing computer controlled industrial machines!!!! I KNOW DATUM POINT AND LINES!! I USED THEM IN HUNDREDS OF MY DRAWING WHICH MULTIPLE VENDORS UNDERSTOOD! They are reference points and lines, not absolute dimensions!!!

Now, tell me who is a PRO at measurement and dimensional knowledge!!!!!

By the way, I gave away 2 of 3 secrets of accuracy in reloading in this thread!!! One is beneficial to all shooters!! The other is for ULTIMATE accuracy for the Cold Barrel, One Shot Shooter!!! The one hints, smooths the pressure curve, making the curve work efficiently and more consistent!!! I challenge you to find that subtle hint!!!!

Reply when you find it!!!

ENGINEERING IS BASED ON PRINCIPLES, NOT

Don’t need to find it, my application used only for 6PPC. Jackie’s method is fine but for the PPC most guys I know use the custom gauge with die base where case is inserted witth the die body that slips over it with a dial indicator….accurate, repeatable bump measurement, swap barrels, swap bushings, verify bump instantly, usually .001-.002” worth,
 
Last edited:
Don’t need to find it, my application used only for 6PPC. Jackie’s method is fine but for the PPC most guys I know use the custom gauge with die base where case is inserted witth the die body that slips over it with a dial indicator….accurate, repeatable bump measurement, swap barrels, swap bushings, verify bump instantly, usually .001-.002” worth,

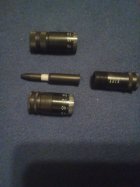
Here's an oldie but goody!!! Kinda like what you are describing!! 7-08 Bench rest comparors!!!! The bullet shaped piece is for finding RIFLE SEATING LENGTH, NOW CALLED TOUCH!!! To find the bump, you set the case base inside the case base holder (the threaded piece on the right) screw down the Bump Cap (lower cap piece in pix), run it down like a C-MIC and read the caliper scale!!! To find the CASE BASE to Ogive Length, drop the loaded round into the case base holder and thread on the Ogive Cap (top Cap in pix)! Screw it down to touch just like using a C-MIC!!!

But here is the thing I do different!!! I bought my Bonanza COAX press because you set the dies once and forget!!! The floating die and moving jaws allow the die and case to self center!!! The really big selling point, at the time, I read in my dad's Military Times Magazine that Specal Forces were using those presses and had a picture of a soldier using that press!!! Hey, who knows more about guns and ammo than the Military????? And, there several Militay testing grounds and ballistics labs all over the country until 1975!!! I sold my Sinclair cartridge dial indicator checker for bullet run out and cartridge concentrisity after reloading over 10,000 rounds!! Every round came out perfect!! The precision of that press eliminated my fear of having a bad round or two or more!!! I never worry about BUMP, once that die was set!!! I think I still have anorher ad for Forster (Formally Bonanza) COAX presses were the top choice for the military, Olympic Shooting teams, and some American International Shooting teams!!!
 

Attachments

  • IMG_20250416_215307.jpg
    IMG_20250416_215307.jpg
    314.6 KB · Views: 15
Last edited:
People are passionate about their hobbies and can be sensitive about their opinions… and now you know why I apologized after getting unnecessarily cheeky with Doom back on page 2 ;)

As I recall, SAAMI schematics for a cartridge indicate a shoulder datum/midpoint. However to achieve that exact measurement/contact point then your shoulder bump gauge would need to have exact same profile as your barrel chamber. Unfortunately, this is highly unlikely since your bump gauge was cut using a different cutter than the reamer used to cut the rifle’s chamber.

When I measure my shoulder, which I sometimes refer to as the datum, I am taking a reference measurement based on my caliper/bump gauge setup. Exactly what point along my case’s shoulder does the bump gauge make contact with is anyone’s guess. So long as I continue to use the same setup to make future measurements than I have established a meaningful measurement to use to assess the cases before and after firing. This measurement, my datum measurement, will most likely differ if the same case is measured by someone else using their own setup.

Sometimes the common terminology that we use is shorthand that people will easily understand. Yes, it may be a technically incorrect definition or application, but an acceptable misuse for convenience. The two Hot Button examples are “Annealing” and “Neck Tension” as compared to metal softening and interference fit.
 
Your bolt has an extractor but you don't have to remove .just hook brass under extractor

Basically you have Sako extractor and Mauser ejector.

Anyways cases are not always fully formed to chamber for first 2 firings.

Just size neck without touching body until fire formed to chamber
 
Removing spring loaded ejectors is to be avoided. Parts can go flying and get lost. In many cases the roll pin holding them is extremely tight. Proper punches are a must. When installing the roll pin, the tightness may mask misallignment of the ejector causing it to not work at all, or not as it should.
He doesn't have a spring loaded ejector.good lord you look at pics.
 
Yeah everyone got way off pace about irrelevant stuff.its not that difficult

Once you do what ive mentioned and you have sized for third time measure the brass.geese
That's your chambers dimensions

Then bump shoulder back and no need to remove your extractor or ejector they aren't in the way.its not a Remington 700 needing ejector removed.in that action neither is in the way to shove brass case into chamber
 
So if the datum point isn't the established measurement point, what is and who decides?

You?

And what is a 'thingy'?

I suggest you research what a datum point is for yourself.

I'll give you a hint. It's a circle of a specific diameter as applied to a circular cone, to simply it.
The answer lies in your questions you asked!!! Switch you understanding of measurements in 3D space from the Cartesian Coordinate System {x, y, z} to Cylindrical Coordinate System {h (height established on the centerline of the cylinder), r (radius perpendicular to the centerline), 0- [theta 0 with a line in the 0) (the angle of the radius)}!!! The datum point is a reference point determined where that other cylinder make contact at a full 360° sweep of that tapered cone called the shoulder!! WHICH WAS STATED IN MY POST YOU REPLIED TOO!! A COMPARATOR, A "THINGY", HARDWARE STORE BUSHING!!! Knowing the diameter of contact will be a reference to the height!!! The height will very depending on the diameter of the hole or taper in the cylindrical tool of measure called the Comparator!!! The calipers plus the comparator measures the height (a line between two points) which is a reference determined by the contact diameter!!!!

You use this datum point (height) to determine the difference between the bump gauge or proven fire formed cases and the fired cases and/or formed cases made by the die/shim set up!!!

Either means of finding the maximum length of chamber length between the bolt face and mating comical surfaces will work (bump gauge or confirmed full fire formed case)!!! THEY ARE BOTH A MASTER COPY OF THE BASE TO SHOULDER CONTACT OF THE CASE CHAMBER OF THAT RIFLE!! In my opinion, I prefer the full fired formed [3F] (ONCE AND DONE) cases over the 2-3 maybe 4 shootings to establish bump for 2 reasons!!!

1. The 3F method allows the reloader to finish the case prep for better accuracy!!
Volume checking of cases (critical, and explained in 2.) and setting the desired set back or bump through die adjustment and/or shims!!! Now the reloader can move straight into load development in better testing results without having the effects of variability of different case internal volumes!!!

2. A simple Thermodynamic (the bases of internal ballistics) formula explains the need to have consistent volume to have consistent pressure!! ∆V=∆p and/or ∆t!!! Simply stated, a change in volume (∆V) will cause a proportionally change in pressure (∆p) or a change in temperature (∆t) or both!! ∆ (DELTA IN GREEK) means "a change or difference" in the scientific terms or "heat" under the reaction arrow in chemistry equations!!! ELIMINATING ∆V GREATLY REDUCES CHANGES IN PRESSURE!!! ∆t will also change pressure!!! A change in powder temperature, case temperature, and chamber temperature are also variables to take into consideration!! The multi firing to get to the desired bump leads to slightly inconsistent ∆ps which could cause group sized to open up when looking at seconds of angle (1 SOA = 1/60 MOA)!!! Now some of you will say the tiny little change in volume will have no effect on pressure!!! Look at how huge the pressure figure is!!! 1/000 ∆V changes the last 2 digits in psi xx,x∆∆!!

I'm just explaining the science for forum members!!! It's your choice to used it or ignore it!!!
 
Last edited:

Upgrades & Donations

This Forum's expenses are primarily paid by member contributions. You can upgrade your Forum membership in seconds. Gold and Silver members get unlimited FREE classifieds for one year. Gold members can upload custom avatars.


Click Upgrade Membership Button ABOVE to get Gold or Silver Status.

You can also donate any amount, large or small, with the button below. Include your Forum Name in the PayPal Notes field.


To DONATE by CHECK, or make a recurring donation, CLICK HERE to learn how.

Forum statistics

Threads
165,686
Messages
2,200,653
Members
79,046
Latest member
GLINK964
Back
Top