• This Forum is for adults 18 years of age or over. By continuing to use this Forum you are confirming that you are 18 or older. No content shall be viewed by any person under 18 in California.

Testing shoulder bump with bolt and action

This is by far one of the most informative discussions I've encountered so far on cartridge prep. Some of you guys are into the prep method farther than I ever expect to be, but gets me much farther down the road than my knowledge to date has taken me.
I've found myself having to get more deeply into shoulder bumping than ever before since fresh 6 PPC brass has become unobtanium and caused me to buy "once fired brass" that was fired in an unknown chamber. I'm having to rebuild every cartridge to fit in my chamber, and this discussion has been an immense help.
Thanks to every one of you guys who have commented. YOU ARE ALL GREAT~!!
 
1) “Spring Back” means that the brass case expands during the firing, but then as it cools its shrinks ever so slightly. This is the reason that your fired cases are able to be removed from rifle’s chamber.
This is not what happens. Springback as applied to brass cases is a function of the behavior of a material to internal (to the material) stresses. As the pressure in the case increases during firing the case expands following what is called the stress strain curve which is the relationship of material stretch/displacement to the applied stress. If the applied stress is less than the yield point then the material will return to it original size when the pressure in the case is removed. If the pressure in the case is large enough to increase the stress beyond the yield point then when pressure is removed the case will still decrease in size but not to the original size. In both cases this behavior is what we call springback.

In firing of a round as the chamber pressure increases the brass case expands and contains the pressure until it contacts the steel chamber of the barrel. At that point any additional pressure is contained by the case and the chamber/barrel. Both the case and chamber expand until the maximum pressure is obtained. As the pressure decays the barrel and case then decrease in size (springback). They do so at different rates related to the materials properties. The chamber/barrel return to their original dimensions because the internal stress was less than the yield stress but the stress in the case exceeded the yield stress so it does not return to its original size but normally less than the size of the chamber. Only in severe overpressure cases will the case not return to less than the chamber size. When this happens the case is trapped by the chamber and bolt lift/extraction becomes hard during to the interference fit.

The case will not normally expand to match the chamber at SAAMI pressure limits but will reach a point where case growth from firing to firing becomes minimal.
 
Last edited:
I guess I should have been more detailed.
Start with the die a quarter turn off of touching the shell holder, size a piece of fired brass, then check the base to shoulder length. Adjust the die down slightly and check again . Do this until your die has just touched the shoulder.

Then based on tape thickness on the case you checked headspace, adjust your die up accordingly. Use small adjustments, as 1/16 of a turn will change base to shoulder length .008” -.009”.

If you have a method where you can set your die at touching the shoulder, on once fired brass, in a new chamber the first time, every time, I’d be interested in knowing it. I always have to basically use trial and error, even using competition shell holders.
Yeah that explains it I do the same thing.
 
Doom - thank you for the thorough explanation. My oversimplified explanation was geared toward a newbie who’s just starting down the path. Just reading the room…

Perhaps you might consider following up with an in-depth explanation of brass metallurgy, proper annealling, or perhaps neck tension.

Edit: I posted the above and stepped away. It’s been up too long to simply delete and pretend that it didn’t happen.

Doom - you have my apology. I was wrong to respond.
 
Last edited:
I keep it simple and use a Lee Collet die to size one fired brass. Sometimes with thick brass such as Sako I might even use the LCD after the second firing. Cases are then fireformed (or very close to it) and I bump back 2 thou while FLS for each resizing after that. I have given up bumping after the first firing.
 
Last edited:
I'm a new reloader that just recently learned the method of testing shoulder bump by taking the firing pin and extractor out of the bolt and then bumping case shoulders until the bolt drops on a loaded case without resistance. Then the ol' scotch tape trick to double check. Cortina's video on that was great. Worked great on my hunting 6.5 PRC Seekins element, then great on my Lone Peak Fuzion 6 Dasher. I'm feeling good about myself and feel like I'm starting to get it...but then I pick up a custom build with a Bighorn Origin in 223 rem. The bolt doesn't have an extractor (see below). So I just take out the firing pin assembly. I tried some virgin brass and bolt closes no problem. But then I put in some x1 fireformed brass that was shot out of this same rifle, and bolt also closes as freely as the virgin brass. Am I missing something? Shouldn't the fireformed brass be sized, and shouldn't the bolt be tough/impossible to close with this unsized fireformed brass? If it isn't, how am I supposed to do the old bolt/scotch-tape test if even unsized brass fits fine? Thought maybe the barrel breakin rounds I shot were too light to truly fireform the brass, but that seems really unlikely. I fireformed with Varget; velocities were upper 2700s, and TAC; velocities from 2700 to almost 3100.
Lots of good info given to you, but I want to alert you to one thing. You keep saying "extractor", but the word you should be using is "ejector".

Everybody obviously knows what you mean, and I'm not picking on you, but using the correct terminology might keep someone else from getting confused.
 
I guess I am in the minority on the push it back untill it chambers with ease.

I have seen several Short Range Benchrest Shooters adjusting their die until the bolt fell. When actually using the proper tools to measure exactly what was going on, the discovered that they were pushing the shoulders back way too far, past .010 inch.

Why? There are other variables involved. For instance, if the web has grown a little too much for the die to handle, that can give you a false reading. Other things as well, such as just how truly straight everything is can also influence the “feel”.

In short, ther is no substitute for measuring exactly how the die is affecting the cartridge. If you do not have the proper tools, get them. They are readily available from several suppliers.
 
Last edited:
I guess I am in the minority on the push it back untill it chambers with ease.
Jackie, could you briefly describe how you determine shoulder bump? The measurements I take are OAL, neck thickness, neck OD, base to shoulder, and the .200 line. Are there others I should be doing? I’m always trying to learn a better way.

Thank You!
 
Doom - thank you for the thorough explanation. My oversimplified explanation was geared toward a newbie who’s just starting down the path. Just reading the room…

Perhaps you might consider following up with an in-depth explanation of brass metallurgy, proper annealling, or perhaps neck tension.

Edit: I posted the above and stepped away. It’s been up too long to simply delete and pretend that it didn’t happen.

Doom - you have my apology. I was wrong to respond.
No problem.
 
Jackie, could you briefly describe how you determine shoulder bump? The measurements I take are OAL, neck thickness, neck OD, base to shoulder, and the .200 line. Are there others I should be doing? I’m always trying to learn a better way.

Thank You!
None of that has anything to do with the actual amount you are pushing the shoulder back during the sizing operation, which of course determines the actual headspace of the loaded round when the bolt closes.
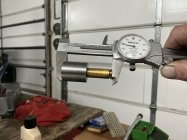
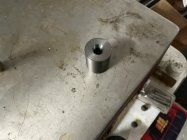
Many Benchrest Shooters use a device we call a “thingy”. It is simply a piece of barrel stub faced square and with the neck and shoulder part of the reamer established.

You measure the fired case, size it, then measure again, adjust the die accordingly.
You can also also use the “thingy” to ascertain where your bullet is on the lands and grooves since it is your chamber.

If I do a barrel for someone, I always make one of these for them off of a drop.
IMG_0661.jpegIMG_0663.jpeg
 
Last edited:
None of that has anything to do with the actual amount you are pushing the shoulder back during the sizing operation, which of course determines the actual headspace of the loaded round when the bolt closes.
Many Benchrest Shooters use a device we call a “thingy”. It is simply a piece of barrel stub faced square and with the neck and shoulder part of the reamer established.

You measure the fired case, size it, then measure again, adjust the die accordingly.
You can also also use the “thingy” to ascertain where your bullet is on the lands and grooves since it is your chamber.

If I do a barrel for someone, I always make one of these for them off of a drop.
View attachment 1652040View attachment 1652041
Got thingy for 1 barrel luv it
 
There are two things to keep in mind about cases:
1) “Spring Back” means that the brass case expands during the firing, but then as it cools its shrinks ever so slightly. This is the reason that your fired cases are able to be removed from rifle’s chamber.
2) New cases may take as many as 2-3 firing before they stabilize to match a rifle’s chamber. For this reason some shooters choose to only resize the case neck (re-establish neck tension to hold a bullet) after initial fire-forming. The goal is to leave the shoulder unmolested until case dimensions stabilize / match the chamber.

If you choose to FL Size these 1x fire-formed cases then a good process is to determine the baseline for the shoulder (case base to shoulder datum). Measure the shoulder before sizing and then remeasure after sizing. Don’t be surprised if the shoulder measurement has increased. This has occurred because the shoulder on the fired case is still short and as the FL Sizing Die squeezes the case body it pushes the brass forward into the empty space (ie void between actual shoulder and shoulder profile of FL Die.

Why is it, the LR target and Bench shooters rules must apply to all other shooters!!

I'm an accurate shooter, but not a hot barrel target shooter!!! COOL BARREL LONG RANGE SHOOTER!! In my load prep, I file the base flat, eliminating cupping and pulling (mounting) from the the primer pocket punch operation!! Then, uniform the pocket!! With a flat base, once fire form at a pressure that creates slight heavy bolt lift on extraction! The elongation of all those cases will be more consistent in stretch compared to a multiple fire completion of headspace where random orientation will cause random stretching!!
Those Once and Done cases, when placed back into the chamber will have slightly heavy bolt drop!!!!

Back to press, adjust the sizing die to the point where the formed case is placed back into the chamber, there is a slight resistance at the tail end of the bolt drop!!! This is 100% head space setting of the die!!! Unlike target shooters, a little heavy bolt drop (clicker) is no big deal to the One shot, hit on target shooter!!! Plus, seting back a couple of thou work hardens the brass and fatigues the stretch!!!

Long range big game, long range plinking (steel), long range coyote and varmint!!! That's my competition!!!

And it is not SPRING BACK!! IT IS THERMO CONTRACTION THAT RELEASES THE BRASS FROM THE CHAMBER!!! The case actually shrinks from the the brass transfer the heat to the chamber mass after being heated by the combustion of the propellant!! Linear coefficient of thermal expansion for brass (close to cartridge brass) is 0.000019 in/F°!!!!! SHOW ME THE SPRING COEFFICIENT OF BRASS!!! It will be other brass and bronze alloys!!!! YOU WILL FIND THE COMPRESSABLITY FACTOR OF AROUND 0.0005" WHICH DIE MAKERS USE!!!! The formed case will recoil back 0.001" in diameter and 0.0005" in length!! Cylindrical coordinates!!
 
Last edited:
  • Like
Reactions: Oso
None of that has anything to do with the actual amount you are pushing the shoulder back during the sizing operation, which of course determines the actual headspace of the loaded round when the bolt closes.
Many Benchrest Shooters use a device we call a “thingy”. It is simply a piece of barrel stub faced square and with the neck and shoulder part of the reamer established.

You measure the fired case, size it, then measure again, adjust the die accordingly.
You can also also use the “thingy” to ascertain where your bullet is on the lands and grooves since it is your chamber.

If I do a barrel for someone, I always make one of these for them off of a drop.
View attachment 1652040View attachment 1652041

That is the best "thingy" to use as a bump comparator where the datum line is an area, not a single point contact datum or slight larger single point bump insert!!!

This is the method, I developed using physical properties of brass to improve accuracy, I've been using for over 40 years for finding maximum headspace and limits of the brass for adjust bump on the sizing dies!!! AND, THERE IS NO NEED TO REMOVE THE EJECTOR FOR THIS TESTING PROCESS!! This is for a 6.5 PRC, using virgin ADG brass!! Find the maximum safe range in rifle breaking in and test using demiled Nosler brass!!! In the process, I determined the bump on the new ADG brass by random factory bump measurement and set the sizing die to the datum number 1.622 where most of the cases were slightly bumped!!! Loaded 2 round of each powder intervals!!! The last 2 cases were 0.2 grains over reloading manual max pressure!!!

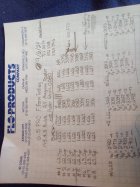
Take a caliper with attracted bump comparator to the range!!! Before firing each round, use the comparator and record that datum length!!! Fire the round, measure the new datum length after cooling to ambient temperature , record, and record the velocity!!! HERE IS THE KEY!! Wait for that rifle to cold down with the bolt open for 3 to 5 minutes!!! In the meantime, record any changes in felt bolt lift, look at the previous fired case for pressure signs, measure and record the next round!! Fire the next round and keep reaping and recording while looking for pressure signs and changes in bolt lift on extraction!! The attachment is the records from that range test!!!

There is the load number, powder load weight, with two sets of columns, where each set of columns were the before bump, after fire bump, and the velocity!! The top big arrow, pointing to 3089 was the 1st slightly noticeable heavier bolt lift, the start of compression of the brass which is at 1.6265"!! The brass was fire formed from #4 and up in the table!!! The last fired load at 3120 exceeded full brass COMPRESSABLITY (0.0005 compression on the shoulder and 0.0005 on the base) with noticeably heavy bolt lift and a very, very slight extractor imprint on the filed base which I filed off lightly!!! The starting point load of severe overall case deformation, pressure well exceeding the tensile strength of the base brass region (another physical property)!!! The DESIGNED base has higher tensile strength due to its hardness compared to the softer shoulder and neck with lower tensile strength!!! This is why I don't anneal without a coolant bath to avoid softening below the 1/4" region below the body/shoulder junction!!! IMPROPER ANNEALING CAN LEAD TO CASE HEAD SEPARATION, LOWER BODY BLOATING (Clickers), AND/OR PRIMER POCKET WALL SWELLING (Lose primers) IF HEAT IS ALLOWED TO FLOW TO THE LOWER BODY!!! OVER PRESSURE CAN CAUSE THESE SAME ISSUES!! Staying under 3100 will almost eliminate deformation at and under the stretch zone at 0 Bump!!! Find the minimum load to achieve full fire formation is needed with Bump >=1 town reduce deformation due to the hammering affect of the base slamming into the boltface!!! That is your max safe load for case longevity!!!

From the data, the slight compression (approximately 0.00025" on both the shoulder and the base) on the full length fire formed cases is my desired load at 62.9grains of powder to finish fire forming the rest ADG brass!! Now, I adjust the die till I have 1.6265 and have a slightly heavy bolt drop at the tail end of the bolt lug cam stroke and the case, under compression (firmly and rigid) which will center the base and the double centering of the two tapers, aligning the bullet, near perfect, to the rifling!!!! Once and done setting of the die for that rifle using the old Bonanza coax press!!! I put one case in the die box for checking the comparator because the chamber should not change under normal conditions!!! THAT ONE CASE IN THE DIE BOX IS THE CHEAP, FIXED BUMP GAUGE!! For you target and hunter shooters, set you bump by subtracting the desired set back of the shoulder and adjust the die using the CASE IN THE DIE BOX for a reference to the true headspace of the chamber!!

I will retest for the Lapau virgin 6.5 PRC cases due to their probable differences in physical properties!!!! Once I find the differences of tensile strength at the base, the higher tensile brand cases will be used for high pressure/velocity hunting loads!! The lower tensile brand will be used for lower pressure/lower velocity target and plinking!!! Just need to know the limits of the two brands!!!!
 

Attachments

  • IMG_20250415_090618.jpg
    IMG_20250415_090618.jpg
    377.8 KB · Views: 20
Last edited:
@Oso and @K22 thank you for the info! I just pulled out my headspace gauge and my x1 fired cases are all one to one and a half thousandths longer than the virgin brass. Seems crazy to me that it wouldn't fully fireform with one firing. So if I'm understanding correctly, I should FL size these x1 cases to basically return them to their current headspace (which means, as K22 said, they will get longer initially, and then bump back to that baseline), and then fire them again and repeat the back-to-baseline-bumping-back UNTIL they reach a firing where they no longer chamber freely. I'd then consider that to be true fireformed and can bump back .002" from there?
The easiest way to quantify where the shoulder is moving, and how much it needs to be bumped, is a shoulder bump gauge.

How much the shoulder is bumped is dependent on the dies. Some when screwed all the way down the shell holder will bump an appropriate amount (.003-.004), and others will move the shoulder back WAY too much (.008 or more!).

This can be adjusted either by backing off the die, or using an alternative shell holder. These can shimmed, or if you want an idiot proof method, use Redding Competition shell holders. With these you can adjust the headspace in .002 increments all while running the die down to the shell holder every time. This is helpful if your press is worn, or introducing variability into the sizing operation.

The most reliable way to assure easy operation for a bolt gun with dedicated brass is a .002-.003 shoulder bump from the fired case dimension. This should remain the same between the first and later firings.

You can use introduce all sorts of other complexity (separate shoulder bumping then a bushing neck die, only neck sizing, etc). You are new though and should just keep this simple and trouble free.
 
I'm a new reloader that just recently learned the method of testing shoulder bump by taking the firing pin and extractor out of the bolt and then bumping case shoulders until the bolt drops on a loaded case without resistance. Then the ol' scotch tape trick to double check. Cortina's video on that was great. Worked great on my hunting 6.5 PRC Seekins element, then great on my Lone Peak Fuzion 6 Dasher. I'm feeling good about myself and feel like I'm starting to get it...but then I pick up a custom build with a Bighorn Origin in 223 rem. The bolt doesn't have an extractor (see below). So I just take out the firing pin assembly. I tried some virgin brass and bolt closes no problem. But then I put in some x1 fireformed brass that was shot out of this same rifle, and bolt also closes as freely as the virgin brass. Am I missing something? Shouldn't the fireformed brass be sized, and shouldn't the bolt be tough/impossible to close with this unsized fireformed brass? If it isn't, how am I supposed to do the old bolt/scotch-tape test if even unsized brass fits fine? Thought maybe the barrel breakin rounds I shot were too light to truly fireform the brass, but that seems really unlikely. I fireformed with Varget; velocities were upper 2700s, and TAC; velocities from 2700 to almost 3100.
View attachment 1651344
“If it isn't, how am I supposed to do the old bolt/scotch-tape test if even unsized brass fits fine?”

I take a sized case that fits just fine and add layers of scotch tape one at a time, measuring base to datum on the (case + tape). I use the Hornady adapter on calipers. Do this until the bolt won’t drop easily or won’t close, that gives you a no go measurement to use when setting the die for shoulder bump, i usually bump 2 thou below the no go.
 
None of that has anything to do with the actual amount you are pushing the shoulder back during the sizing operation, which of course determines the actual headspace of the loaded round when the bolt closes.
Many Benchrest Shooters use a device we call a “thingy”. It is simply a piece of barrel stub faced square and with the neck and shoulder part of the reamer established.

You measure the fired case, size it, then measure again, adjust the die accordingly.
You can also also use the “thingy” to ascertain where your bullet is on the lands and grooves since it is your chamber.

If I do a barrel for someone, I always make one of these for them off of a drop.
View attachment 1652040View attachment 1652041
Nice. Can't get any better than a gauge made with the exact reamer the chamber was cut with.
 
I’ve never had fired brass that fits loosely in the sizing die. Even if it’s a bushing die and I’ve pulled the bushing, the body of the brass always has a few thou of interference on diameter.

So while I agree with this concept I don’t see how it will work on fired brass.
That's mostly because the sizing die and the chamber can't match. If it did, it would never chamber correctly at some point. Can't give specifics because there are too many variables.
What is important to understand is that the brass must be sized to slightly below chamber dimensions everywhere or it won't chamber without effort.
 

Upgrades & Donations

This Forum's expenses are primarily paid by member contributions. You can upgrade your Forum membership in seconds. Gold and Silver members get unlimited FREE classifieds for one year. Gold members can upload custom avatars.


Click Upgrade Membership Button ABOVE to get Gold or Silver Status.

You can also donate any amount, large or small, with the button below. Include your Forum Name in the PayPal Notes field.


To DONATE by CHECK, or make a recurring donation, CLICK HERE to learn how.

Forum statistics

Threads
165,771
Messages
2,202,625
Members
79,101
Latest member
AntoDUnne
Back
Top