Follow along with the video below to see how to install our site as a web app on your home screen.
Note: This feature may not be available in some browsers.
This Forum is for adults 18 years of age or over. By continuing to use this Forum you are confirming that you are 18 or older. No content shall be viewed by any person under 18 in California.
I’m happy with mine. I do think it could be heavier. if they offered a cast iron heavy base that would take the total weight up to 16lbs it would be ideal. But really man at the price point it’s a fine rest.
I got the new SEB rear bag and got to shoot it. It’s nice. I know what I like in a rear bag having around 5 rear bags, I looked at it said yea that should be nice and it is. Plus I color coded to my Rifle. I thought it was cool, never even thought about that before. So I like it.
boltman 13: That's the way I have been using my AR-250 also. I haven't experienced any "lift" of the back legs when sliding the rifle forward and backward doing it this way, nor on recoil. It looks a little odd to some people with the single screw forward, but it works for me and I haven't added any weight to the rest yet. If SEB comes out with a plate for the bottom of this rest I may buy it just to see if it changes anything, but at this point I am quite pleased with this rest and like it a lot. Of course adding more weight to the rest negates the primary reason I had for buying it in the first place....less weight=easier to transport. The only issue I have with the AR-250 is with the tension screws for the top bag. I add very little tension to these screws when shooting as the SEB supplied bag is pretty grippy with my rifles. If I am not careful about checking these screws they loosen up quite a bit, or it could be the bag(s) conforming to the rifle as I shoot.
I have already caught myself trying to figure out how to convert this SEB rest to a one piece rest similar to my Randolph setup with the rear adapter plate, but that's another project for another time. For now I am content with this SEB rest just as it is, even if I am using it backwards for most. I don't normally recommend people buy something I have purchased or used for fear of repercussions, but the AR-250 is the exception to that rule. It is a great little rest that seems to work well and is super easy to transport and this is coming from a confirmed one-piece rest user. Adding the PMA attached Stabilfoot leveling screws made it really convenient. Dare I say it is even fun to use? I love this rest and would not hesitate to buy another one if I had to.
If you didn't know there are plastic tipped tension screws in the bottom of the ear plates. On facing forward and one facing rearward. They a hard to see. Look for the extra hole at the bottom of each ear plate. Using the supplied Allen key, you can apply tension to the screws to prevent the side bag adjusters from loosening up on you.
If you didn't know there are plastic tipped tension screws in the bottom of the ear plates. On facing forward and one facing rearward. They a hard to see. Look for the extra hole at the bottom of each ear plate. Using the supplied Allen key, you can apply tension to the screws to prevent the side bag adjusters from loosening up on you.
Thank you so much!
I never saw those little suckers.
First looked with the ears attached and saw no holes/screws...dropped the ears off and there they were...2 little adjuster screws.
Much appreciated.
I've had mine a couple of weeks now. I shoot ARA Factory and I am really liking the rest. I hot glued some sections of nylon pistol belt to the bottom and sides of rest to get a better grip on the front of my Bergara B14R. It takes me a while to settle in on new equipment, but I was able to shoot one 2500 target at the Red, White, & Blue range in Georgia.
If you didn't know there are plastic tipped tension screws in the bottom of the ear plates. On facing forward and one facing rearward. They a hard to see. Look for the extra hole at the bottom of each ear plate. Using the supplied Allen key, you can apply tension to the screws to prevent the side bag adjusters from loosening up on you.
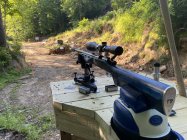
All of my practice and competition has been from either a bench or a concrete firing line so far and I find with the single peg forward and the included foot pads my rifle is very stable when I push it forward. On unlevel grass or dirt it might give me problems and putting the single peg forward might become a real issue.
I can say that I am shooting slightly better scores now than when I used the Farley.
The Farley was just too big/heavy for me.
Although, to be fair, the scores being only slightly better...maybe an extra .1 or .2 (say 100.3 compared to 100.5. But enough of a difference to know that I enjoy the SEB more.
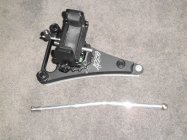
Two gripes I do have...the handle is not too good at locking tight on the first version of the rest (that I have).
Even with making a wee steel bar to help tighten the lock ring there is still some backlash/slop.
Plus, the internal grease is way thick stuff by the feel of things. I do lock the adjusting weight on then use that to 'twirl' the mechanism before use, and that does make the rest easier to operate.
But let it sit for about 10 minutes and it goes stiff again.
This stiff operation adds to the slight slop in the handle, as it makes the handle work hard to move the mechanism.
Would be nice to have an online manual showing the stripping and cleaning/greasing of the unit as I doubt any one will be wanting to send the rest back to Indonesia for sorting out.
But that's my only concerns. Nothing major.
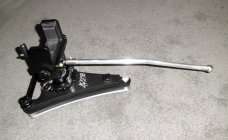
I have made my own handle that locks with a couple of grub screws and that works fine. Not as nice as a SEB handle though.
No 'complaints' as such...I'm a happy owner. It's a nice rest.
I can say that I am shooting slightly better scores now than when I used the Farley.
The Farley was just too big/heavy for me.
Although, to be fair, the scores being only slightly better...maybe an extra .1 or .2 (say 100.3 compared to 100.5. But enough of a difference to know that I enjoy the SEB more.
Two gripes I do have...the handle is not too good at locking tight on the first version of the rest (that I have).
Even with making a wee steel bar to help tighten the lock ring there is still some backlash/slop.
Plus, the internal grease is way thick stuff by the feel of things. I do lock the adjusting weight on then use that to 'twirl' the mechanism before use, and that does make the rest easier to operate.
But let it sit for about 10 minutes and it goes stiff again.
This stiff operation adds to the slight slop in the handle, as it makes the handle work hard to move the mechanism.
Would be nice to have an online manual showing the stripping and cleaning/greasing of the unit as I doubt any one will be wanting to send the rest back to Indonesia for sorting out.
But that's my only concerns. Nothing major.
I have made my own handle that locks with a couple of grub screws and that works fine. Not as nice as a SEB handle though.
No 'complaints' as such...I'm a happy owner. It's a nice rest.
Hello Kelvin, thank you very much for your input and apologies for the confusion. I have revised my manual to include filling the sandbag. As for the joystick there's a newer improved version in the work for the second batch which would allow you to tighten the joystick firmly without having to use as much force.
I am happy with mine. I would like to see an optional base that could be purchased. Maybe slightly wider In the front and 8-9 pounds heavier. Maybe made of steel or cast iron.
So my only complaint would be maybe it’s a little too light. I haven’t really had a problem with mine. To me and I maybe alone on this it needs to be a little heavier. Too light would be my only complaint, if you can call it a complaint. Maybe more of a user preference.
I thought the same too about the weight. But shot a few target cards first and no problems.
The rest performed fine. No problems (apart from the wobbly joystick).
My rest has always felt stiff, and I thought it might free up after some use. As yet it hasn't, but it's only used once a week for 1 or 2 target cards.
However I have a much lighter rifle arriving and so I have added a steel plate under the rest.
Increased weight by 3lb, and I feel happier now. Probably just a 'mind thing' after lugging around a Farley for a couple of years...everything feels light.
My plate is 1/4" (6mm) steel plate, and I had a local laser cutter make it for me.
Also...yes, I like my rest sitting up higher (my dodgy neck doesn't bend).
I can say that I am shooting slightly better scores now than when I used the Farley.
The Farley was just too big/heavy for me.
Although, to be fair, the scores being only slightly better...maybe an extra .1 or .2 (say 100.3 compared to 100.5. But enough of a difference to know that I enjoy the SEB more.
Two gripes I do have...the handle is not too good at locking tight on the first version of the rest (that I have).
Even with making a wee steel bar to help tighten the lock ring there is still some backlash/slop.
Plus, the internal grease is way thick stuff by the feel of things. I do lock the adjusting weight on then use that to 'twirl' the mechanism before use, and that does make the rest easier to operate.
But let it sit for about 10 minutes and it goes stiff again.
This stiff operation adds to the slight slop in the handle, as it makes the handle work hard to move the mechanism.
Would be nice to have an online manual showing the stripping and cleaning/greasing of the unit as I doubt any one will be wanting to send the rest back to Indonesia for sorting out.
But that's my only concerns. Nothing major.
I have made my own handle that locks with a couple of grub screws and that works fine. Not as nice as a SEB handle though.
No 'complaints' as such...I'm a happy owner. It's a nice rest.
Kelvin, thank you very much for your feedback. I have finished the production of an extra 100pcs of the new joystick version. This new version has a plastic insert which allows a firm connection with zero play. I deeply apologize if some people here have found the 1st batch of the joystick to be lacking. I can assure you this newer version has addressed this play issue.
As for the stiffness of the joystick action. You could try adjusting the pressure on the center shaft ball bearing. Use the 4mm allen key to open the set screw on the top plate (center of the top plate, Part 25). You'll then see a small set screw which can be adjusted with the 2.5mm allen key. Try loosening this set screw ever so slightly bit by bit. This set screw controls the rotational resistance of the joystick. The more you lessen the pressure, the less rotational resistance and the less stiffness you should feel. Though still make sure that there's still enough rotational resistance so you can move the joystick around without it rotating all over the place.
PS. Make sure to prevent any sand or debris falling into the inner mechanism of the body when you are taking off the top plate's set screw. Reinstall the top plate's set screw back on after you finish adjusting. This screw prevent sand or debris falling into the inner mechanism of the body.
I plan to make a more comprehensive features explanation / maintenance video after I am finished with the production of the 2nd batch. I hope this helps both of your issues.
All units of the AR250 starting from the 2nd batch will only use the new and improved joystick. Though I had some spares of joystick from the first batch I will no longer sell or use them.
I apologize if I haven't been able to reply this thread lately as I am swamped with the production of the 2nd batch. For people who have placed their orders, your unit is somewhere in this picture. I am trying my best to get them out to you as soon as possible.
As for the stiffness of the joystick action. You could try adjusting the pressure on the center shaft ball bearing. Use the 4mm allen key to open the set screw on the top plate (center of the top plate, Part 25). You'll then see a small set screw which can be adjusted with the 2.5mm allen key. Try loosening this set screw ever so slightly bit by bit.
Hi Chris...many thanks for this info.
I am not sure what part you are meaning though (Part 25?). I don't have a parts list to show what 'Part 25' is.
Do I have to remove the bag holder?
Then play with one of the arrowed screws (white arrow, or red arrow as per the photo)? Yes...I shamelessly stole your photo and played with it. Sorry!
Thanks Chris.
The screw you want to adjust would be the one with the white arrow, this little screw that will show up once you take of the M8 set screw on the top plate. You would first have to remove your front bag to access them.
This Forum's expenses are primarily paid by member contributions. You can upgrade your Forum membership in seconds. Gold and Silver members get unlimited FREE classifieds for one year. Gold members can upload custom avatars.