You are using an out of date browser. It may not display this or other websites correctly.
You should upgrade or use an alternative browser.
You should upgrade or use an alternative browser.
Need Advice on Finishing my Wood Stock
- Thread starter CjC73
- Start date
Pistol grip cap as wellWhy not trim the end off a bit more to square the edges up and add an ebony wood cap and reshape? The plug will then be hidden forever…
Arrow oil? 12 Oils, sealer and a filler. Many stocks finished with it from this site. All look amazing and very user friendly stuff to use
Good luck. I can't wait to see the final work.
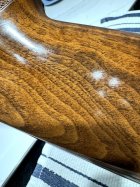
One thing I like about the traditional approach and using a filler like rottenstone is the way the grain darkens (as it fills with the slacum/rottenstone which forms a sort of cement) and you get a lot of 'micro contrast'. I've tried to photograph this:
My own project is ticking along steadily but is still a ways from something I will be happy with:
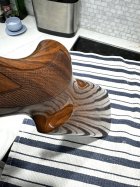
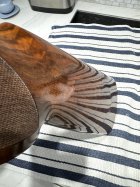
These pics were taken just after removing the excess slacum from an application and before dusting with another layer of rottenstone.
Last edited:
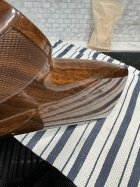
@CjC73 I was thinking a bit more about your tip issue. You'll see plenty of examples on the web of people using resin to infill live edge wooden tables and the like. Cerus Rifleworks also does the same. If you shape out a cavity that is centered on the stock and fully covers the problem area, use a clear grain filler on the inner circumference edge so it there's no bleed into the wood, set in an epoxy colored to your choice (something like a dark amber would be cool), let it harden fully and then reshape the tip bringing the epoxy to a fine polish it will look like an embedded jewel. There's no boundaries to what you can create.
@CjC73 I was thinking a bit more about your tip issue. You'll see plenty of examples on the web of people using resin to infill live edge wooden tables and the like. Cerus Rifleworks also does the same. If you shape out a cavity that is centered on the stock and fully covers the problem area, use a clear grain filler on the inner circumference edge so it there's no bleed into the wood, set in an epoxy colored to your choice (something like a dark amber would be cool), let it harden fully and then reshape the tip bringing the epoxy to a fine polish it will look like an embedded jewel. There's no boundaries to what you can create.
That would be a cool and all but I really don't have the talent or the tools to cut that inlay.
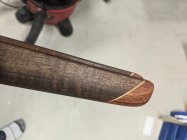
If it wasn't for the couple spots of glue showing, the plug blends really well. Probably just have to live with it and chalk it up as lesson learned
back at it a little after some family issues to deal with.
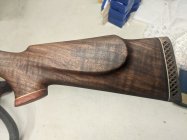
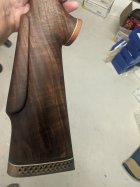
so I decided to just go ahead and start oiling it, since the plug in the tip is noticeable and I have a chip by the bolt cutaway. no sense in spending much more money on it.
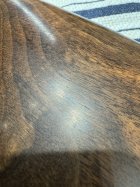
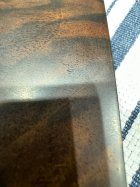
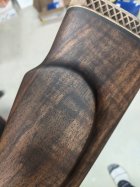
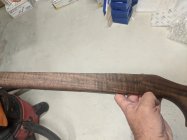
I sanded it down to 400 and left all the dust on it and put on a coat of arrow oil thick, at least I thought it was thick. I see some vertical lines, are these tool marks? Is the dark coloring in the butt a characteristic of the wood?
next steps? sand to get those tool marks out, if those are tool marks. Or just sand 800 and apply thin coat of oil, then 1000, oil, etc. then light coats of oil to get the sheen I want.


Who was the stock maker?So, I've been wanting to try doing this myself for a while and I'm finally going to tackle it. The stock is rough shaped, lots of tool marks and such. Inletting should be close, I'm sure I'll have to finish that a touch or two.
I've read a LOT online and here on steps and how to get to the actual finishing stage. One of my many questions will be what finish? I have TruOil, Arrow, Gloss Wipe-On Poly. But open to getting what I need to do it right. I'm leaning towards a glossier finish. But I realize I'm a long way off from this stage.
Guess my first steps will be to start sanding. 120 or 220 grit to get to the shape I want it? Being careful not to create ridges and go with the grain as much as possible. Any other tips at this stage?
Here is the before picture of my stock. Wood is walnut with rosewood (?) grip cap and tip.
View attachment 1457571
also, not sure if anyone knows... what are the black pits/streaks? are these the pores? need filling?
I think I need to go back to sanding those tool marks out? anyone have advice
The dark vertical lines is the sex appeal that's in your walnut!! They're "curl" where the grain changes directions slightly. Google curly maple and you'll see it there too.
Tool marks will look like scratches or dents, often like scratches from rasps, files, and sand paper.
Get the wood wet with a nearly dripping cloth, hit it with a blow.dryer to dry. Any tool marks will become very obvious. You'll also get some wood whiskers that need to be knocked off with the lightest touch possible with the same grit paper as the last one you used or finer.
It's a Richards MicrofitWho was the stock maker?
What sort of a look are you after? If you want a true gloss/mirror finish you can never spend too much time sanding, raising the grain, grain filling and sanding prior to any oil. If you have any sort of open grain you'll have shine but you'll still see the poc marks where that open grain has left a bit of a "crater", a bit like very old acne scars. No amount of filler in a liquid is going to level open grain. Rather you'll have smooth, small craters and the only way to get rid of this is to cut the finish back repeatedly with fine paper as you keep on with applications of oil.
If you are looking to save time and effort, as anyone using Arrow Oil is, I strongly recommend using a grain filler very early in the sanding process. Sand up to 2000 grit and then burnish with a chamois and a little oil. Will only take you a few hours to do the entire process.
If you are looking to save time and effort, as anyone using Arrow Oil is, I strongly recommend using a grain filler very early in the sanding process. Sand up to 2000 grit and then burnish with a chamois and a little oil. Will only take you a few hours to do the entire process.
Last edited:
You have a good deal of open grain and an obvious dent in the first pic above. Steam the dent out (wet rag and iron - be sure not to burn the wood). Then sand. Be absolutely meticulous during this part of the process. You won't regret it and you'll reap the rewards of that effort quickly.
(I still think you should pop the contrast but that's up to you.)
(I still think you should pop the contrast but that's up to you.)
Can you not remove the butt pad until you've finished the stock?
Keep going. Raise the grain (ethanol alcohol 75% / water 25% or oxalic acid solution; soak and hit with heat gun) and then sand again. Work carefully and meticulously rather than 'mechanically'. Keep going until 2000 grit. The wood will develop a slight sheen. You can't do too much of this. The final buffering can be done with a chamois and finishing oil.
Trust me. It is far easier to work with paper than to fix issues with finish.
Working with a finishing oil/sandings slurry too early is a bit of a waste of time. In order for that to be effective you need the oil to 'dry' and set the sawdust in the grain. That requires leaving the oil base (typically linseed oil) to rigidify. Even with drying agents that's a 5-6 hour turnaround at least. If you don't wait, the next step can pull the dust out of the grain. In the time it takes for one application to set, you could have that wood as smooth as a baby's bottom and have less to manage with finishing oil.
Last edited:
Similar threads
- Replies
- 4
- Views
- 2,272
Upgrades & Donations
This Forum's expenses are primarily paid by member contributions. You can upgrade your Forum membership in seconds. Gold and Silver members get unlimited FREE classifieds for one year. Gold members can upload custom avatars.

Click Upgrade Membership Button ABOVE to get Gold or Silver Status.
You can also donate any amount, large or small, with the button below. Include your Forum Name in the PayPal Notes field.
To DONATE by CHECK, or make a recurring donation, CLICK HERE to learn how.

Click Upgrade Membership Button ABOVE to get Gold or Silver Status.
You can also donate any amount, large or small, with the button below. Include your Forum Name in the PayPal Notes field.
To DONATE by CHECK, or make a recurring donation, CLICK HERE to learn how.


