Follow along with the video below to see how to install our site as a web app on your home screen.
Note: This feature may not be available in some browsers.
This Forum is for adults 18 years of age or over. By continuing to use this Forum you are confirming that you are 18 or older. No content shall be viewed by any person under 18 in California.
I just got a Lee Collet Die for my 22 Hornet and have not had much of a chance to look it over. Is it possible to set it to only size part of the neck, or will doing so cause the collet to not close and size?
I just got a Lee Collet Die for my 22 Hornet and have not had much of a chance to look it over. Is it possible to set it to only size part of the neck, or will doing so cause the collet to not close and size?
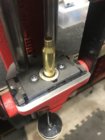
Partial neck sizing with collet die
Posted by on 13 August 2015 03:19 PM
If you want to resize just a part of the neck, find a washer at your local hardware store the has an inner diameter large enough to fit over the case, and an outer diameter large enough so that it contacts the collet sleeve that protrudes from the bottom of the die. Slide this washer over the case after the case has been inserted into the shell plate. Now when the ram is raised, you can still close the collet by applying force at the top of the stroke, but the case will not go up as far into the collet, and the neck will be sized less an amount equal to the thickness of the washer http://leeprecision.net/support/index.php?/Base/Search/Index
Use washers or whatever to adjust where the collet starts to compress farther up the neck. I use a +.010 Redding Comp Shellholder that raises that point up .010. Adjust die up .010 to maintain clamping pressure desired, 25 foot lbs as per Lee. I do this by adjusting to cam over slightly with light (25lbs) pressure, still I stop seeing the vertical lines on the neck from the collet fingers. Jim
A couple of things for the new collet die user. Take it apart to become familiar with how it works. As per instructions do not operate the collet (pushing it up into the die by ram force) without a case in place. You will spring the collet. Lastly, a friend found that his problems with one were caused by tightening the cap down to hard metal to metal, and that when he just tightened enough so that the O ring kept the cap from turning, the problems went away.
A couple of things for the new collet die user. Take it apart to become familiar with how it works. As per instructions do not operate the collet (pushing it up into the die by ram force) without a case in place. You will spring the collet. Lastly, a friend found that his problems with one were caused by tightening the cap down to hard metal to metal, and that when he just tightened enough so that the O ring kept the cap from turning, the problems went away.
Use washers or whatever to adjust where the collet starts to compress farther up the neck. I use a +.010 Redding Comp Shellholder that raises that point up .010. Adjust die up .010 to maintain clamping pressure desired, 25 foot lbs as per Lee. I do this by adjusting to cam over slightly with light (25lbs) pressure, still I stop seeing the vertical lines on the neck from the collet fingers. Jim
Interesting. After sizing a handful of cases, I do see slight vertical collet lines,and I adjusted it per Lee instructions for other presses, ones that cam over (Forster Co-Ax). Their instructions, in this case, were to screw the die down to touch, then two full turns more.
A couple of things for the new collet die user. Take it apart to become familiar with how it works. As per instructions do not operate the collet (pushing it up into the die by ram force) without a case in place. You will spring the collet. Lastly, a friend found that his problems with one were caused by tightening the cap down to hard metal to metal, and that when he just tightened enough so that the O ring kept the cap from turning, the problems went away.
He had concentricity issues. I did not examine his die, but if I had to, I would guess that when the interior of the cap was turned, a small nub was left in the center and with the cap tight, metal to metal, that it interfered with the float of the mandrel. In any case, he figured it out by himself and after making the change, things were as they should have been all along. I have used these dies for years and not run into this, but I always take them apart when I first get them and do not put the cap back tight, just tight enough to compress the O ring slightly.
Partial neck sizing with collet die
Posted by on 13 August 2015 03:19 PM
If you want to resize just a part of the neck, find a washer at your local hardware store the has an inner diameter large enough to fit over the case, and an outer diameter large enough so that it contacts the collet sleeve that protrudes from the bottom of the die. Slide this washer over the case after the case has been inserted into the shell plate. Now when the ram is raised, you can still close the collet by applying force at the top of the stroke, but the case will not go up as far into the collet, and the neck will be sized less an amount equal to the thickness of the washer http://leeprecision.net/support/index.php?/Base/Search/Index
So I realized after I ran out to buy washers like you said, I have a Forster coax. Duh. No shell holder. So I ground down the outside edge of the washer to fit in the circle of the shell plate. It worked perfect. Sized 2/3 neck at .2880, and the bottom third was left at .2950. Thanks!!!
Interesting. After sizing a handful of cases, I do see slight vertical collet lines,and I adjusted it per Lee instructions for other presses, ones that cam over (Forster Co-Ax). Their instructions, in this case, were to screw the die down to touch, then two full turns more.
You would be surprised to find how little pressure it takes to size the neck. I do not want to damage the brass, so I reduce pressure till marks are gone(sacrificial case) plus a little. Consistency is king. Jim
You would be surprised to find how little pressure it takes to size the neck. I do not want to damage the brass, so I reduce pressure till marks are gone(sacrificial case) plus a little. Consistency is king. Jim
You would be surprised to find how little pressure it takes to size the neck. I do not want to damage the brass, so I reduce pressure till marks are gone(sacrificial case) plus a little. Consistency is king. Jim
This is not something that needs to be that precise, but if you divide 1 by 14 you get about .071 per turn. Do you understand why they specify two turns?
In time when that die gets used to you <wink> you'll get to feel the neck yield on most cases but not so much with the Valentine method of setting an LCD.
The first thing I do is take the die apart and polish. The second thing I do is get a Hornady lock ring to replace the crap that comes with the die.
Then, the method as outlined by the Valentine ( I think that’s his name) always works for me. Where people screw up is by going too far and too fast. It doesn’t take much to do the sizing. Adjusting down in really small increments ( like an 1/8 of a turn) works and once there, lock the die ring and you are good to go.
More than one way to skin a cat. This one works for me.
I've used a LCD on 1x+ 204R cases and only lost a couple cases when setting the die up. Now I have a LCD for 22/250, and set it up per the directions for a LEE single stage press.
The 22/250 brass is new, never fired, just wanted/needed to straighten out the necks (dings & flat spots) and then trim/chamfer (Winc brass). I was not feeling any resistance when raising the ram at the very top of the stroke but the neck opening was as it should be (round/even). I "tested" a few of the new cases that did not have dinged up necks with a 22 cal bullet, and always got a good tight fit just using my fingers to seat the bullet before I used the LCD.
Just wondering if it's normal to not feel any resistance when using the LCD on new brass like one does when re-sizing fired brass??
This Forum's expenses are primarily paid by member contributions. You can upgrade your Forum membership in seconds. Gold and Silver members get unlimited FREE classifieds for one year. Gold members can upload custom avatars.