• This Forum is for adults 18 years of age or over. By continuing to use this Forum you are confirming that you are 18 or older. No content shall be viewed by any person under 18 in California.

inletting a used long range br stock with no mill

so this is a very used stock. it has had at least 2 different actions in it..
i removed the carbon fibre arrows and lead in the forearm.....what a pain..it was cast in place.
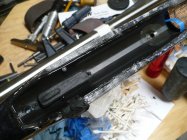
once i had a bbl'd action i started looking at the lay out. the recoil lug cutout and bbl channel appear fine.
i relieved the action channel for no contact..
BUT the action screw hole in the rear( a 5/8's ss pillar) appears to not be straight.. i laid out and drilled the forward action screw hole right at .250 and did it square to the stock(left right,up and down).with a screw it in the rear did not line up...so
today i drilled out the rear pillar, opened to 3/4" dia and glued in a new piller screwed to the action/trigger guard.
the bbl is .040 above cl at the recoil lug and at the fore end of the stock
 
so dis-assembled after the rear pillar had set, re-assembled and check the square of the assembly.
i am under .001 out, so ...so far,so good.
up next is to bore for the front pillar and glue in place..waiting on a tool. wed is the earliest.
 
some people do...i think my structural rod is better.
some like al pillars
some like ss pillars
i went this way years ago

Yeah, I have some that are cast with JB mixed with steel powder, some AL, some SS, one with an entire bedding block, another with brass tube pillars, lol! I like anything that moves less than wood.

I also have a stock I'm re-inletting. It was a home made RF BR stock that was about as straight as they guy on the Bud Light can. Pretty wood, but was very screwy, and I bought it very cheap. I did almost all the work with hand files and rasps after laying out some reference lines, but did have a buddy with a mill run a channel straight down it for a R700 and 1.25" barrel. Ive got probably 40-50 hours in just the exterior shaping/straightening now.
 
so today was the front pillar..had to wait on a proper size counter bore for the hole.
bbl'd action in the stock with rear screw and forward clamp. waxed the bottom of the action, greased the screw and action threads. . put some glue on the sides of the hole,with a stud in the forward screwhole, the pillar was spread well with glue and pushed in place. the action screw and "washer" were put in place and tightened. the washer is waxed but has a layer of tape on its stock side face. clean up the excess and wait for it to set.
 

Attachments

  • P1010011 - Copy.JPG
    P1010011 - Copy.JPG
    503.4 KB · Views: 47
took some time and effort to cut and clear for the bolt handle..not the same location as either of the 2 prior actions!
so it is drying/curing
some clay in big holes, a good wax job, some tape to protect the stock, some tape on the recoil lug front and 3 sides..not the back..just wax, waxed and greased the actions screw to keep stuff from sticking.
will pop it out tomorrow and see how i did.
marinetex
 
THIS IS "as cast"...no cleanup just how it looks with the bbl'd action popped out.
one small void by the trigger cutout(clay fill now)
all in all looks good will clean up and add the trigger and wait for the ss action screw to show up.
( i ordered them late, did not realize i was out)
(dang black pic does not look good..hmmm)
(maybe the 2nd is better)
 

Attachments

  • P1010012.JPG
    P1010012.JPG
    501.9 KB · Views: 155
  • P1010013.JPG
    P1010013.JPG
    497.4 KB · Views: 157
Last edited:
so now the bad news IT IS SCREWED SIDEWAYS.
this was a challenge because it had been seriously USED
but every time i took it apart and then back together all was good.
one of the pics shows a pc of paper under the bbl .
when clean up was done and reassembled the muzzle went right hard into the front of the stock.
soooo
i am going to counter bore the bedding to the pillars, and remove a ton of bedding and see what it takes to get it straight.
to be continued
( this aint my first bedding, just the first i have to do over)
 
so here is step one , re-establish base line location
counterbore pillar locations thru bedding to the tops of the pillars
 

Attachments

  • P1010014.JPG
    P1010014.JPG
    470.5 KB · Views: 61
Before you knock the bedding out and start over.....how much clearance is there between the action screws and the pillars?
PLESSE KEEP THE COMMENTS COMING i have seen some of your work
the counterbore spots could be refilled easily if you guys find something i need to know.
 
so i spaced up the action higher than the bedding and retightened the action screws...
and in a natural unforced position. the bbl appears straight..not the cocked position seen in the bedding.
pause..waiting for comments
 
alex, yes...i used front support and bbl height to help locate the action holes and get stuff straight.
the bbl only had lift, no side load.
i "think" something in around the clay on the bolt cutout and maybe in combination with the big log of clay under in the trigger hanger spot caused a resistance to the home postion and pushed the rear to the left, bbl right
 
Remove all the existing pillars and bedding compound and start fresh. Do it like this article and you should have very good success.

 
Remove all the existing pillars and bedding compound and start fresh. Do it like this article and you should have very good success.

there s not issue with the pillars and this is a USED ABUSED STOCK
there is no comparison to bedding a new rifle with a fitted stock and bbl'd action, to trying to salvage a used LONG RANGE benchrest stock to a new action and a new bbl
 
Last edited:
so...since the bedding has the action pointed sideways and thus the bbl pointed to the right,
the fix is to remove all basic bedding until the bbl action will point straight again with no binding.
did i miss something ??
( i have bedded a bunch of rifles, mostly competition rifles, in all these years this is the first comp rifle where things did not finish well. it is the first time i started with a very used stock)
thanks
 

Upgrades & Donations

This Forum's expenses are primarily paid by member contributions. You can upgrade your Forum membership in seconds. Gold and Silver members get unlimited FREE classifieds for one year. Gold members can upload custom avatars.


Click Upgrade Membership Button ABOVE to get Gold or Silver Status.

You can also donate any amount, large or small, with the button below. Include your Forum Name in the PayPal Notes field.


To DONATE by CHECK, or make a recurring donation, CLICK HERE to learn how.

Forum statistics

Threads
166,643
Messages
2,222,707
Members
79,768
Latest member
Isaiah1611
Back
Top