• This Forum is for adults 18 years of age or over. By continuing to use this Forum you are confirming that you are 18 or older. No content shall be viewed by any person under 18 in California.

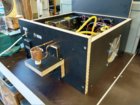
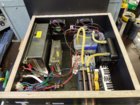
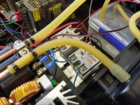
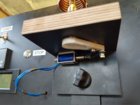
Induction brass annealer redux

And yes, very short anneal times resulted in more junked cases. It doesn't take much wall thickness difference to get inconsistent results. Have better luck longer times and lower amperage, about 9A works well for the 223 based stuff. My goal is less junked high volume varminting brass- split necks, split shoulders after 4-5 firings, not an every firing deal trying to get back to the same hardness. I think AMP did their homework, and for a competition shooter its probably a better solution.
 
Well we will soon find out. I shoot F class competitively in Aus 308cal, I didnt have the $2500 Aus to buy the AMP results with flame were not great better off not doing any. Have used a mates AMP which got me thinking again. For club level stuff I think annealing may be ok, for serious comp new brass or once fired I think gives best results so far.

For the 223 I have found some brass loses all its "spring" after just one firing and bullet like the Speer flat base are 1 thou bigger at the base than the rest of the bearing surface. When seating these bullets it expands the brass which is not springing back around the bullet and it can be moved with your fingers. If seated deep base past neck it may just fall in. I found annealing solved that issue altogether, but flame annealing gets old fast once you have used an induction machine.
 
(It is almost cheaper for Mouser to deliver to Europe than to Florida - and faster. And they ship to Europe from TX.)

I know they are gaining a more global market, I have no idea if they are physically expanding to different locations, been using them for quite a few years, the search functions work well, technical papers right there for almost every part, they are accurate on stock levels, no monkey business, easy to deal with. I know in the past they had two locations, west coast (Huntington Beach?) and Mansfield TX, the Mansfield warehouse is HUGE, been by it. I shy away from Fleamarketbay and Scamazon, especially for things I need good tech info on. Having to dig hard and waste time for tech info drives me batty, well worth the extra money to me for many items. To each their own.
 
David101-

I am not qualified to tell a comp shooter what is and isn't going to work for them. Your example certainly says 'go softer' to me. We are all neophytes on the subject of induction heating here, but there is a lot of room for experimentation with coil shapes to achieve a particular goal. Its one of the basic rules of induction heating that the shape of the workpiece influences the shape of the coil if you want to heat evenly, or heat in specific areas. With the current limiting and fault tolerance of the fancier power supplies or an add-on system it makes experimenting with odd coil shapes fairly painless. For instance to get more heat into the neck you can wrap a coil with the top two coils wound tighter the top one same diameter as bottom, and the next two tighter, going back wider as you get over the shoulder area. The wider coil at the top bends the magnetic flux field sharply away from the end of the neck.

https://www.google.com/search?q=ind...fAhVkmK0KHXXgAvMQsAR6BAgDEAE&biw=1016&bih=633

Take a look at a few of these pictures of the flux field shapes for the basic idea.

Every paper I've been able to find also strongly suggests that round tubing is not the ideal shape for this operation, but rather oval or square tubing for the coil (see above links). This is very difficult and expensive for us hobbyist types so round it is.

Also with the frequency that the tank circuit resonates at, and the material of the workpiece there is a direct correlation to how deep the heating occurs. A solid piece of steel needs a much lower frequency to heat it deeply, a thin piece of tubing only needs to be heated to a rather shallow depth, and this is what higher frequencies do.
 
Hi Everyone, I have nearly completed my own build of the GinaErik induction annealer. I have gone for more or less the original design but have run into an issue today when trying to run it the first time.
Today I finally received the correct induction board from china (took 3 attempts). On opening the package, I noticed that one of the coils on the board had one leg that was not soldered into the board, so I fixed that (I think) and got it all mounted, connected to the heater coil and wired it in. I started it up to have a go and was getting no heat into the brass at all. My relays are working and running the "Annealing" LED and the heatsinks on the induction board are getting hot. Both SSR relays are also getting quite hot, but no heat into the brass.
I did wind the heating coil backwards by accident and since I dont have enough tube to make another just yet I thought I would try it anyway. Is it important for the coil to be wound clockwise/anti-clockwise? will this be what is causing my issue or is it likely a faulty induction board?
The only other major difference I have to the original design is that I am using 2 SSR relays instead of the contact relay as I am not able to get the correct relay in New Zealand for a reasonable price. I have one relay on each leg of the induction board. Is this necessary? Could this be causing the board to not start fast enough or something like that?

This project is about the limit of my electrical capability and I am really just following the instructions provided (thanks Gina) without having a proper understanding of what is going on.

Thank you everyone on this thread for all the information and especially to Gina for starting it all.
 

Attachments

  • IMG_20190120_194031833_HDR.jpg
    IMG_20190120_194031833_HDR.jpg
    283.9 KB · Views: 450
  • IMG_20190120_194053989_HDR.jpg
    IMG_20190120_194053989_HDR.jpg
    350.3 KB · Views: 464
  • IMG_20190120_194106193_HDR.jpg
    IMG_20190120_194106193_HDR.jpg
    314.4 KB · Views: 453
  • IMG_20190120_194047191_HDR.jpg
    IMG_20190120_194047191_HDR.jpg
    290.8 KB · Views: 388
I'm going to start out with a std 1/8" diameter tube straight wound coil, then experiment with a conical asymmetrical optimized coil profile design that I found for OEM case annealing, and then try to form a square tube coil at some point. Square or flattened round tube is supposed to be the ideal, most efficient coil, and the asymmetrical winding (both diameter and coil spacing) is to shape the flux field to the part shape. First step is to cut a coil winder mandrel, left hand thread 6-7 TPI with the correct thread shape for 1/8" tube. Supposedly the most optimized shape for bottleneck cases sort of looks like a short topped hourglass viewed from the side with variable coil spacing, if it makes that much of a difference it means we don't need that much of a power $upply.

hi all.
I'm new in this forum. I'm from italy and my english is not very well, so be a little patient. I'm reading this post with much interest, is like a little enciclopedia :-)
Grocmax can you add a photo to explain better coil dimensioning?

Thank you
 
...
Could also try some shaped coils, with cancelling loops. Imagine a shape like a nuke cooling tower, but the 2nd loop from the bottom is 1/2" larger ID, bends the flux lines at the bottom and cancels out heating without changing inductance. You can also cancel out by changing loop direction, CW to CCW.

can you make a draft?
 
been using them for quite a few years

Same. They're good. eBay etc is full of fakes. Farnell is ok in Europe as are a couple of other providers but I have preferred Mouser. I used to get free shipping if I spent over £45 and stuff would arrive within 2-3 days.
 
Hi Everyone, I have nearly completed my own build of the GinaErik induction annealer. I have gone for more or less the original design but have run into an issue today when trying to run it the first time.
Today I finally received the correct induction board from china (took 3 attempts). On opening the package, I noticed that one of the coils on the board had one leg that was not soldered into the board, so I fixed that (I think) and got it all mounted, connected to the heater coil and wired it in. I started it up to have a go and was getting no heat into the brass at all. My relays are working and running the "Annealing" LED and the heatsinks on the induction board are getting hot. Both SSR relays are also getting quite hot, but no heat into the brass.
I did wind the heating coil backwards by accident and since I dont have enough tube to make another just yet I thought I would try it anyway. Is it important for the coil to be wound clockwise/anti-clockwise? will this be what is causing my issue or is it likely a faulty induction board?
The only other major difference I have to the original design is that I am using 2 SSR relays instead of the contact relay as I am not able to get the correct relay in New Zealand for a reasonable price. I have one relay on each leg of the induction board. Is this necessary? Could this be causing the board to not start fast enough or something like that?

This project is about the limit of my electrical capability and I am really just following the instructions provided (thanks Gina) without having a proper understanding of what is going on.

Thank you everyone on this thread for all the information and especially to Gina for starting it all.


Good ol' Sistema! The fella made a bundle out of that business.

Start with the basics. Is the induction board getting power? (LED on board, next to R5, lighting up?) You only need to switch one side of the supply to it. (BTW twist all your wiring pairs heavily together and keep the supply wires to the induction board as short as possible.) Check the output voltages at your PSUs etc.

PS: do you have a diode across the trap door solenoid wires? This isn't the cause of your problem but I don't see one in the pics.
 
can you make a draft?

A simple one would be shaped just like a nuclear cooling tower (like a venturi) with the coils in the narrow section closer together vertically, the coils at the bottom wider apart. If it ends up too tall you can wind the lower 2 coils flat, like a stove element.
 
The only other major difference I have to the original design is that I am using 2 SSR relays instead of the contact relay as I am not able to get the correct relay in New Zealand for a reasonable price. I have one relay on each leg of the induction board. Is this necessary?
Try it with one. I tried two and it didn't work nearly as well as one. The SSR's over heated if I remember correctly.
 
A simple one would be shaped just like a nuclear cooling tower (like a venturi) with the coils in the narrow section closer together vertically, the coils at the bottom wider apart. If it ends up too tall you can wind the lower 2 coils flat, like a stove element.

thank you for both answers :)
 
. the heatsinks on the induction board are getting hot. Both SSR relays are also getting quite hot, but no heat into the brass.
I did wind the heating coil backwards by accident and since I dont have enough tube to make another just yet I thought I would try it anyway.

This really sound like the Mosfets are not oscillating it is all the right symptoms other than probably only one of the induction heatsinks is getting warm.

Really check all the solder joints on the PCB. To the point of perhaps reheating them and adding some solder. I had multiple cold solder joints and like you some that were to the point of being loose. Like others have said one SSR is enough keep the other for a spare.
 
Gina do you take the primers out before you anneal? Perhaps I dont need to ask that question I remember seeing a post with a broken glass tube when a live primer went off.
Reason I ask is that AMP say to remove primers. I cant see it making a big difference to the anneal process or any extra current being drawn any thoughts?
 
Hi Everyone, I have nearly completed my own build of the GinaErik induction annealer. I have gone for more or less the original design but have run into an issue today when trying to run it the first time.
Today I finally received the correct induction board from china (took 3 attempts). On opening the package, I noticed that one of the coils on the board had one leg that was not soldered into the board, so I fixed that (I think) and got it all mounted, connected to the heater coil and wired it in. I started it up to have a go and was getting no heat into the brass at all. My relays are working and running the "Annealing" LED and the heatsinks on the induction board are getting hot. Both SSR relays are also getting quite hot, but no heat into the brass.
I did wind the heating coil backwards by accident and since I dont have enough tube to make another just yet I thought I would try it anyway. Is it important for the coil to be wound clockwise/anti-clockwise? will this be what is causing my issue or is it likely a faulty induction board?
The only other major difference I have to the original design is that I am using 2 SSR relays instead of the contact relay as I am not able to get the correct relay in New Zealand for a reasonable price. I have one relay on each leg of the induction board. Is this necessary? Could this be causing the board to not start fast enough or something like that?

This project is about the limit of my electrical capability and I am really just following the instructions provided (thanks Gina) without having a proper understanding of what is going on.

Thank you everyone on this thread for all the information and especially to Gina for starting it all.
Board is not oscillating or starting up correctly. Simply bypass the SSR and wire directly to the board with one wire like - minus side and touch the + positive side wire to other power input for 3 - 5 seconds. Be sure to have brass in the coil. It (brass) should get hot hot hot. If that doesn't work board has to be bad if it's getting 30 to 40 volts dc ok. If that direct power method works wire in only one SSR and try it. HB
 

Upgrades & Donations

This Forum's expenses are primarily paid by member contributions. You can upgrade your Forum membership in seconds. Gold and Silver members get unlimited FREE classifieds for one year. Gold members can upload custom avatars.


Click Upgrade Membership Button ABOVE to get Gold or Silver Status.

You can also donate any amount, large or small, with the button below. Include your Forum Name in the PayPal Notes field.


To DONATE by CHECK, or make a recurring donation, CLICK HERE to learn how.

Forum statistics

Threads
165,846
Messages
2,204,062
Members
79,148
Latest member
tsteinmetz
Back
Top