• This Forum is for adults 18 years of age or over. By continuing to use this Forum you are confirming that you are 18 or older. No content shall be viewed by any person under 18 in California.

Induction brass annealer redux

So I haven't soldered my coil in yet - it is just sitting in there with contact to the 1/4" copper tube in the induction board - but as I was mucking around with the build I decided to slap my oscilloscope across the terminals of the coil. Interesting results. I had the timer set as follows:

A 3 secs
B 0 secs
C 0.5 secs (trap door open)
D 0.5 secs

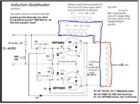
The first pic shows the overall capture. Note it is 0.5s per horizontal division (and offset by 1s). Count out 6 segments for the 3s a 308 case was in the coil.

Now it appears to me, from looking at the scope pic and from watching the LED, that the induction board remains powered for at least period C. I need to probe the Sestos timer itself. It could merely be that it takes a good while for the energy in the induction board to dissipate. You can see it take 770ms for the waveform to collapse.

The vertical voltage division is 50V per division. The voltage across terminals ranges from +112V to -106V. (Note the v sag into and out of the 0.5s mark.) So we have Vpp of 218V => 77 Vrms. This, divided by two, sort of roughly matches the voltage the voltmeter is showing at the input to the induction board.

NewFile13.png

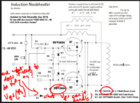
The second pic is a zoom into the more stable part of the capture.

NewFile14.png

You can see the circuit is resonating at 104kHz.

I have a compact 7 turn coil in 1/8" copper tubing.

IMG_3426.JPG
 
Last edited:
This might help Bill out a bit...

I have not gone back over old threads to see how Hollywood derived the 'right' coil for this application. I suspect, however, his work was targeting a desired frequency of operation. We can get to the desired coil (roughly) very quickly and simply with a little mathematics.

Two formulae are required. We know that a parallel L(inductance) C(apacitance) tank circuit will oscillate at:

f = 1/(2*Pi*SQRT(L*C)) where L is the inductance in Henries and C is the capacitance in Farads

We can add up the capacitance on the induction board. For the 20A models it is 6x0.33uF or 1.98uF.

Now what about the inductance of the parallel inductor - the work coil? The inductance of an air core inductor is:

L= (d^2 * n^2)/(18d+40l)

where:

L is inductance in micro Henrys
d is coil diameter in inches
l is coil length in inches
n is number of turns

https://www.daycounter.com/Calculators/Air-Core-Inductor-Calculator.phtml

Very roughly, the work coil described in the first couple of posts of this thread has 7 turns and is about 1.25" in diameter and length. (Feel free to refine this.) Plugging these into the calculator above yields 1.05603uH.

We can estimate, therefore, that the resonant frequency of operation of this design is: 110kHz.

Now of course deriving the 'right' coil would have been done the other way around, calculating the required inductance of the work coil for a desired frequency of operation given the onboard capacitance and then trying to solve for a convenient diameter for ease of implementation (a readily available tube to use as a die for wrapping 1/8" copper tubing) and an even number of turns. Schedule 40 pipe and 7 turns pretty much smacked the nail on the head if one were targeting circa 110kHz operation.

[EDIT: I wonder if Erick sat with the calculator above knowing that 7 turns of 1/8" copper tubing, tightly packed, would yield a length of 1 1/4" and hence he needed a roughly 1" mandrel. 6 turns wouldn't be anywhere near as convenient because the coil diameter would need to expand to almost 1.5". Luckily, 7 turns of 1/8" 'wire' wrapped around a 1" mandrel is goldilocks for 110kHz and the mandrel readily available. Voila!]

Of course the actual inductance of the work coil is likely slightly off the estimate above (I haven't bothered to measure the actual inductance of my coil) and various parasitics probably come into play, but you can see the simple math yielded a frequency pretty close to the actual frequency of operation I observed with my oscilloscope. 'n it great when maths works?

Change the onboard capacitance or alter the properties of the work coil and you will alter the frequency of operation of the 'design'. Increasing the total capacitance on the induction board while leaving the work coil the same will lower the frequency of operation (and vice versa). Add more turns to the work coil or space them out more? The formulae above can be used to estimate the new frequency.

Whether something in the 104kHz or 110kHz range is right for this application, I have no idea. Bill has some links on that I believe.

At this point it might be interesting to take a look at the EZ-Anneal implementation. Their work coil has a considerably greater number of turns. I wonder what the diameter of their coil is or how much capacitance they have on their induction board, or what their frequency of operation is and why they chose that frequency? 11 turns of the same tubing around the same mandrel as ours would yield about 2.3x the inductance. If they have the same capacitance on their induction board the frequency of operation would fall to circa 72kHz.
 
Last edited:
Well.... as I remember it, way back when, it was trial and error on Hollywood's part. (sort of like Edison and the electric light bulb). some where at or near the beginning of this tread is a picture of ALL the coils he tried until we got the right size. Adding the ammeter was a kind of the break through, in that it let us see, current draw to coil / case size.
Now you young whipper snappers are taking it to a whole new dimension. ;)
 
First time in a long, long while I have been called "young". :)

Note that the current and voltage is about Power (and hence speed). I understand that selecting the right frequency has everything to do with skin effect (AC current and therefore excitation and heating is greatest at the exterior surface and diminishes rapidly as one 'looks' into the workpiece) and depth. Theoretically the exterior surface of the case (likely where you have put your tempilaq) heats far more quickly than its inner wall and all in between. Lower the frequency and the excitation has more depth. Kind of a different part of the fish so-to-speak.

From what I have seen, commercial small arms ammunition annealers operate at much higher frequencies. For example: https://inductothermhw.com/products/small-caliber-ammunition-systems/ Their systems have operating frequencies between 135kHz and 400kHz. And it would seem that a different frequency is selectable for a different use (case). Thinner case = higher frequency? Or is it that in a 'constant speed production line' that frequency is altered rather than time? Dunno. Hard to find good sources of information on this. From Ambrell (another commercial manufacturer):

An induction heater consists of a coil, through which a high- frequency alternating current (AC) is passed. Heat may also be generated by magnetic hysteresis losses in materials that have significant relative permeability. The frequency of AC used depends on the object size, material type, coupling (between the work coil and the object to be heated) and the penetration depth.


I've also read of some people putting the tempilaq on the inside of the case neck. So a lot of people doing stuff very differently and all thinking they are annealing correctly. Whether any of this matters I have no idea.

After awhile you begin to have more and more respect for the proper science-based approach taken by my Kiwi brethren at AMP even if the workflow is a little more awkward.
 
Last edited:
First time in a long, long while I have been called "young". :)

Note that the current and voltage is about Power (and hence speed). I understand that selecting the right frequency has everything to do with skin effect (AC current and therefore excitation and heating is greatest at the exterior surface and diminishes rapidly as one 'looks' into the workpiece) and depth. Theoretically the exterior surface of the case (likely where you have put your tempilaq) heats far more quickly than its inner wall and all in between. Lower the frequency and the excitation has more depth. Kind of a different part of the fish so-to-speak.

From what I have seen, commercial small arms ammunition annealers operate at much higher frequencies. For example: https://inductothermhw.com/products/small-caliber-ammunition-systems/ Their systems have operating frequencies between 135kHz and 400kHz. And it would seem that a different frequency is selectable for a different use (case). Thinner case = higher frequency? Or is it that in a 'constant speed production line' that frequency is altered rather than time? Dunno. Hard to find good sources of information on this. From Ambrell (another commercial manufacturer):


I've also read of some people putting the tempilaq on the inside of the case neck. So a lot of people doing stuff very differently and all thinking they are annealing correctly. Whether any of this matters I have no idea.

After awhile you begin to have more and more respect for the proper science-based approach taken by my Kiwi brethren at AMP even if the workflow is a little more awkward.

Read your post, got me to thinking, so I ran a small experiment. Coated one of my 6BR dasher cases with Tempilaq (750). I also coated the inside of the case with the same tempilaq. Annealed it for my usual 5.45 seconds. This gives me a color change to the tempilaq, 1/4" below the shoulder. Looking into the case with a Hawkeye bore scope, I was able to measure the color change inside the case. It also was 1/4" below the shoulder, also. What ever the frequency of the GinaErick basic unit is, it does the job, inside and out. I can see a higher frequency unit, with much more power for commercial applications.
For us, re-loader's, why re-invent the wheel. Not saying to make it better, that's an on going process. But for a off-the-shelf product (annealing PCB)... it works,
 
My two posts were really aimed answering some of the questions posed lately regarding frequency, number of caps and such like. That said, I'm not sure a little tempilaq (anywhere) on the surface of a piece of brass tells us much about what's going on with its molecular structure. If commercial designs use a different frequency they likely do so for good reason. However, I certainly don't have the knowledge to take the subject further as the AMP guys have. I'm prepared to run with the tempilaq approach. ;)

What I am interested in is incremental improvement of the basic design. Auto operation based on case detection - check. (Not that this was new but I have a PCB with software that others can use if they wish.) Reasonably-priced generic (or should I say GinaErick) autofeeder - almost check. And so on. I am "intrigued" as to whether the (actually relatively expensive) induction board can be improved, particularly in regard to thermal conditions. I also like to understand how things work.

BTW you could hit circa 135kHz resonant frequency by removing two of the caps on the board. However, then the sinusoidal load would only be split across 4 caps. Better to go with 6 or more lower value caps (e.g. 6 x 0.22uF).

Now to less technical subject matter...

For those running a current limiter, approximately what current limit have you set?
And can anyone provide me with approximate annealing times for 308 brass and 223 brass?

I realise there's a decent number of variables at work but it would be easier to walk up from somewhere close as opposed to shooting in the dark?

At some point I will share some pics of my build. I haven't completed it yet because I have been so impressed by the quality of the 3D printed autofeeder parts I had printed I'm probably going to redo my shelf to 'pot' the IR switch. Kind of like this only in black:


Image 01-08-2018 at 21.46.jpg
 
Read your post, got me to thinking, so I ran a small experiment. Coated one of my 6BR dasher cases with Tempilaq (750). I also coated the inside of the case with the same tempilaq. Annealed it for my usual 5.45 seconds. This gives me a color change to the tempilaq, 1/4" below the shoulder. Looking into the case with a Hawkeye bore scope, I was able to measure the color change inside the case. It also was 1/4" below the shoulder, also. What ever the frequency of the GinaErick basic unit is, it does the job, inside and out. I can see a higher frequency unit, with much more power for commercial applications.
For us, re-loader's, why re-invent the wheel. Not saying to make it better, that's an on going process. But for a off-the-shelf product (annealing PCB)... it works,

I did the same thing last night with a 6BR case and had the same results at 5.4 seconds.

I've said it before, but I'll say it again. HUGE thank you for your design.
 
Gina that was a good idea to verify with Tempilaq inside and outside the neck. The skin effect reference probably originates in the context of processing solid objects. Think about it, with rifle cartridges they're essentially ALL SKIN cause they're hollow. With the high thermal conductivity of brass and the thin wall thickness, even if all the heat technically is generated on the outer 0.001", you'd never be able to maintain any significant temperature differential between the inner and outer walls of the cartridge.
Temperature differential along the longitudinal axis of the cartridge from the upper part of the cartridge that's in the focus of the coil down towards the shoulder I feel is a different matter. I thought it was dskogman that showed pictures (but I went back and looked and can't find them, so maybe someone else) of some cartridges annealed with his 50A ZVS and 1000W PS that he was concerned about. Whoever it was I think later posted that he lowered his PS voltage to increase the anneal time because of concern. This is just from looking at so many pictures of cartridges from people's different builds, as well as commercial brass, and my general experience over the years (Gina read as an older whipper snapper) from looking at pieces of metal that have gotten hot and changed color, but his pictures showed a very sharp line of demarcation between the annealed portion of the cartridge and that well below the shoulder, rather than the kind of blurry transition that is normally seen. Its my gut feeling that is a sign that the upper part of the cartridge was much hotter than the 950 target annealing temperature because the inductive heating was focused too much on the upper part. Its hard to explain but I think the sharp line is caused because heat was conducting down the cartridge wall to that point, rather than that point being heated directly by the induction.
 
We can get to the desired coil (roughly) very quickly and simply with a little mathematics

*** Holds up hand and waves***

On the previous page I asked " Do not the wire wound torroids also contribute inductance (its not just the tubing coil) in this calculation I was trying to do? "

I got no response so I'll ask again. I was talking about the same equation ...… f = 1/(2*Pi*SQRT(L*C))

Aren't those wire wound donut shaped ferrite cores on the ZVS board also inductors, and each have one leg attached to the end of the capacitor bank? They sure look like part of the oscillator circuit to me.
 
I've said it before, but I'll say it again. HUGE thank you for your design.


Indeed!


One thing that is bugging me having spent a bomb for this Mean Well RSP750 48V PSU is the voltage sag under load. I mean, at 12A it can only produce c37V - a mere 450W and a far cry from its rated 750W!

Gina, when you are doing those five and a half second anneals what do you see on your volt/ammeter? Maybe the PSU takes awhile to react to the transient load.
 
Last edited:
*** Holds up hand and waves***

On the previous page I asked " Do not the wire wound torroids also contribute inductance (its not just the tubing coil) in this calculation I was trying to do? "

I got no response so I'll ask again. I was talking about the same equation ...… f = 1/(2*Pi*SQRT(L*C))

Aren't those wire wound donut shaped ferrite cores on the ZVS board also inductors, and each have one leg attached to the end of the capacitor bank? They sure look like part of the oscillator circuit to me.


Now come on Bill - you already have the answer to that in your homework reading. :) Those are chokes designed to prevent from current spikes. Look at the schematic of the board. Are they parallel to the capacitance?

I'm teasing Bill because I sent him three links so that he could understand this induction board circuit better.

1. The Mazilli Zero Voltage Switching Flyback Driver

http://adammunich.com/zvs-driver/

2. The original author of the circuit and his application of the above to induction heating. A very simple circuit. Meet Marko:

https://markobakula.wordpress.com/power-electronics/500w-royer-induction-heater/

3. The 20A version sold on eBay:

https://spaco.org/Blacksmithing/ZVSInductionHeater/1000WattInductionHeaterSchematic.jpg
 
Last edited:
The skin effect reference probably originates in the context of processing solid objects. Think about it, with rifle cartridges they're essentially ALL SKIN cause they're hollow.

The skin effect applies to everything - we're talking much smaller numbers here than the thickness of a rifle case cartridge. Inside or outside, the tempilaq is being put on the skin. The AMP guys are the only ones I have seen offering a retail product where they have thought about what is actually happening to the brass. The rest of us (and I mean me as well) are just using an exterior temp indicator on the presumption that when that indicator 'indicates' the job has been done. Absent more info it's the best us guys can do. It shouldn't stop inquisitive minds from trying to find out why things like frequency seem to be an important factor in commercial applications.
 
950 target annealing temperature

950?

Awhile ago I asked what temp tempilaq people were using. I believe Gina replied with 750F. So I bought some 750. You guys have been doing this a lot longer than me.

So what is the 'right' skin temperature for annealing a rifle case cartridge? How sensitive is the process to that target temp?
 
because I sent him three links so that he could understand this induction board circuit better
Ok I'm going to stay in from recess and read it again. But in the mean time you please think about this, looking at the first circuit with the center tapped induction coil threw me off. In that diagram yes the inductor on the V+ line I would have identified as a filter, but in the second circuit diagram I CAN see the torroids as parallel to the capacitors, and parallel to the induction coil. Look at the attached file with my markup of the Noobheater circuit diagram. Isn't the blue line parallel to the red one? Please explain how I'm looking at it wrong.
 

Attachments

  • NoobHeater_Parallel.JPG
    NoobHeater_Parallel.JPG
    61.5 KB · Views: 136
Last edited:
OK. I have questions/concerns about the ammeter and voltmeter.
During various test of my unit I have seen amperage from 7.4 to 13.4 on 243s.
I have also seen readings of 25-30A depending wiring and placement of large metal things,cooling fans.
I believe that for the 243 7.5A id probably right and drawing about 250 watts. Why? because no matter what the readings were the Templiaq melted at the same time.
Thanks
 
I've ordered a couple of these CPU water blocks to attach to the bottom of the board under the caps to see what happens. $4 each on ebay.
water block.jpg
 
Ok its SGK's fault now I have ANOTHER question. On this page he referenced http://adammunich.com/zvs-driver/ not quite half way down the page it references the Zener diodes:

"The Zener diodes prevent the gate voltage from exceeding either 12, 15 or 18V depending on the zeners you use"

Anyone checked to see what voltage zeners are actually in the ZVS's we're getting. 'plain me this, isn't that Zener limiting the voltage that's applied to the MOSFET? If its limiting it to 12, 15, or even 18 volts, why are we buying 48V PS's?
 
@dskogman I was looking at this on eBay as well as a potentially better cooler for the MOSFETS. We are definitely underutilising our liquid coolant system.

https://www.ebay.com/itm/Copper-Wat...509?_trksid=p2349526.m4383.l4275.c10#viTabs_0

I think the reason the caps get so hot is because they are crappy caps being used at a much higher frequency than their intended use. So perhaps better to try to tackle the problem at source.

Wima, a manufacturer of very good film capacitors have some charts in the data sheets for their FKP series. Excerpt attached from a data sheet found while browsing for .22uf caps

Wima Caps Temp rise vs freq.jpeg

You can see how as you go up in frequency a lower Vrms sinusoidal waveform causes the same 10 degree rise in temperature. By my eye, that 1000VDC .22uF cap can handle somewhere between 70 and 80Vrms 100kHz AC with a 10C temp rise. The scope shot I took and posted above showed 77Vrms. I think I'd be rather happy with a 10C rise in internal temp. But .22uF would mean circa 135kHz and you are going to get more heat (look to the right and follow the line down for the permissible Vrms at that freq). I just happen to have this data sheet handy and haven't bothered to grab a similar one for .33uF and you'd have to do a similar analysis with the .33uF. FKP caps have very good dissipation factors. Coincidental that Marko recommended their use?

So, one thing an adventurous person might try is to replace the caps on the board with Wima FKP. They cost about $2 each. This adventurous person might also solder the middle two on the other side of the board from the other 4 thereby allowing substantially more room for air cooling. I now wish I hadn't stuck the heatsinks on the board as it increases the cost of such experiment by about $10.
 
Last edited:
Ok its SGK's fault now I have ANOTHER question. On this page he referenced http://adammunich.com/zvs-driver/ not quite half way down the page it references the Zener diodes:

"The Zener diodes prevent the gate voltage from exceeding either 12, 15 or 18V depending on the zeners you use"

Anyone checked to see what voltage zeners are actually in the ZVS's we're getting. 'plain me this, isn't that Zener limiting the voltage that's applied to the MOSFET? If its limiting it to 12, 15, or even 18 volts, why are we buying 48V PS's?


To the GATE.

You have the MOSFET part number. Look up the data sheet. What would happen if you placed 48V on the gate? (now searching for a smoke emoji...)

Don't blame the questions on me! Only critique the quality of the answers.
 

Attachments

  • 1000WattInductionHeaterSchematic copy.jpg
    1000WattInductionHeaterSchematic copy.jpg
    101.1 KB · Views: 142
Last edited:

Upgrades & Donations

This Forum's expenses are primarily paid by member contributions. You can upgrade your Forum membership in seconds. Gold and Silver members get unlimited FREE classifieds for one year. Gold members can upload custom avatars.


Click Upgrade Membership Button ABOVE to get Gold or Silver Status.

You can also donate any amount, large or small, with the button below. Include your Forum Name in the PayPal Notes field.


To DONATE by CHECK, or make a recurring donation, CLICK HERE to learn how.

Forum statistics

Threads
164,768
Messages
2,184,176
Members
78,524
Latest member
SJTUTTLE18
Back
Top