Follow along with the video below to see how to install our site as a web app on your home screen.
Note: This feature may not be available in some browsers.
This Forum is for adults 18 years of age or over. By continuing to use this Forum you are confirming that you are 18 or older. No content shall be viewed by any person under 18 in California.
(1) How much of the case are you putting into the coil ? For my 6 mm dasher cases, Almost all of the case is in the coil. Top of the neck is about 1 or 2 coil turns below the top of the coil.
(2) Low flow. When you made your coil, did you ream out (flair) the ends, before connecting it to the 1/4" copper tubing ? Cutting it with a pipe cutter tends to close the ends.
(3) if your build is a constant current build, the current should remain constant, and you voltage change with annealing time. If your not running it as a constant current build. then more of the case in the coil will increase the current, more current greater heat, faster annealing time. (without exceeding PS limits)
(4) if your annealing coil is getting too hot (and you have adequate flow through the coil) you may want to think about the radiator listed in the parts list.
(5) with no case in the coil, most builders (basic) see 8.6 amps.
(1) only 0.659" inserted - barely level to 5th coil up. body of case hardly heats at all.
(2) not only reamed, but flared some.
(3) using your listed first PS now set at 45V.
(4) coil only heats a bit and cools fast. Haven't had the nerve to touch it - just finger close. It's too quick for the temp gun to catch.
(5) I wonder if the extra .045" I.D. is the cause of the lower empty A?
I'll try more insertion depth. Just trying to keep the body cool. I was amazed that the neck went from 750deg (by Tempilac) to 84deg (by temp gun) in about 6 sec in a 72deg room while standing on cardboard.
(1) How much of the case are you putting into the coil ? For my 6 mm dasher cases, Almost all of the case is in the coil. Top of the neck is about 1 or 2 coil turns below the top of the coil.
(2) Low flow. When you made your coil, did you ream out (flair) the ends, before connecting it to the 1/4" copper tubing ? Cutting it with a pipe cutter tends to close the ends.
(3) if your build is a constant current build, the current should remain constant, and you voltage change with annealing time. If your not running it as a constant current build. then more of the case in the coil will increase the current, more current greater heat, faster annealing time. (without exceeding PS limits)
(4) if your annealing coil is getting too hot (and you have adequate flow through the coil) you may want to think about the radiator listed in the parts list.
(5) with no case in the coil, most builders (basic) see 8.6 amps.
Dawned on me - I used 12ga wire for the contactor and board. Where others saw a problem with smaller wire than yours, I used bigger.
Went in in stages. As the shelf went up the current hit 8A empty. Shelf must do something, too.
With shell inserted 1.015" (mid 7th coil up),45V, 9->11.2A at 5.4 sec melts paint a hair below shoulder. Body temp hits 105deg at base.
I will find some 6mm if I can to compare settings to yours.
Thank you.
Awwwha... so right now your running a "basic" unit. OK, explains current increase with annealing time.
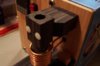
Another awwwha.... Parasitic induction !! Silly me, I didn't see it from your photo's. Of course I was not looking for it.
The closer you bring the trap door to the coil, the coil will induce inductive energy into the steel metal of your solenoid and return spring assy.
You may need a small design change, to get that away from your coil. i'm sure you can figure some thing out. Steel/iron will really pull enegry, more so than the brass.
Awwwha... so right now your running a "basic" unit. OK, explains current increase with annealing time.
Another awwwha.... Parasitic induction !! Silly me, I didn't see it from your photo's. Of course I was not looking for it.
The closer you bring the trap door to the coil, the coil will induce inductive energy into the steel metal of your solenoid and return spring assy.
You may need a small design change, to get that away from your coil. i'm sure you can figure some thing out. Steel/iron will really pull enegry, more so than the brass.
I was worried there. I removed the shelf and it still read 8A empty. Whew. Each 1V change causes .2A change empty. The PS was balancing 44.9-45V. I now have it at a solid 45V.
The magic numbers are:
.323 Mauser RP and Win brass
45V 5.7sec draws 9->11A for a perfect 1/16" below shoulder paint melt.
brass inserted .971" up (into 6th coil).
I ducted the air better thru the cooler coil and it worked well for 10 brass. If needed down the road I'll get the rad. I left room in the case for it.
BUT The rascal works!!!
"Thank you" just doesn't cover it.
My next dumb question: Does the shunt need to be isolated from any metal cabinet? If so presumably grommets need to be used. I'm wondering how I am going to mount this thing.
My next dumb question: Does the shunt need to be isolated from any metal cabinet? If so presumably grommets need to be used. I'm wondering how I am going to mount this thing.
Now that would make sense. But mine did not come mounted on a plastic bar. The nuts and bolts provided for mounting are conductive i.e. rather stupid. (And their wiring diagram doesn't even include the shunt...)
Now that would make sense. But mine did not come mounted on a plastic bar. The nuts and bolts provided for mounting are conductive i.e. rather stupid. (And their wiring diagram doesn't even include the shunt...)
In post #951, first pic shows the shunt well. 2 inner screws for the shunt - don't touch, 2 outer screws for wires, 2 outermost holes for mounting. Hope it helps.
Yup. Your enclosure is made of wood. It's odd to supply a part with mounting fixtures but without isolation when isolation is needed. I guess you get what you pay for. I'll track down some nylon nuts and bolts, as well as something to ensure complete separation from my metal enclosure.
Interestingly, anneal times are basically the same for Hornady 6.5CM cases - about 2.5 seconds. But, Lapua 6.5CM cases anneal a full second faster, at 3.3 seconds, instead of the previous 4.5.
Brands really really make a difference. For my 8x57 : head stamps "21 RPR 56", 57, 58, "S+B 8x57"(old), and "WIN 8x57" the anneal line (paint change) is .480" down - just below the shoulder. The stamp "R-P 8x57" line is .93" down and the neck is BURNT, pitted and ruined - it turned a glowing yellow/orange at about 3 sec. All were at the same coil depth and timing. I see a massive spread sheet coming of cal. vs. brands vs. batch vs. time vs. depth vs. - -
Don't buy this 3mm tubing. It's not that it is bas per se. However it is already coiled relatively small and by the time you uncoil it to wind the annealer coil you are already dealing with copper tubing that isn't the neatest. I managed a halfway decent coil but barely.
Here’s my version. Managed to get it all into an old Compaq case. I even used the PC power supply for both 12 & 5 vdc supply. I went with the 750 watt Meanwell unit and use current control with a 9 position rotary switch as suggested by GrocMax. This thing makes annealing cases easy and quick. A huge thanks to everyone that has contributed to this post with ideas, parts suggestions and help to allow us mortals to create magic.
Here’s my version. Managed to get it all into an old Compaq case. I even used the PC power supply for both 12 & 5 vdc supply. I went with the 750 watt Meanwell unit and use current control with a 9 position rotary switch as suggested by GrocMax. This thing makes annealing cases easy and quick. A huge thanks to everyone that has contributed to this post with ideas, parts suggestions and help to allow us mortals to create magic.
I added a ruler for the shelf, which beats using a caliper every change, and a funnel for the coil. Sure makes it easier to load. I found that freezing the UHMW overnight before reaming makes accurate sized holes. A 31/64" (.4844") bit didn't let a .473 brass thru at all. Freezing and reaming with the same bit made a .4844 hole. Should help other synthetics, too.
For smaller sized feed and shelf holes I made sleeves of styrene plastic sheet, beveled at the top ring edge. They didn't melt after several annealing experiments on 5.56.
Interesting comment regarding freezing. I am about to drill a piece of Delrin. I'm told that using slow speed with a spade drill bit and some dish washing liquid for coolant is the way to go. Annoyingly the pieces of Delrin I received aren't cut smoothly to size nor square and so I'm researching block planes. I wish I had a proper set of tools already.
PCBs for my automatic case detection and fan control are on their way here.
I tried the freeze/spade also. It left a very rough finish. Drilling/freezing/redrilling left a smooth wall. I used a slow feed both passes. For the surfaces I used a fine tooth tablesaw for flat, straight, dull faces, but the mill made shiney neat flats.
I added a ruler for the shelf, which beats using a caliper every change, and a funnel for the coil. Sure makes it easier to load. I found that freezing the UHMW overnight before reaming makes accurate sized holes. A 31/64" (.4844") bit didn't let a .473 brass thru at all. Freezing and reaming with the same bit made a .4844 hole. Should help other synthetics, too.
For smaller sized feed and shelf holes I made sleeves of styrene plastic sheet, beveled at the top ring edge. They didn't melt after several annealing experiments on 5.56.
This Forum's expenses are primarily paid by member contributions. You can upgrade your Forum membership in seconds. Gold and Silver members get unlimited FREE classifieds for one year. Gold members can upload custom avatars.
This site uses cookies to help personalise content, tailor your experience and to keep you logged in if you register.
By continuing to use this site, you are consenting to our use of cookies.


 glad to help. sounds like you have a good handle on it. you have joined an exclusive club.
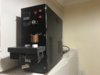


")
