• This Forum is for adults 18 years of age or over. By continuing to use this Forum you are confirming that you are 18 or older. No content shall be viewed by any person under 18 in California.

Induction brass annealer redux

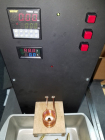
I finished my annealer and it works great! Thank you Gina and Hollywood for sharing your design. I mounted all of the components inside an old computer case and utilized some of the computer's original wiring and parts. The power supply could have been used also, but it was missing. I made the cartridge holder so that it can easily be adjusted for different length and diameter cases. I still plan to add a carrying handle to the top of the case.

Inductive annealer2.jpg Inductive Annealer0.jpg
 
I finished my annealer and it works great! Thank you Gina and Hollywood for sharing your design. I mounted all of the components inside an old computer case and utilized some of the computer's original wiring and parts. The power supply could have been used also, but it was missing. I made the cartridge holder so that it can easily be adjusted for different length and diameter cases. I still plan to add a carrying handle to the top of the case.

View attachment 990668 View attachment 990666


That's my intention also. Would you mind sending me a couple pics of the internal layout?
 
You guy's are amazing. Congrat's SKunce..... You now have a working annealer. AND you did it your way. (parts, lay out, case, etc etc.)
Hollywood and I were glad to have started the ball rolling.

Gina
 
I removed the front face of the computer case and made a new one to mount the switches, timer and volt/ammeter from 1/8" hard board. I used a push button power switch and a 10 amp relay instead of the toggle switch. I cut a hole in the top front of the case and mounted the fan to blow down onto the inductor board. I inverted the stand offs on the inductor board and mounted the coil on the underside. For the cooling system I used automotive antifreeze and distilled water for the coolant that I thinned to one part antifreeze to two parts water. I machined brass nipples to match the heat exchanger and water pump and used plumbing solder to solder them to the 1/4" copper tubing. The water pump is mounted to the top of the case and all of the cooling system components are connected with 5/16" tubing. I also machined some brass reducing bushings to connect the 1/8" and 1/4" copper tubing together. The 48 volt supply is mounted so that it vents out of the rear of the case and the voltage is also adjustable from the outside of the case.

Inductive annealer2.jpg
 

Attachments

  • Inductive annealer2.jpg
    Inductive annealer2.jpg
    2.1 KB · Views: 1,088
Last edited:
SKunce...
Nice bringing the adjustment for the 48 volt PS outside. I was thinking about that, but did not pursue it as I had adjusted the supply where I wanted it, buttoned up.
But, I was wondering how you did it ? Was there something I overlooked in that department? Did you extend the adjustment pot outside the PS? or are you using the remote PS sense line?
For me, maybe a future add-on.

Thanks

Gina

I just mounted the power supply so that the adjustment could be reached easily from the outside of the case. Both of the power supplies are mounted so that air from the fan on top of the case blows though the supplies and out the back of the case.20161003_201025.jpg
 
Hi all...
I had a PM the other day asking how uniform the annealing was with the GinaErick annealer. The following photo is 6XC cases right after coming home from the range and annealed. Picture says it all.
Total time for each case, running in auto-cycle was (5.4 seconds annealing + .5 sec drop time + 2.5 sec delay to load in next case for annealing). All 50 cases took less then 7 minutes.

case1.jpg
 
Hi all...
I had a PM the other day asking how uniform the annealing was with the GinaErick annealer. The following photo is 6XC cases right after coming home from the range and annealed. Picture says it all.
Total time for each case, running in auto-cycle was (5.4 seconds annealing + .5 sec drop time + 2.5 sec delay to load in next case for annealing). All 50 cases took less then 7 minutes.

View attachment 990881

Wow! That looks absolutely perfect. Wish I was handy with the electrical stuff.:(

Paul
 
Started fitting components into the pc case and want to check on something. I plan to leave most of the chassis front aluminum in place. Question is whether this will cause any problems the induction coil opration?
 
Good question....

Since you have your amp meter hooked up, watch the current. Only problem someone had in the GinaErick build with a front panel, was when the coil tubing went through the front panel. Even though it was insulated (through grommets) it was close enough to induce eddy currents into the front panel. This showed up in the current reading. Normal no load current is about 8.6 amps.
His was about 10.2A and the front panel was getting warm. The fix was to cut a larger opening for the tubing.

In your case, put it together and watch your no load current reading. Saw your video... Looking good.

Gina
 
Thanks for this tip. By the way, I'm just starting my build. The video was by another guy, but did look good for sure. I bought a new case for mine, which is about 1/3 as stout as the 15 year old case I threw away this summer. Might be a wood build after all. But, it will get done!

Thanks,
Terry
 

Upgrades & Donations

This Forum's expenses are primarily paid by member contributions. You can upgrade your Forum membership in seconds. Gold and Silver members get unlimited FREE classifieds for one year. Gold members can upload custom avatars.


Click Upgrade Membership Button ABOVE to get Gold or Silver Status.

You can also donate any amount, large or small, with the button below. Include your Forum Name in the PayPal Notes field.


To DONATE by CHECK, or make a recurring donation, CLICK HERE to learn how.

Forum statistics

Threads
165,500
Messages
2,196,954
Members
78,946
Latest member
ballistic bezzy
Back
Top