• This Forum is for adults 18 years of age or over. By continuing to use this Forum you are confirming that you are 18 or older. No content shall be viewed by any person under 18 in California.

Induction annealing question

Well, you know the old saying. " If you can't dazzle them with your foot work, baffle them with BS". ............... We're talking about selectively annealing a portion of a case in a home environment. Not oven annealing in a chemically controlled atmosphere environment in a factory designed specifically for industrial level annealing.................. Thus Ken Light's practical approach to the basics of annealing cartridge cases without the benefits of the above. Ken's methods ain't rocket science but produce excellent results as proven by the numerous manufacturers making annealing equipment and using his basic principles. .................. I rest my case ( pun intended)

I never said Ken Light's annealer wasn't a very good machine. It does a wonderful job. I just disagreed with him saying at 482F things start to happen like grains changing. I disagreed with one word on his website not his machine or how well it worked. I love the way some people say thanks for the info and others say nothing but negative comments. What's the comment about dazzling footwork. The data I provide as far as temperatures is accurate. Apparently you don't like me annealing in lab quality oven and reporting the hardness change. How do you determine what info you beleive in? You sound like an angry person.
 
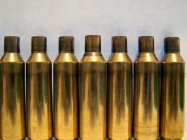
Jumping into the conversation. Here is a picture of several case (6XC) that I annealed with the prototype inductor annealer that Hollywood and I have been working on. As you can see the discoloration of the annealed area is very uniform (done with Tempilaq on the first one to set up the annealing time) in this case 5.8 seconds per case.

cases.JPG
 
I and Gina1 have developed this machine. The idea of it was mine and Gina1 helped with design of the trap door assembly and the finer design points with her background in electrical engineering.

The basics of it are a 48v power supply, 4 mode timer with adjustment down to .01 second, induction board, custom made coil assembly, pc radiator, pc fan, 12v water pump, custom made trap door assembly.

I have one up and running but finalizing some of the design aspects before I fully put it out for the public to see. Gina1 also has an earlier "prototype" version of it running.

Hollywood, your induction circuit and coil looks similar to one I bought off eBay. Where did you source a 48v power supply? All the 1/2 decent ones I've found are around $200.
 
Hollywood, your induction circuit and coil looks similar to one I bought off eBay. Where did you source a 48v power supply? All the 1/2 decent ones I've found are around $200.
It probably is the same PCB. I was able to find the correct coil dimensions so it will actually work. 2016-02-17 08.44.59.jpgIt took a few to find the right one.

The PS can be found on ebay or amazon. Absolute minimum is a 500w.
 
Thats' funny, I have a similar pile of coils on my workbench. I've been testing with a 360w (24v @ 15amps) power supply that i've trimmed out to 440w... definitely not enough power. What diameter tube, coil diameter and number of coils did you end up with?

Definitely the same induction circuit. So far the most expensive equipment is the computer water cooling setup i'm using.
 
Maybe this has been covered before but it looks like you used a similar technique with the end of the coil going into a larger tube and soldering the junction. The larger tube does not look straight so I'm assuming it's thin walled. I used heavy walled 1/4" tubing with an 1/8" hole (at least I think that's what it was). The 1/8" coil tubing would not quite fit so I got a reamer (either .126 or .127) for the heavy walled tubing and ran it in about 1/2" or so. The coil fit well and the 1/4" tube doesn't bend easily. One of the reasons I went with the heavy walled was that my electrical connection is made by slipping the tube through a brass block reamed slightly over 1/4" (maybe .128") and secured with a screw (with light pressure). I didn't want the screw to crush the tube otherwise I'd have a hard time getting it out of the brass.

Also, I believe a coil with minimum clearance ( maybe .040" - .050" per side) from the case will have better coupling than a large coil. I was concerned that the case might short some turns but found when the power is on the case self-centers. It probably depends on a number of other components but I use 6 turns.
 
I fiddled with a home brew induction annealer for a year. I finally got an Annie and once the "New product" learning phase was over, I am a happy camper. One great improvement is the flux concentrater Fluxeon uses. It is a standard pair of ferrite "c" forms with the gap cut out for a case to fit in (Stress carefully for cutting ferrite, it must be done with a water bath or you will break the ferrite.).
 
Webster, Please refer to { the art and science of annealing } in the "articles" section......... Grain structure begins to change @ 482* F. ...... Below that temp. no annealing takes place no matter how long a time period. To clarify, I was suggesting using a 450* F Tempilac stripe on the case body to monitor how far down the case annealing would actually take place so as not to soften the case head....... Tempilac doesn't make a 482* F indicator so the 450* F provides a good educated guess. Helpful on really short cases like 6 BR or 300BO.

I know more about annealing than you will ever know. 800F for 15 seconds you get about a 2 Rockwell B scale hardness drop. No grain size change observed.

upload_2018-4-11_21-57-2.png
 
Hi Guys

When doing induction annealing, how far down do you anneal ?
Using Tempilaq, and painting the whole case, the longer the case is in the induction coil, the further down the Tempilaq changes color. Do you just do the neck, or do you take is a short way past the shoulders ?
Looking for opinions.

Much thanks

Gina
I just go past the shoulder. If I leave it too long the very end of the neck gets too hot. Easy to see in a dark room. I stop at the first sign of anything over dull red. For me a 308 Lapua case reformed to 6.5CM takes about 6.5 seconds. The colour change is below the neck but not as low as the factory Lapua mark. I also use 750 templaq.
It’ll be interesting to see if I’m doing it right.....

I built one of your annealers from the instructing and help in your other post.
 
Hi Guys

When doing induction annealing, how far down do you anneal ?
Using Tempilaq, and painting the whole case, the longer the case is in the induction coil, the further down the Tempilaq changes color. Do you just do the neck, or do you take is a short way past the shoulders ?
Looking for opinions.

Much thanks

Gina

these are 30-06 done in an AMP machine.
5EBD0632-08A1-43AA-A3B5-0A40D856ABD0.jpeg

Compare to this image of factory ammo
70179D5A-10B1-405F-B193-A88BB8082B38.jpeg
 

Upgrades & Donations

This Forum's expenses are primarily paid by member contributions. You can upgrade your Forum membership in seconds. Gold and Silver members get unlimited FREE classifieds for one year. Gold members can upload custom avatars.


Click Upgrade Membership Button ABOVE to get Gold or Silver Status.

You can also donate any amount, large or small, with the button below. Include your Forum Name in the PayPal Notes field.


To DONATE by CHECK, or make a recurring donation, CLICK HERE to learn how.

Forum statistics

Threads
166,255
Messages
2,215,070
Members
79,496
Latest member
Bie
Back
Top