• This Forum is for adults 18 years of age or over. By continuing to use this Forum you are confirming that you are 18 or older. No content shall be viewed by any person under 18 in California.

Home built annealer

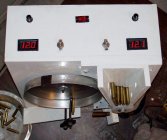
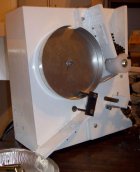
Got tired of cordless screw driver and socket, although it worked well. Fingers don't work as they used to, so I built this. It is pretty rough in appearance, but works very well. I had the plywood and paints, purchased electric motors, pwm, switches, power supply, etc. Ran around $135, which includes shipping. Now that it is done, I wish that I had spent a few more hours on the finish, but it is what it is, a tool, not furniture. A man from Shooting Australia, named Skip, came up with this design prior to me building this, design credit goes to him. Pretty easy to build. Only thing I would change is paint, hi gloss white shows every fault in the wood. A dark color would not. Time is about 7.7 seconds for my cases, which is about 450/hr. Cases spin a couple of times per second. For low volume it will work.

PS The unit looks really rough in the photos, it doesn't look quite as bad in life.

PPS I could have cut the dwell time needed nearly in half by moving the torch another inch further away from the case and using more flame, but it is not a race for me.
 

Attachments

  • Annealer 2 004 (800x672).jpg
    Annealer 2 004 (800x672).jpg
    66.4 KB · Views: 290
  • Annealer 2 002 (658x800).jpg
    Annealer 2 002 (658x800).jpg
    65.6 KB · Views: 297
  • Annealer 2 003 (653x800).jpg
    Annealer 2 003 (653x800).jpg
    55.6 KB · Views: 253
Excellent Jim. That looks a functional, workman like job. Mr longrange/skippy's rotary pan system is becoming quite a tried and tested homebuild now.
 
8" straight walled, 1" deep pizza pan. I ground off the lip, which I felt would be necessary for the cases to feed. In honesty, I did not try it with the lip, but it appeared that it would be a problem. A grinder made short work of the lip, then I put the pan on a drill press and used a file to dress the sharp edge.
 
Link is to youtube, Skips annealer, this is the original build.
https://www.youtube.com/watch?v=0-C-i0Kr2jU

I am certain that you can get better prices than what I have listed, but this is what I used

Materials List
Total materials $116.70
Shipping approx. $16.00

Number Extended
Name Product # Needed Cost Cost Supplier
23.5 volt motor 18 RPM 14204 MD 2 $12.95 $25.90 mpja.com
24 volt power supply 17428 PS 1 $14.95 $14.95 mpja.com
PWM speed control 31566 MD 2 $8.95 $17.90 mpja.com
Snap in panel volt meter 30215 ME 2 $5.95 $11.90 mpja.com
On/Off switch – optional 25002 SW 2 $0.75 $1.50 mpja.com
On/Off switch 120volt 30184 SW 1 $1.25 $1.25 mpja.com
18 g wire for inside connections ?cost 1 $5.00 $5.00 Lowes
Shaft coupler 1/4 to 5mm 2 $5.00 $10.00 Ebay
Aluminum pizza pan 8" straight wall 1 $4.00 $4.00 ` ??
2 1/4" X 1' UHMW Rod 319-4779 1 $8.80 $8.80 Enco.com
various 3-.5mm bolts, nuts, washers 1 $10.00 $10.00 Ace Hardware
1/4" nuts and washers quantity ? 20 $0.20 $4.00 Ace Hardware
1/4 rod (could use bolts) 12" or 18"
I threaded as needed 1 $1.50 $1.50 Lowes

Plywood 1/2" and or 1/4" scraps or what ever is available, used for case bin and motor mounts
I used aluminum brackets I had from newel posts left over from when I was gainfully employed, but
wood scraps will work, for mounting front surface items
Paint I had on hand. Used Hi temperature 2000 degree paint and primer for case stabilizer rod, and scrap aluminum to mount it.
Used antiseize for all hi temp areas.
2 pieces of plastic cut from a coffee can lid as spacers/stops
soldered all connections, had solder on hand.
Electric cord and scrap 120 volt wire I had
 
I also built one inspired by Skip with a few differences. I made an enclosure with a removable front face. I used .200" Finnish plywood so the box is nice and light. You can't edge-fasten ply this thin so I added 3/8" corner sticks along all the inside edges and used glue to assemble the enclosure.

_DSC3271

I mounted EVERYTHING on that front face, so that when you remove four corner fasteners, all the working parts come out leaving the empty enclosure behind. That way you can work on the guts without having wires going to other components fastened to other parts of the box. It does make the enclosure an inch taller and an inch wider, but the convenience of having all the components on one flat sheet and completely accessible is a nice feature.

I used a extension hose for the torch head so that the propane bottle can sit on the floor. That makes it easier to mount and aim the torch.

Most folks position the case stop rod (the 1/4" rod which holds the case in position near the bottom of the pan) so that it's in the flame. It gets real hot. I did a little extra bending and tucked the rod inside the cake pan so that it doesn't get as hot. That's an easy mod and works great.

Other than that, mine is a close copy of the one Skip designed and I am grateful to him for publishing details about his device. It works great and is actually one of the most fun parts of reloading.
 
Jim Casey said:
Mozella, your finished product looks superior to mine. Jim
Thanks for the compliment. Now that yours is complete, the pain of working on the components and doing wiring inside a box rather than out in the open is over, so no need to remount your components on the front face. Putting everything on the front face is mainly advantageous during the construction, not so much after you're done.

However, your case stopper assembly looks to me like a good deal of it is right in the flame and I imagine it gets real hot.

If you have a piece of 1/4" steel rod you could bend up something like mine and remount yours. From your photos, it looks to me like you could use the same mounting hardware and simply relocate the mounting point to just outside the 11 o'clock position of the cake pan. That should keep your case stopper rod from becoming so hot. I suspect the change would be cheap, easy, and quick. Something to think about anyway.
 

Upgrades & Donations

This Forum's expenses are primarily paid by member contributions. You can upgrade your Forum membership in seconds. Gold and Silver members get unlimited FREE classifieds for one year. Gold members can upload custom avatars.


Click Upgrade Membership Button ABOVE to get Gold or Silver Status.

You can also donate any amount, large or small, with the button below. Include your Forum Name in the PayPal Notes field.


To DONATE by CHECK, or make a recurring donation, CLICK HERE to learn how.

Forum statistics

Threads
166,253
Messages
2,215,024
Members
79,496
Latest member
Bie
Back
Top