• This Forum is for adults 18 years of age or over. By continuing to use this Forum you are confirming that you are 18 or older. No content shall be viewed by any person under 18 in California.

Do it yourself Stock making thread

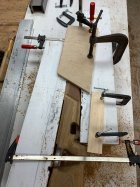
those look like my clamps!! if thats a stock blank though i dont quite see how its clamped
edit- oh now i see it- mabie you are clamping strips on the side?

your table looks nice and flat—- mine isnt- i think thats why i stared using the saw for glueing stuff. need to fix the table for sure.
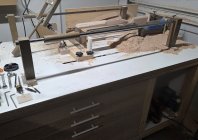
The white surface is new. I replaced the old one because it had curled from using particle board under plywood. The new is all plywood @ 1 1/2”. Glued and screwed.
IMG_1805.jpeg
 
Last edited:
Here’s my work center:
View attachment 1692775

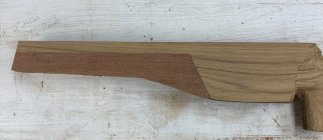
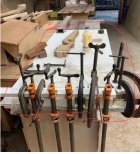
The blank in the clamps. 3/8” strips outside a 1 1/2” center. The inside piece is bland with a few knots. The white boards protect the walnut from clamp damage.
View attachment 1692777View attachment 1692776

This one is promising. I split the board because it wasn’t thick enough. Thin strips in the center.
View attachment 1692778

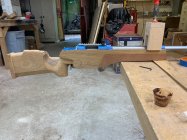
After that, Mesquite:
View attachment 1692779
the work center looks good--thanks for all the pics- my actual wood working table needs attention to the top for sure.. Oh that one table you have about as much stuff as i do on my table!!! - good idea how you glued that blank together. i usually glue 3--- 3/4 thick pieces together. --- looks like its time 4 you to go shoot some now
 
the work center looks good--thanks for all the pics- my actual wood working table needs attention to the top for sure.. Oh that one table you have about as much stuff as i do on my table!!! - good idea how you glued that blank together. i usually glue 3--- 3/4 thick pieces together. --- looks like its time 4 you to go shoot some now
My wifey calls it chaotic. I think it’s managed chaos.
3-3/4” boards works fine usually. I have a bunch of 2” rough cut boards. They come out in different thicknesses by the time I get them flattened out. Making 1/4” to 3/8” pieces is a pain but they can be more interesting.
I’m in a groove and the clock is ticking. No time to shoot. I want to get these shaped as far as I can before the migration to Texas.
A new stock for my 6.5x47. The old stock goes on a 300WSM build.
A new stock for a 30-06 build.
The new stock for the Tikka 6.5x55.
A new stock for a 6.5x284
And a couple Christmas presents.
 
Last edited:
My wifey calls it chaotic. I think it’s managed chaos.
3-3/4” boards works fine usually. I have a bunch of 2” rough cut boards. They come out in different thicknesses by the time I get them flattened out. Making 1/4” to 3/8” pieces is a pain but they can be more interesting.
I’m in a groove and the clock is ticking. No time to shoot. I want to get these shaped as far as I can before the migration to Texas.
A new stock for my 6.5x47. The old stock goes on a 300WSM build.
A new stock for a 30-06 build.
The new stock for the Tikka 6.5x55.
A new stock for a 6.5x284
And a couple Christmas presents.
lol if i had a wife Im sure she would use words like disaster for my place. ill leave you alone for now since ur on the tite schedule— later
 
The good old radar carve i ended up putting mine on fully supported linear rails . I mounted these to 150x50 x 5 mm rhs made a massive difference to stiffness
 
That will come up looking nice. While you glue and shape up Josh. Im on over watch at a local chook farm they have an issue with a couple foxes at the moment. Bloody cold out here can tell you that much
 
Thank you, Papa! It’s nice of you to say that.
I tried a couple F Class type stocks. I’m not too good at it. Maybe because I don’t have a design . I’ve done a couple of the Master Sporter styles with a long fore end and a flat butt. . I’m kinda stuck in my niche. I read about guys making them and how they “keep tolerances to the thousandths so they track right”. I can’t do that with my hand sanding and crude tooling so I stay away from that puddle.
 
Last edited:
What type of ftr stock do you have at the moment. If you put a pic up mite have an idea or 2 on how you can use in open.
Thank you, I have a Chassis which would only require adding a slider up front.

I have thought about building an F Open rifle. I like what I saw from Josh's work and was just wondering if he had ever built an Open rifle stock.
 
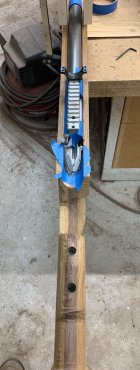
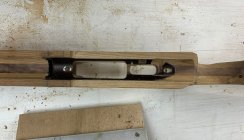
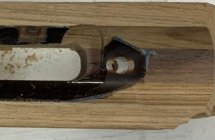
Back to the build, With my pillars set, I cut for the magazine, trigger and safety. Then I flipped it over and used my template to route out for the PT&G bottom metal. I put the bottom of the pillars at the same level from the top of the jigs to make the cut. With the bottom metal in and screwed to the action, I can use a bearing bit to finish cut the trigger opening.
IMG_1817.jpegIMG_1818.jpegIMG_1820.jpeg
 
Sorry you’re freezing!
I’m toasty! My shop is 75 degrees. Perfect for bedding an action.
View attachment 1693639View attachment 1693640
*so you preglue the pillars in before doing the final bedding job? like Jstock
*how do you set and hold the pillars at a certain height?
*what is the block of wood on barrel channel? ive used something like this to level top offorend to gun.
* ive bin using pillars made of devcon for awhile and i havent cared if they stuck out past the action however ill have to do this one like the old days. as you know not much tang on a reminton to cover apillar and still get it substancially glued— ive had them come loose before. you must have youre pillars matched so they are the correct length for your bottom metal?____ more fun to come!

have a safe trip!
 
1.*so you preglue the pillars in before doing the final bedding job? like Jstock
*2.how do you set and hold the pillars at a certain height?
3.*what is the block of wood on barrel channel? ive used something like this to level top offorend to gun.
4.* ive bin using pillars made of devcon for awhile and i havent cared if they stuck out past the action however ill have to do this one like the old days. as you know not much tang on a reminton to cover apillar and still get it substancially glued— ive had them come loose before. you must have youre pillars matched so they are the correct length for your bottom metal?____ more fun to come!

have a safe trip!
1&2. No. I do it all in one. I measure and cut my pillars. (Put everything together and check function. Sometimes a pillar is a little long.) Then I lock them to the bottom of the waxed action with bolts. I’ll spread my bedding compound in the stock, the holes and coat the pillars. Set the barreled action in the stock, press it in and check for level. Leave it overnight.
3. Exactly! The shims under the forend are making it level as clamped. It leaves room to slip in the barreled action.
4. I buy the aluminum pillar blanks 10 pair at a time. I cut them to length on my miter saw using a homemade fixture. Tape wrapped around the bolts keeps the pillar centered. I drill a 5/8” hole for the 9/16” pillars leaving room for the epoxy bedding. Gotta spread bedding in the holes and goop up the pillars. In the morning, I unscrew the bolts and drill out the extra epoxy with a 5/8” Forstner bit, careful not to hit the pillar.
Trade secret: I put a steel washer on the bottom of the pillar before I lock it to the action. The Forstner bit will hit the steel washer and spin it loose, leaving the pillar undamaged.
Plenty of room to cover the pillar in the rear.
IMG_1823.jpeg
Not leaving yet!
 
Last edited:
1&2. No. I do it all in one. I measure and cut my pillars. (Put everything together and check function. Sometimes a pillar is a little long.) Then I lock them to the bottom of the waxed action with bolts. I’ll spread my bedding compound in the stock, the holes and coat the pillars. Set the barreled action in the stock, press it in and check for level. Leave it overnight.
3. Exactly! The shims under the forend are making it level as clamped. It leaves room to slip in the barreled action.
4. I buy the aluminum pillar blanks 10 pair at a time. I cut them to length on my miter saw using a homemade fixture. Tape wrapped around the bolts keeps the pillar centered. I drill a 5/8” hole for the 9/16” pillars leaving room for the epoxy bedding. Gotta spread bedding in the holes and goop up the pillars. In the morning, I unscrew the bolts and drill out the extra epoxy with a 5/8” Forstner bit, careful not to hit the pillar.
Trade secret: I put a steel washer on the bottom of the pillar before I lock it to the action. The Forstner bit will hit the steel washer and spin it loose, leaving the pillar undamaged.
Plenty of room to cover the pillar in the rear.
View attachment 1693999
Not leaving yet!
thanks for all that good info—
 
I cut the top chamfer with a 15 degree bit.
IMG_2969.jpeg
Cut the bottom edge with a 3/4” round bit.
IMG_2972.jpeg
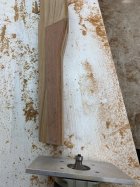
Tried a different side cut with a 1” core box bit, then cut the rest of the side with a 3/4” flat bit. I took off 3/16” of wood.
IMG_2973.jpeg
Then I bedded the recoil pad in epoxy and the leopard wood grip cap. It will sit overnight.
IMG_2974.jpeg
 
Last edited:
I cut the top chamfer with a 15 degree bit.
View attachment 1694152
Cut the bottom edge with a 3/4” round bit.
View attachment 1694153
Tried a different side cut with a 1” core box bit, then cut the rest of the side with a 3/4” flat bit. I took off 3/16” of wood.
View attachment 1694154
Then I bedded the recoil pad in epoxy and the leopard wood grip cap. It will sit overnight.
View attachment 1694155
something happened to my 1st post. i was wondering how you did those things lately and i do have a model i can go off. bin thinking how i will do the different operations. power washing house today and ladder fell over and i fell off and hit the ground. went to ER— compression fracture— seems ill bee okay. thanks for the info. im looking forward to working on this one…
 

Upgrades & Donations

This Forum's expenses are primarily paid by member contributions. You can upgrade your Forum membership in seconds. Gold and Silver members get unlimited FREE classifieds for one year. Gold members can upload custom avatars.


Click Upgrade Membership Button ABOVE to get Gold or Silver Status.

You can also donate any amount, large or small, with the button below. Include your Forum Name in the PayPal Notes field.


To DONATE by CHECK, or make a recurring donation, CLICK HERE to learn how.

Forum statistics

Threads
166,771
Messages
2,223,977
Members
79,848
Latest member
Rugersdad
Back
Top