Follow along with the video below to see how to install our site as a web app on your home screen.
Note: This feature may not be available in some browsers.
This Forum is for adults 18 years of age or over. By continuing to use this Forum you are confirming that you are 18 or older. No content shall be viewed by any person under 18 in California.
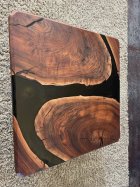
Next up is a Mesquite stock with a turquoise fill. It has some bigger cavities so I’m going to use larger chunks of stone. Should be fun, but more involved. We’ll see how it goes. It’s going to be cut for the Winchester M70 for my friend.View attachment 1485459View attachment 1485460
Josh, you do amazing work. That piece of Mesquite will look amazing once the voids are filled. Looks like it will need some bow ties or steel pins to add back strength. At least that is what I would do. Looking forward to seeing this one progress.
Josh, you do amazing work. That piece of Mesquite will look amazing once the voids are filled. Looks like it will need some bow ties or steel pins to add back strength. At least that is what I would do. Looking forward to seeing this one progress.
I was just cutting and fitting chunks of stone for the bigger cracks. Once the cracks get filled with the slow cure epoxy, I’m pretty sure it will be as strong as a solid piece of wood. Take a look at @nakneker ‘s table.
I was just cutting and fitting chunks of stone for the bigger cracks. Once the cracks get filled with the slow cure epoxy, I’m pretty sure it will be as strong as a solid piece of wood. Take a look at @nakneker ‘s table.
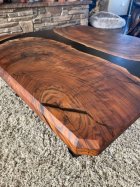
My son made our tables in the living room, one is epoxy and walnut, the two end tables are epoxy and Russian Olive, at least we think it’s Russian Olive, found a big wood burl in a creek and brought it home using the tractor. Anyways, those tables are tough, he goofed up on one and we intentionally tried to break it, it finally broke but not where epoxy meets wood. The finish is baby butt smooth too, neat stuff.
I was just cutting and fitting chunks of stone for the bigger cracks. Once the cracks get filled with the slow cure epoxy, I’m pretty sure it will be as strong as a solid piece of wood. Take a look at @nakneker ‘s table.
I am sure that you (@joshb) and @nakneker are correct. The resins that I have experience when I think about it are from 40 years ago and I have a tendency to over build things.
My son made our tables in the living room, one is epoxy and walnut, the two end tables are epoxy and Russian Olive, at least we think it’s Russian Olive, found a big wood burl in a creek and brought it home using the tractor. Anyways, those tables are tough, he goofed up on one and we intentionally tried to break it, it finally broke but not where epoxy meets wood. The finish is baby butt smooth too, neat stuff.
I am sure that you (@joshb) and @nakneker are correct. The resins that I have experience when I think about it are from 40 years ago and I have a tendency to over build things.
That's gonna look awesome Josh. Is that the guy that woke you up at 4:00am? I bet it's hard to get mad at him...he looks like your helper...
EDIT: if you were going to inlay a coin, would you cover the top of the coin with resin/epoxy? Or would you leave that with just the coin on the surface?
That's gonna look awesome Josh. Is that the guy that woke you up at 4:00am? I bet it's hard to get mad at him...he looks like your helper...
EDIT: if you were going to inlay a coin, would you cover the top of the coin with resin/epoxy? Or would you leave that with just the coin on the surface?
Yup! That cute fluffy golden doodle bitch(emphasis here) is doing her best to either drive me crazy or kill me. My wifey’s pick instead of my German Sheppard choice. My “wifey’s dog” has decided she’s my dog and I can’t go anywhere without her. If I do, I pay for it with chewed up slippers!
I’ve done the coins covered and exposed. I use Silver Liberty quarters, so they would just tarnish when left exposed. I like having Lady Liberty on my stocks. Seems appropriate in these times. Covering them brings on the problem of bubbles in the epoxy. That can be dealt with but you have to keep checking for them over a four hour period.
Ah, it's a her...my sister has the exact same doodle, but her's is a he. Too bad you're not closer...LOL Those should be good hunting dogs...
Yes, you describe the problem I'm anticipating. I have a Ben Franklin $0.50 piece, no Walking Liberty in my year...but it has a liberty bell on the back. My Grandfather gave it to me.
And I was thinking about bubbles and/or permanent cloudiness would be an issue. I wasn't sure if it could be poured over a polished coin, mine is not clean, it came out of a cash register.
When I get to my stock, it's something I'm considering. I have that piece of redwood I'm saving.
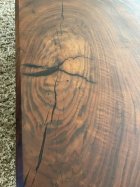
I packed the one side with stones and a thick slurry of epoxy and turquoise dust, sealing the cracks. I let it harden for two days, then ground it down with a Diamond wheel and palm sander. A dose of alcohol showed the results.
I flipped it over, formed some tape damns and crammed more stones in the crack. I stirred up some more epoxy and added some colored mica powder and started to pour it over the stones to fill the whole crack. This takes time and patience as the epoxy slowly seeps in and you have to add a little more….and a little more. After an hour, I was still dripping epoxy in so I knew something was wrong. I hadn’t covered the bottom with tape and epoxy was dripping out of a few pinholes. I taped it up and started dribbling again. Another half hour and I was done.
That needs 2 days to harden up, so in the meantime I’ll try to make some bowls out of some oak burls I found.
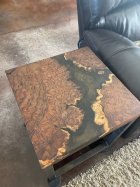
I was ready to start inletting the stock, but did an inspection of the cracks. I decided to fill them first on this one. Too many in the wrong places. The bowl is a royal PIA! Every time I sand the filler, more holes open up! (I fixed the problem, Nick! I bought bigger ash trays!) When all my trash cans are filled with saw dust, I’m not inclined to empty them quickly!
This Forum's expenses are primarily paid by member contributions. You can upgrade your Forum membership in seconds. Gold and Silver members get unlimited FREE classifieds for one year. Gold members can upload custom avatars.
This site uses cookies to help personalise content, tailor your experience and to keep you logged in if you register.
By continuing to use this site, you are consenting to our use of cookies.