Follow along with the video below to see how to install our site as a web app on your home screen.
Note: This feature may not be available in some browsers.
This Forum is for adults 18 years of age or over. By continuing to use this Forum you are confirming that you are 18 or older. No content shall be viewed by any person under 18 in California.
I've also started rounding the grip front with my palm sander and bringing my thumb groove around with my 3/4" drum sander. I'll use the line I drew from my gripping the stock as a guide.
Notice that I had a little "oops" with my router. I'll deal with that later.
When sanding the thumb groove, stay above the cheek piece cut line. You want a nice curved sweep up off the line.
I'm starting to get things roughed in. I want to focus on the grip now but I have to start forming my butt to work on the area around the heel of my palm. I'll dissolve the "mystery" of how to get the nice, smooth curves. We're going to sand facets. You draw lines on the stock and sand flat between the lines. Continue with smaller and smaller facets until you get the curve. See? Easy as pie, when you break it down! The challenge is in the use of the disc sander. KEEP IT MOVING!! You want to use a constant speed of motion, forward and back. It's like a Waltz. Starting at the rear. 1 2 3 forward, 1 2 3 back. Stop, look at your progress and repeat. I use the side handle to control my angle , check it and adjust if necessary between passes. With 60 or 80 grit, these sanders remove a lot of wood, fast. It's best to mark a piece of scrap wood and get a feel for it before you do the stock. If the speed of wood removal makes you feel nervous, drop down a grit to 100 or 120.
To get my lines, I hold a straight edge along my butt plate template and mark where the edge meets the surface. Then I measure the distance to the mark from the bottom, Mark that distance near my grip, and draw the line. You're going to remove more material as you use finer sand paper so I leave 1/8" of wood around my template to start.
Clamp your blank down and sand . The lines give you a good indication of how evenly you're sanding, too.
After a couple passes, I see my angle is off so I adjust.(above)
Done. I'm off my line a little but , more important, I have an eight inch of wood left from the edge of my template. Now I'll make two more lines and repeat.
Notice that I touched the grip area a little but that's enough and I'll stay away for now, with the disc sander.
My lines on the bottom and another picture angle of the grip area.
Marking the next set of lines.
Notice that I touched the grip area a little but that's enough and I'll stay away for now, with the disc sander. View attachment 1009012 View attachment 1009013
My lines on the bottom and another picture angle of the grip area.
Marking the next set of lines. View attachment 1009015
Hi Josh I hope you are feeling better. I am just getting ready to drill the guard screw holes. This takes some long drills. Anyway i have a couple questions i hope you can answer.
Page 5 #95 How do you decide how far to route the action channel past the rear of the tang?
What are those heavy black marks across the top of the wood a little behind the tang?
When bedding the stock pillars it looks like the action is sitting right on the wood. Is that true
or will it get changed?
Thanks, Kim. I'm dragging but feeling better, every day.
The black mark is a magic marker line showing me the start of the angle down at the end of the action cut/grip area. The action channel gets cut a little past that. There is a gap between the angle and the cheek piece so I end the cut there. (Last sentence in #92)
One of the main reasons for doing this maple stock is so every one can see the lines I draw. I started the walnut Tikka stock but noticed pretty quick that the pencil lines don't show up in the pics. As for the bedding, I layed a little material around the top of the pillar holes in the rear and a little more around the action in the front. When I finalize the bedding, I'll goop up everything so I get another layer on top. I don't proscribe to any "certain" thickness for bedding, really. I use it to fill the gaps between the stock and action, with a thin layer over my pillars. Read other threads on this forum for the expert opinions on that and do as you wish. I'm not the expert on it.
So, I've drawn some more lines and sanded more facets. I got out my palm sander, put some 100 grit on it and started smoothing things out on the butt.
Getting close, so now I'm back to focusing on my grip. I keep "grabbing" and sanding until it feels good in my hand. I flip the blank several times to get both sides close to where I want it, sanding a little here and there as I go. Once I feel it's close, I redraw my curves for the final forming. I'll go for looks, now. I want a nice curve at my edges and I'll smooth out the rough spots. Notice that I have a mark at 4 1/2 inches from the end of my cheek piece. Stop there.
Now, I'll use my palm sander to smooth things out and work to the new lines.
I'm just using the outer edge of my sander. Keep it moving. It will cut a groove if you let it. Just brush the surface in a slow motion.
Now that I'm close to where I want to be with my grip, I grab a piece of 80 grit and sand with my thumb to take off the high spots, blend in to the low spots and take off any edges on the grip. Then I hit it again with 120 grit.
I still have some fine tuning, but I'll do that with 150 grit , later.
I have big hands and long fingers. I like a bigger grip. You can take it down to where you like it. On the back side, I use my little drum sander to make a groove for my middle finger.
Flipping over to the other side, it's time to prep for the adjustable cheek piece hardware. I want to use the flat sides of the blank to lay this out. I need to have the cheek piece installed to sand my facets and form the top of the butt. I have to wait for my order to come in, but the specs are on line. You can go by the print or wait. Either way, there are a few things to know. You want to keep the lock screw end 1/16 to 1/8 " below the finished surface. Measure to your butt template at that line and write that down.
Add 1/8" to that and draw that distance on your cheek piece flat cut. Base your lay out from there. Measure your centerline 2 1/2" from the rear for your center. Make your total length 1/8" longer than actual part dimension. Drill your 7/8 holes 1/8" deeper for the ends and drill 1/2" holes 2" deep for the upper hardware holes. Trust me on this. I've done a few of these. You want a little play. With the slight oversize, the hardware swings on the lock screw. When we put it together, the upper hardware will set the final position when you epoxy it in. You want your final A.C.P. receiver hardware 1/16-3/32 below the wood of your cheek piece stock surface. You'll drill the hole on the side for the lock screw, accordingly.
Do NOT drill this side hole all the way thru your stock! I don't have the hardware, so I can't give you the exact length. Drill 1 1/2" deep for now and wait for the hardware. I'll post the procedure when I get it.
And please hold the comments about the fubar on the cheek piece route, between my 7/8 holes. I set the stock in my jig and nailed in my stop. Problem was, my nail gun ran out of nails and my stop moved when I hit it. Filler! Oops!
Here's another stock with the hardware roughed in. I tried to do this one " perfect" I was off on my depth cut by 1/16" at the front. When I epoxied it in, the base is angled slightly backwards. The cheek piece binds when it rises, so I'll have to sand a slight gap on the rear of my cheek piece.
Here's a stock that I didn't get the screw depth set right. Notice the shiny sanded end. I'll keep pointing out my mistakes! It will let you feel better if you screw up and let you see that you can recover from minor miscuts. I make most of my mistakes when I rush the process to try to get done faster.
Going back to the other side, I'll start forming that "strip" above the grip. I'm just going to angle it gently into the stock. I sanded with the disc sander first, then used the palm sander. It's really just extra wood to strengthen that area.
Well, try to stick with it. It makes no never mind to me, as to progress. There aren't any deadlines, here. I'm trying to get the steps posted before I get pulled in another direction. Someday, I would like to see pics of finished stocks by the guys that did one. I'm just saying that it's not that hard to make something nice for one's self. Something to enjoy by one's own handy work, and pass along.
Well, try to stick with it. It makes no never mind to me, as to progress. There aren't any deadlines, here. I'm trying to get the steps posted before I get pulled in another direction. Someday, I would like to see pics of finished stocks by the guys that did one. I'm just saying that it's not that hard to make something nice for one's self. Something to enjoy by one's own handy work, and pass along.
ill keep at it and get it one of these days. Dont get to spend much time on it each day. I sure have read this thread many times. One question is where do i get the spiral bit with 3" cutting length? I may have to use a drill to cut my trigger inlet thanks
I'll dig that info out. I have a lot of catalogs.
Update: My upcut 1/2" spiral bit has a 2" cutting surface and is about 3 1/2-4" long. My memory is going. I shoulda checked, first.
Second update: I found it! Eagle America part # 106-0965 solid carbide 2" cut ,4" length, 1/2" bit. $60 Sorry for the confusion. Josh
Man, I've been following along on this from the beginning just soaking up all the info, great work! I have a new barreled action I'm picking up tomorrow and now have even more of a reason to attempt this. I'm quite good with tools and have the patience of a fence post, so this is right in the ball park for me, however I really do not have a need or desire for the 3 position style stock. I'm more interested in a prone style, any ideas on where I can get a pattern from, or anyone willing to trace out an accurate pattern of something along the lines of a T2, etc?
I have been wanting to do a cedar laminate with carbon fiber between the lamainates, make a reasonably strong and light stock.
That's easy! Just take my pattern and draw a straight line from your bottom metal depth at the action to the end of the fore end. That "flare" below the action area is superfluous to the structure of the stock. I like it because it hides the mag. Here's one with some of that cut away. What's left of the angled portion is for an internal mag on a Hunter Benchrest action. You could bring the flat cut straight back to the grip for a single shot action.
The main purpose of this thread is to enlighten shooters about stock making. You don't have to be a rocket scientist to do this. With a few simple jigs and tools, you can make custom stocks for yourself and save thousands of dollars in the process. My apologies to the "stock sellers" on this forum.
Man, I've been following along on this from the beginning just soaking up all the info, great work! I have a new barreled action I'm picking up tomorrow and now have even more of a reason to attempt this. I'm quite good with tools and have the patience of a fence post, so this is right in the ball park for me, however I really do not have a need or desire for the 3 position style stock. I'm more interested in a prone style, any ideas on where I can get a pattern from, or anyone willing to trace out an accurate pattern of something along the lines of a T2, etc?
I have been wanting to do a cedar laminate with carbon fiber between the lamainates, make a reasonably strong and light stock.
Your right on the strong and light part, but you forgot the -look crosseyed at it and it will dent part ---
I have a 700 inletted and ready to go if you need one bad enough...
Your right on the strong and light part, but you forgot the -look crosseyed at it and it will dent part ---
I have a 700 inletted and ready to go if you need one bad enough...
Oh, I know how soft cedar is, I would do a layer of s-glass on the outside for impact resistance. I work in composites and plastics industry, so I can get it done right.
My gun is singleshot, is the stock you have inletted for BDL?
This Forum's expenses are primarily paid by member contributions. You can upgrade your Forum membership in seconds. Gold and Silver members get unlimited FREE classifieds for one year. Gold members can upload custom avatars.


")


 It will let you feel better if you screw up and let you see that you can recover from minor miscuts. I make most of my mistakes when I rush the process to try to get done faster.
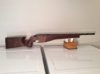


")


