Follow along with the video below to see how to install our site as a web app on your home screen.
Note: This feature may not be available in some browsers.
This Forum is for adults 18 years of age or over. By continuing to use this Forum you are confirming that you are 18 or older. No content shall be viewed by any person under 18 in California.
Where within this 'rant' can one find constructive criticism?
Looks a whole lot like 'Well, that's not how I would have done it.' to me.
The Southbend 'How to Run A Lathe' book is more trouble than it's worth. If that is what you are evaluating this thread on then no wonder you're upset. Ever try applying the advice therein? Yeah, it's crap.
Sad, but true.
Unfortunately, qualifications are not verified before publication of a book.
Secret To Life, Phase One.
My butt-hole mentor insisted that I made an octagon from 1" cold rolled steel with a flat file. Then He couldn't believe it when I'd done it.
But no matter about me. The man is making progress. Like it or not.
'If you can't explain it simply, you don't understand it well enough'.
Your the first guy I have ever heard that ran down that South Bend Book. Are you with the required qualifications to claim to a probe, that book is crap?
Appears to be a lot of chatter there. What's wrong? Stick with HS until you have it figured out, HS is a lot more forgiving than carbide. If you start buying inserts and holders all you will learn is how to reach for your wallet and which tools to buy, not how to grind a tool from a blank.
mram10 , thanks for this thread ! You’re learning and so are a lot of us right along with you. I’m looking forward to getting my shop built and learning just like you. You certainly need thick skin around here and it’s a good thing I don’t run the place or the banned hammer would drop a lot more often than it does.
Thank goodness for SomeOldGuy and many others who have offered good advice. I feel sorry for TRA. His “Instructing me” comment shows his heart. If we may get back to critiquing my thread making (chip making) ....
Off to check my latest threading tool. I’ll make sure it’s as perfect as I can make it, verify it’s centered and do another piece for grading. I’ll pull an action apart this morning so we can see if they fit right. Just gotta build a barrel puller Have an action wrench already. Thanks again gents. See ya in a couple hours.
The thing we must remember about the South Bend lathe book is those tools were ground for the old rocker tool post so they have a lot of rake on them. For our rigid tool posts we can get away with much less rake. Actually a rocker tool post is pretty good in some situations as it will allow you to get in closer to the tailstock than the larger square tool posts will allow without an extended tool holder.
The rocker tool post can be modified with a flat washer of the correct thickness to do away with the rocker so it makes it more rigid. The trouble is that you need tooling that is pretty close or you will have to shim the holder up. You can make a tool holder for the rocker post that takes 1/4" bits hand ground to your satisfaction. If I can get the time and summon up the skill to post a picture of the thing I'll post it so everyone will have another target to shoot at.
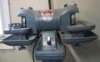
Carlsbad asked about grinder recommendations earlier in this thread. Mram10, I don't think you've told us about how you're grinding your tools. I still use the cheap import bench grinder I used before I got into machining. I went through several grey wheels grinding HSS; my mentor insisted that I do everything with HSS and grind all my tools from blanks. When he let me use carbide, it was only brazed carbide tools that I still had to grind myself. I got a diamond wheel for my bench grinder and it is very nice for putting that razor sharp finished edge on HSS or carbide.
My cheap bench grinder:
Picked up a nice diamond wheel for $20. I don't know what the nomenclature means (except the Max RPM):
One of my brazed carbide threading tools:
A miniature internal threading tool I made for 1/2-28 threads:
It looks like my file is too large to upload. I do this pretty infrequently so I'm going to have to relearn. I tried to send using my camera hoping it would be small enough but no dice.
You are just spitting the wind trying to learn to grind a tool bit and run a lathe at the same time. Been there. Start with a professional ground bit or insert first. If the thread ain't right then at least you know it's not the bit. To me a new gearhead lathe is not the optimum to learn on. The first time you crash it you will see what I mean. Good luck,have fun and enjoy the journey. I'd stay off the forums some, too many opinions.
I have one just like this...the table makes grinding HSS and carbide much more pleasurable than a pedestal. Got a diamond wheel on one side and AO on other. Picked mine up at an auction for $220. Been a life saver. I grind all my HSS and cemented carbide on it...even touch an insert up now and then just to get more life out of them...
I have a couple upright sanders and an old grinder I used for making knives. For my 5/8 hss, I scribed the profile I wanted on it, clamped it in the vise and used a cutting wheel to get it close. Then I took it to an AO 80 grit sanding wheel with 8deg rake to finish. I know it isn’t the best, but I’ll get a better process.
I have one just like this...the table makes grinding HSS and carbide much more pleasurable than a pedestal. Got a diamond wheel on one side and AO on other. Picked mine up at an auction for $220. Been a life saver. I grind all my HSS and cemented carbide on it...even touch an insert up now and then just to get more life out of them...
That's just plain nonsense. Learning to hand grind turning/facing tools, drill bits and threading tools is part of learning lathe work. Always has been, always will be!
I can multitask
Here is #11.... I think. Measurements turned out +/- .001 on everything! Very happy. Shoulder needs to be better. Threads still don’t look smooth. The last couple passes I used .003, .001 and .001 on the compound to finish them. I sanded them again to 1.060. Should I leave more of an edge on the threads? Maybe I should take more small bites? Glad I measured my new recoil lugs. They are 1.065. Next time I’ll cut the shank to 1.065 for the recoil ug and 1.060 behind the relief cut. Critiques yet again please
View attachment 1030215View attachment 1030216View attachment 1030217 I can multitask
Here is #11.... I think. Measurements turned out +/- .001 on everything! Very happy. Shoulder needs to be better. Threads still don’t look smooth. The last couple passes I used .003, .001 and .001 on the compound to finish them. I sanded them again to 1.060. Should I leav more of an edge on the threads? Maybe I should take more small bits? Glad I measured my new recoil lugs. They are 1.065. Next time I’ll cut the shank to 1.065 for the recoil ug and 1.060 behind the relief cut. Critiques yet again please
something doesnt look right about the threads but it may just be the light reflection. Hard to tell. How wide is that unthreaded area the recoil lug goes over? Id stop with the sandpaper -youre wasting your time with it. just practice until you get nice threads. i sometimes use scotchbrite to clean them up thats it. I did it on my own the same way as youre doing it a couple years ago. I would buy a hss insert and tool from warner and use it and also keep working and learning on grinding a tool. that way you can see the difference in threads they cut. and get that action without a barrel so you can try these in it. it would be good to get the threads the proper depth and see how they look then. The threads dont have to look that great to work well but they do have to fit in the action. Just go back and look at that tenon pic Alex Wheeler posted.
View attachment 1030215View attachment 1030216View attachment 1030217 I can multitask
Here is #11.... I think. Measurements turned out +/- .001 on everything! Very happy. Shoulder needs to be better. Threads still don’t look smooth. The last couple passes I used .003, .001 and .001 on the compound to finish them. I sanded them again to 1.060. Should I leav more of an edge on the threads? Maybe I should take more small bits? Glad I measured my new recoil lugs. They are 1.065. Next time I’ll cut the shank to 1.065 for the recoil ug and 1.060 behind the relief cut. Critiques yet again please
mram10... I've been watching this post silently since the beginning and I'd just like to say you've came a long ways in just a short time. You have some of the best mentors on this site and with their guidance I'm absolutely positive you will have this mastered sooner than you think. Keep up the hard work, it's paying off.
Puzzaz , thanks and you’re right about the correct guidance. They’ve been a huge help.
Hoz, the relief was cut at .280 from the shoulder. I was going to clean it up .010 more but decided to leave it cause it was getting late. The recoil lug is .300 wide, so I wanted .010 play when it’s all said and done. I’ll do another one this morning without sanding the threads and making the tenon 1.065 for the recoil lug and 1.060 for the threads. I will try smaller bites near the end of threading.
You still look like your getting chatter and/or tearing the material off and not cutting it. Show us a picture of your threading tool, like some one has mention before once you have a nick or burr on your threading tool it needs to be address or your surface finish will be compromised. So far I think your threads on picture #71 post look the best what did you change? but then again it could just be the pictures some times are out of focus.
Contents:
1 bar 1/2 inch shank 5.0 inches overall length
Minimum bore: 1.375 inch
For 8 through 36 pitch 60 degree threading
End pocket: offset for OD and ID threading
1 Insert T-15 High Speed Steel TNMC 32 NV
IC: .375 inch
Thickness: .125 inch
Hole: .150 inch
1 Insert T-15 High Speed Steel TPMC 32 NV
IC: .375 inch
Thickness: .125 inch
Hole: .150 inch
Back rake: 10 degree
You've come a long way, but you still have some scalloping on your thread walls. It's probably always been there but hard to tell from all the other problems you've solved along the way. This could be from a number of things so it'll be hard to diagnose. It could be the geometry of your threading tool not giving sufficient clearance and rubbing below the cutting edge. It could be from cheap or poorly adjusted spindle bearings. It could be a bad spot on one or more gears in the gear-head. It could even be harmonics from a single-phase motor (I've seen it go away just going to a 3-phase motor).
This Forum's expenses are primarily paid by member contributions. You can upgrade your Forum membership in seconds. Gold and Silver members get unlimited FREE classifieds for one year. Gold members can upload custom avatars.


") Have an action wrench already. Thanks again gents. See ya in a couple hours.
Have an action wrench already. Thanks again gents. See ya in a couple hours.


")

