• This Forum is for adults 18 years of age or over. By continuing to use this Forum you are confirming that you are 18 or older. No content shall be viewed by any person under 18 in California.

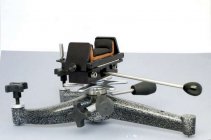
Bald eagle front rest mod

Yes, that's correct. It stops the rod just spinning inside the bearing.
On the knob side I used the actual knob as the 'lock nut' on the outside.
Used a locknut on the inside.
The far end (away from the knob) gets a locknut each side of the bearing.
Lock up the knob end first, then do the far end (that stops any hint of binding).
It really does work very smoothly, and doesn't take a lot of effort.
Main thing is to get those threaded holes drilled straight so that the rod ends sit level with each other.
The big advantage (apart from the smoothness) is the extra traverse (left to right) that you gain, because you do gain all that area currently taken up by the return springs.
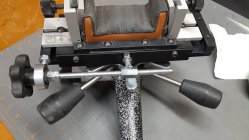
Edit: I just found my original photos.
This one shows the lock nuts, and I had forgotten that I used a nylock nut at the far outside end so that nothing would spin loose.
It just occurred to me as I looked at this photo that a clever person could just use longer side rails and put plain bronze bushes in there (instead of using rod ends). I don't know, but 'maybe' the rod ends will offer a smoother operation though? Plus rod ends are self aligning and bushes aren't.
One extra advantage...the windage knob is nearer to the shooter. You don't need to reach so far forward to operate the knob.

View attachment 1547482
That there is a great ''cob job'' This is a complement, not an insult in any way.
 
Thank you guys for your responses. I can't wait to see your version of it!
Just in case some of you are wondering about my front 'bag'...I had to make my own out of a high density foam to suit my Oryx chassis. No skinny bags were available. I cut the foam with my little bandsaw to keep the edges nice and straight, and then just glued it all together (Gorilla Glue, Ados F2, etc).
The foam 'bag' lasted about 2 years for me and still going OK for the new owner of that Bald Eagle.
 
I don’t have a Bald Eagle rest anymore. I sold both of mine that I modded to remove the cable. So I can’t look to see if this will be a dumb question/suggestion or not…

But if you milled your own new end plates to align the springs , couldn’t you just thread the new end plate to match the finer threads and put the adjustment back in its original place?

Maybe mill an other new end plate a little thicker for more thread contact?
 
I really like the mod done by @Grey Kiwi and will be doing that or something similar.

I have been toying with shortening the threaded shaft, eliminating the rod end on the right side, and replacing the threaded coupling with two nuts J-B welded to the added plate.

Here's a picture of what I'm thinking. I would appreciate feedback on this.

View attachment 1547861
I think yes/maybe.
Would you need a support though at the point where you cut the rod? Otherwise it would waggle a bit maybe? Or is that where one of the nuts will go?
It would be an easy test though as the threaded rod is sold in a 1m length usually (1 yard in USA?).
So you would have plenty to spare if you needed to go back to the longer rod.
I'd say 'give it a go'.
Oh, and we want photos too please.
Thanks.
Edit: But the 2 nuts idea has the minor drawback of aligning the 2 threads correctly so that they are synced together (so they don't bind). Would the 2 single nuts have enough surface for the JB Weld to grip? I like your idea but maybe a connector nut to get the extra length (larger surface for glue to grip)? But worth trying and no harm if it's not quite right...you can always fit a connector nut if the 2 single nuts idea doesn't quite work.
Maybe attach the end nut first? Then when JB Weld has set you can wind out the rod, insert the inner nut and wind rod in again to get it synced? The JB Weld is fine though. Mine hasn't moved, or cracked, etc. still as solid as the day I did it. The new owner uses the rest for indoor and outdoor shooting. It's working absolutely fine still.
Once I had mine working and could see any problems (and I just remembered this)...I pulled it apart and put a dab of epoxy (JB Weld, or Loctite would do. I used Araldite) on the thread of the rod end and screwed them back in. That's because I thought I could see a wee bit of sideways play on the rod ends as I turned the knob back and forth (rod end threads maybe a tad looser than my tapped hole threads).
I wanted to make sure there was no backlash happening.
 
Last edited:
I don’t have a Bald Eagle rest anymore. I sold both of mine that I modded to remove the cable. So I can’t look to see if this will be a dumb question/suggestion or not…

But if you milled your own new end plates to align the springs , couldn’t you just thread the new end plate to match the finer threads and put the adjustment back in its original place?

Maybe mill an other new end plate a little thicker for more thread contact?
I originally thought of that...but the main shaft (the up and down bit) connects up through that line with a large screw holding the bag holder gadget on. Then I also had the problem of drilling a hole all the way across the slide for the rod. I even thought maybe just a hole going ½ way across with a threaded insert in the slide.
I did scratch my head a bit at first trying to figure out that approach, but the threaded rod mod removed all that problem...plus gave me a knob closer to my hand (which I found to be a great help for me).
 
Last edited:
I think yes/maybe.
Would you need a support though at the point where you cut the rod? Otherwise it would waggle a bit maybe? Or is that where one of the nuts will go?
It would be an easy test though as the threaded rod is sold in a 1m length usually (1 yard in USA?).
So you would have plenty to spare if you needed to go back to the longer rod.
I'd say 'give it a go'.
Oh, and we want photos too please.
Thanks.
Edit: But the 2 nuts idea has the minor drawback of aligning the 2 threads correctly so that they are synced together (so they don't bind). Would the 2 single nuts have enough surface for the JB Weld to grip? I like your idea but maybe a connector nut to get the extra length (larger surface for glue to grip)? But worth trying and no harm if it's not quite right...you can always fit a connector nut if the 2 single nuts idea doesn't quite work.
Maybe attach the end nut first? Then when JB Weld has set you can wind out the rod, insert the inner nut and wind rod in again to get it synced? The JB Weld is fine though. Mine hasn't moved, or cracked, etc. still as solid as the day I did it. The new owner uses the rest for indoor and outdoor shooting. It's working absolutely fine still.
Once I had mine working and could see any problems (and I just remembered this)...I pulled it apart and put a dab of epoxy (JB Weld, or Loctite would do. I used Araldite) on the thread of the rod end and screwed them back in. That's because I thought I could see a wee bit of sideways play on the rod ends as I turned the knob back and forth (rod end threads maybe a tad looser than my tapped hole threads).
I wanted to make sure there was no backlash happening.
Yes - you raise some good points and I'm not sure about the answers. Hope to get to the hardware store today if the roads aren't too icy. A length of 5/16"-18 all-thread and miscellaneous pieces and we'll see. I'll post some photos.
 
Yes, that's correct. It stops the rod just spinning inside the bearing.
On the knob side I used the actual knob as the 'lock nut' on the outside.
Used a locknut on the inside.
The far end (away from the knob) gets a locknut each side of the bearing.
Lock up the knob end first, then do the far end (that stops any hint of binding).
It really does work very smoothly, and doesn't take a lot of effort.
Main thing is to get those threaded holes drilled straight so that the rod ends sit level with each other.
The big advantage (apart from the smoothness) is the extra traverse (left to right) that you gain, because you do gain all that area currently taken up by the return springs.
Edit: I just found my original photos.
This one shows the lock nuts, and I had forgotten that I used a nylock nut at the far outside end so that nothing would spin loose.
It just occurred to me as I looked at this photo that a clever person could just use longer side rails and put plain bronze bushes in there (instead of using rod ends). I don't know, but 'maybe' the rod ends will offer a smoother operation though? Plus rod ends are self aligning and bushes aren't.
One extra advantage...the windage knob is nearer to the shooter. You don't need to reach so far forward to operate the knob.

View attachment 1547482
Nothing wrong just like this. Are the springs still in place for tension. Is there more horizontal travel?
Good job Don.
 
Here is how I modified mine. It is a descent rest now.
 
Here’s how I did mine. I used the rod end that was on the frame holding the cable. It’s not perfect… I need to do some fine tuning on the jam nuts and may use one spring to reduce play. We’ll see. I changed to different knob… I like this one better. Excuse the weld job…should have used JB Weld.

IMG_0178.jpeg

Edit: fined tuned setup. Added one spring that seems to take out slack/backlash in whole system. Had to clean all thread … had stuff on threads from manufacturing. Will get out this week for use test.
 
Last edited:
Nothing wrong just like this. Are the springs still in place for tension. Is there more horizontal travel?
Good job Don.
No springs. Yes...more travel.
To take up any slack that may develop in the threads a layer of tape behind the mounting plate 'tightens' the threads. No springs needed to take up the slack then.
 

Upgrades & Donations

This Forum's expenses are primarily paid by member contributions. You can upgrade your Forum membership in seconds. Gold and Silver members get unlimited FREE classifieds for one year. Gold members can upload custom avatars.


Click Upgrade Membership Button ABOVE to get Gold or Silver Status.

You can also donate any amount, large or small, with the button below. Include your Forum Name in the PayPal Notes field.


To DONATE by CHECK, or make a recurring donation, CLICK HERE to learn how.

Forum statistics

Threads
165,271
Messages
2,192,599
Members
78,786
Latest member
Vyrinn
Back
Top