• This Forum is for adults 18 years of age or over. By continuing to use this Forum you are confirming that you are 18 or older. No content shall be viewed by any person under 18 in California.

Another Shooting Bench Project

Great idea, well executed too. That puppy should last you your entire lifetime.
Very impressed with your tidy shop, the way it should be. Good job sir.
 
Thanks for the compliments everybody. I really enjoy people sharing ideas on this forum and like doing so myself.

My above pic was kind of blurry making it hard to see details, so snapped another pic just now. The pins with white handles can be removed to detach the pole from the axle assembly, and the pole slides out between the rear legs. You could also remove only the upper pin, allowing the pole to drop towards the ground (when the bench is sitting on the three feet). If a person’s shooting stool would then straddle the pole, you could sit directly behind w/o fully removing the pole itself.

The larger two pins where the axle pivots can also be removed to separate the axle from the frame. As it turns out, the axle isn’t at all in the way of my feet, like I thought it might be.

If anyone would like the Solidworks files, just holler.

View attachment 1379627View attachment 1379628
Nice! That’s perfect ;)
 
That's one of the best benches I've ever seen fabricated. I built my own concrete bench two years ago and wished I'd followed some of the steps you outline. I did use the melamine board but did not use the platicizer. I too had the small pinholes. I ended up just using Eagle sealant to coat my bench top. Not perfect but it did create a weather barrier and made the bench top more of a glaze.
 
Again, thanks everyone for the kind words!

I’m currently working on the top and side surfaces of the concrete, using a slurry of Portland and the bonding agent Menard’s sells, to fill pinholes. This slurry dried a much lighter color than the concrete. I thought those filled pin holes would look better if darker than the surrounding concrete, rather than lighter. My wife had some Rit die in the drawer so I added some of that to the 2nd coat. Was that a bad idea? Not sure how UV stable that stuff is?

Maybe a sealer could provide UV protection? There are so many different sealers to pick from.
@vonb, I checked the Eagle sealant websight; they offer so many different part numbers!

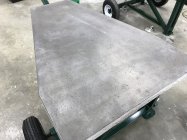
If I were doing this again, one improvement I would make, is drill & tap the top end of the threaded posts welded to the rebar. Then it could be screwed in-place to the Melamine form. It was a hassle keeping it positioned accurately and was much more difficult than I imagined to tweak it once covered in concrete. Those threaded holes on the top surface would later offer attachment points for things. I used stainless steel for those posts. I had reduced the posts‘ diameter to about .2” where they contacted the form, thinking the top surface would look better with tiny SS circles rather than the 1” hex. But in the process of repositioning the rebar weldment, I think pea gravel may have gotten under a couple of those threaded posts as not all of them now show through the top surface of the concrete.

I finally grabbed the bathroom scale to measure tongue weight. I thought it felt less that what I initially estimated it to be, and guessed it was 50lbs. But no, it’s a few lbs more that the initial 90lb estimate. I measured 94lbs. Maybe I’m just strong…ha ha. Moving them around the shop, I found the balance point to be when the tongue is about waist high. So it doesn’t feel very strenuous pushing them around the shop.

The force you have to push down on the lift handle to raise the bench, measured 36lbs. That’s not a great deal, but when letting the tongue back up (to lower the bench), you have to be ready for it. I could see it smacking someone not engaged in what’s going on.

In the raised position the feet are 4” off the floor (when the tongue is parallel to the floor). The concrete’s center of gravity could be moved a bit more over the axle to reduce the lifting required. That would increase the pushing force required to raise it. Maybe 2 1/2 or 3” ground clearance would be enough? If so, the leverage ratio could be made accordingly to require less pushing force to raise it. But with less ground clearance it would be less forgiving on the ball height of the vehicle moving it.
B00C8338-5162-4673-BD0E-6EC69103BFCF.jpeg
 
Last edited:
You did a great job here, I wish my brain worked like that! I'm curious if this is going to sit on flat/level/stable ground? If not, would it make sense to attach trailer tongue jacks to all three points on ground contact.
On a side note, there's really no reason to mix up a slurry mix to fill those pin holes but you're a member here so you probably are touched by the OCD bug.
 
You know, I had thought about making it with trailer jacks. I used them on an off-road camping trailer and they worked pretty well if you angle them outward & forward/backward, to help prevent wiggling. I hadn’t come up with an elegant solution using them that would accommodate the axle, etc. They could just be attached to the existing frame legs I suppose.

At the farm where I’ll be using this, it would temporarily sit in either of two locations. So I thought I’d roughly level those two spots where the bench will be used. Another thought was to take advantage of the lifting feature, to place shims (dfferent thicknesses plywood?) under the legs to level it. I thought about attaching some sort of rack or basket to hold plywood shims or one of those army surplus folding shovels.

I plan to pick up one of those round bubble levels and stick it out of the way on the front lower crossmember. It’s stuff like this that prevents me from falling asleep at bedtime!
 
Last edited:

Upgrades & Donations

This Forum's expenses are primarily paid by member contributions. You can upgrade your Forum membership in seconds. Gold and Silver members get unlimited FREE classifieds for one year. Gold members can upload custom avatars.


Click Upgrade Membership Button ABOVE to get Gold or Silver Status.

You can also donate any amount, large or small, with the button below. Include your Forum Name in the PayPal Notes field.


To DONATE by CHECK, or make a recurring donation, CLICK HERE to learn how.

Forum statistics

Threads
165,830
Messages
2,204,061
Members
79,148
Latest member
tsteinmetz
Back
Top