• This Forum is for adults 18 years of age or over. By continuing to use this Forum you are confirming that you are 18 or older. No content shall be viewed by any person under 18 in California.

Another Shooting Bench Project

BuffaloBill

Silver $$ Contributor
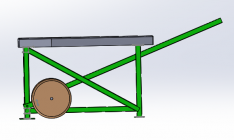
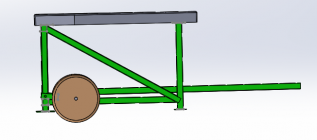
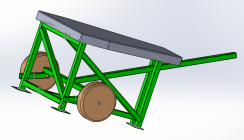
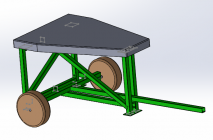
I have a farm to use as a gun range, but a permanent bench would in the way of farming activities. So I’m thinking about making one as shown below. The top would be concrete and shaped/dimensioned similar to those I read people liked at the St. Louis range (if I found the right discussion threads).

I believe the tongue weight would be about 90lbs with a total weight of about 550lbs. As drawn the tubing is 2” square. I liked the use of diagonals for rigidity and smaller tubing, as opposed to larger tubing w/o diagonals. I’m thinking 11ga wall thickness for the axle/tongue ass’y and 14ga for the rest of the tubing.

Do you think the axle ass’y is taking up too much foot room?
 

Attachments

  • 8EC30434-C8A9-4C45-A8CD-0C8C071F01F7.png
    8EC30434-C8A9-4C45-A8CD-0C8C071F01F7.png
    38.9 KB · Views: 101
  • 3C03C462-CF81-42E2-908D-F48C48603746.png
    3C03C462-CF81-42E2-908D-F48C48603746.png
    31.3 KB · Views: 98
  • 038B0104-BEDC-4B8B-9F10-E08BA424903A.png
    038B0104-BEDC-4B8B-9F10-E08BA424903A.png
    115.1 KB · Views: 100
  • AB4F0A97-3310-4607-9BC1-EA6FFEF15659.png
    AB4F0A97-3310-4607-9BC1-EA6FFEF15659.png
    71.5 KB · Views: 102
You will need a pin/latch mechanism to hold the handle down to wheel around and have to bend over pickup handle to move(potential for back injury). Maybe a screw jack on each front post, lowers wheels on to the ground for moving, handle than becomes a lever (with axle more centered).
 
A brief update on my project:

I took the forms off the concrete tops today, and attached them to the bench frames. Will have to slide the bathroom scale under the tongue to see what weight I’m lifting when attaching to the tractor or atv. My guess is 50lbs(?).

I did tie the frame together beneath the concrete, and added a lift handle as suggested. I powder coated the frame pieces hunter green.

I poured the concrete the way people make inverted cast concrete countertops. And as expected, there are many small pinholes in the top surface. I want to fill those. I read about people making their own slurry using Portland & water, sometimes with an added binder. Also read about pre-packaged countertop fillers. Do any of you have a recommendation on a specific product?

This was a fun project and I’m looking forward to shooting off them.

Thanks for your input.

0CCA7FA1-16BA-4573-AAB9-8C2E2459AB63.jpegDD2EA5BA-C079-4003-8BE6-793461F727A5.jpeg5B25F8B8-54A4-4231-BE0C-97C6065CB851.jpeg
 
Last edited:
Really cool bench and nice work!

Being the devils advocate, I would say that if the design allowed the shooter to sit directly behind the rifle instead of off to the side it would be a winner for me ;)
Maybe a swing away trailer tongue?
 
Thanks for the compliments everybody. I really enjoy people sharing ideas on this forum and like doing so myself.

My above pic was kind of blurry making it hard to see details, so snapped another pic just now. The pins with white handles can be removed to detach the pole from the axle assembly, and the pole slides out between the rear legs. You could also remove only the upper pin, allowing the pole to drop towards the ground (when the bench is sitting on the three feet). If a person’s shooting stool would then straddle the pole, you could sit directly behind w/o fully removing the pole itself.

The larger two pins where the axle pivots can also be removed to separate the axle from the frame. As it turns out, the axle isn’t at all in the way of my feet, like I thought it might be.

If anyone would like the Solidworks files, just holler.

CF98852B-264E-4365-B9F0-1882750CDB63.jpeg730E7386-F696-4B6B-9E95-4A85385C3B8B.jpeg
 
Last edited:
Thanks for the compliments everybody. I really enjoy people sharing ideas on this forum and like doing so myself.

My above pic was kind of blurry making it hard to see details, so snapped another pic just now. The pins with white handles can be removed to detach the pole from the axle assembly, and the pole slides out between the rear legs. You could also remove only the upper pin, allowing the pole to drop towards the ground (when the bench is sitting on the three feet). If a person’s shooting stool would then straddle the pole, you could sit directly behind w/o fully removing the pole itself.

The larger two pins where the axle pivots can also be removed to separate the axle from the frame. As it turns out, the axle isn’t at all in the way of my feet, like I thought it might be.

If anyone would like the Solidworks files, just holler.

View attachment 1379627View attachment 1379628
What a outstanding job on that bench!
I’m most impressed by the way you made your attachments in the concrete to where it will be bolted to the bench.
 
Portland cement and water slurry should do fine. Rub with increasingly finer stone(s) to achieve the finish that you want. Then maybe a sealer.

Even if it develops cracks, it should stay together due to the rebar. If you allow it to cure properly, I doubt you'd ever break it in half just by moving it...

Clean looking job, sir.
 
That's about the nicest looking bench I've ever seen,at home or at any of the ranges in my area!I bought one from Legacy Shooting Products a couple years ago that's pretty nice,the U-shaped model you sit directly behind with four adjustable legs that stow underneath the table top.
 
Thanks for the compliments everybody. I really enjoy people sharing ideas on this forum and like doing so myself.

My above pic was kind of blurry making it hard to see details, so snapped another pic just now. The pins with white handles can be removed to detach the pole from the axle assembly, and the pole slides out between the rear legs. You could also remove only the upper pin, allowing the pole to drop towards the ground (when the bench is sitting on the three feet). If a person’s shooting stool would then straddle the pole, you could sit directly behind w/o fully removing the pole itself.

The larger two pins where the axle pivots can also be removed to separate the axle from the frame. As it turns out, the axle isn’t at all in the way of my feet, like I thought it might be.

If anyone would like the Solidworks files, just holler.

View attachment 1379627View attachment 1379628

That is some fine engineering right there. Very, very impressive.

Can you explain how you poured the top?
 
That is some fine engineering right there. Very, very impressive.

Can you explain how you poured the top?
Thank you! I used the method and suggestions from YouTube vids of people pouring countertops:

I added about 1 1/2oz of a super-plasticizer to each 80lb bag of Quikrete, using the minimum starting water amount. For the flavor Quikrete I used that was 6 pints. Mixed it in a harbor freight mixer and poured it in the form with the rebar weldment already in place. No wheelbarrows or pails. No having to transport concrete, etc.

The plasticizer made it very fluid. The top surface of the bench top is at the bottom of the form, etc. A buddy helping me, troweled the top of the concrete (which is actually the bottom of the benchtop), while I cleaned up the equipment.

The form was made with 3/4” Melamine panel, held together with 2 1/2” screws. I reinforced the outside corners of the melamine with thin metal strips and additional 3/4” screws. Six days later (which was yesterday) I bolted the frames to the tops and flipped it upright using a gantry crane. I found the concrete had shrunk enough to allow lifting the form off the top in one piece. I had caulked the corners of the form to both make it water tight and to create a radius on the top’s edges.

The plasticizer I used is Melflux 2651F. I found 1lb bags for sale on Amazon.

Not having much concrete experience, I chose not to try and create a radius on the bottom edges, fearing I would dork up the sides with an edging tool. So I hope to grind/sand a small radius there.

I covered the freshly poured tops with plastic and did not heat the shop’s floor during those six days.
05B7CA95-AC4C-49D1-B727-329A21A891EE.jpeg
 
That's about the nicest looking bench I've ever seen,at home or at any of the ranges in my area!I bought one from Legacy Shooting Products a couple years ago that's pretty nice,the U-shaped model you sit directly behind with four adjustable legs that stow underneath the table top.
Thank you!
That one would be nice to carry to your hunting spot. I made a similar light weight one years ago, sandwiching 2” foam between thin plywood paneling. The legs are 2” exhaust tubing and store inside. I kept an eye out for cheap 2” aluminum tubing to save weight but that never happened.
 

Upgrades & Donations

This Forum's expenses are primarily paid by member contributions. You can upgrade your Forum membership in seconds. Gold and Silver members get unlimited FREE classifieds for one year. Gold members can upload custom avatars.


Click Upgrade Membership Button ABOVE to get Gold or Silver Status.

You can also donate any amount, large or small, with the button below. Include your Forum Name in the PayPal Notes field.


To DONATE by CHECK, or make a recurring donation, CLICK HERE to learn how.

Forum statistics

Threads
165,810
Messages
2,203,677
Members
79,130
Latest member
Jsawyer09
Back
Top