Florida Wally
Gold $$ Contributor
Very interesting. Thanks for taking the time to share your findings.
I refuse to spend $1 on hardness testing. It's really simple just anneal till it's red maybe hold a couple seconds longer. There is no other way to anneal that makes sense. I anneal till its red for a couple seconds. If you squeeze the neck with pliers, it still has a lot of stiffness compared to a new cartridge. I know a lot about annealing and this is what I choose to do.Me too but I’m mostly interested in what the target says.
I bought an Ugly Annealer a couple of years ago and have used it to anneal 1000’s of pieces of brass.I refuse to spend $1 on hardness testing. It's really simple just anneal till it's red maybe hold a couple seconds longer. There is no other way to anneal that makes sense. I anneal till its red for a couple seconds. If you squeeze the neck with pliers, it still has a lot of stiffness compared to a new cartridge. I know a lot about annealing and this is what I choose to do.
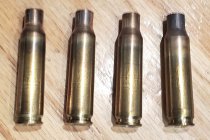
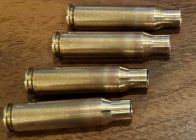
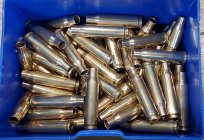
I've already processed that box of Lapua cases and have some loaded up and ready to go to the range. But, just for YOU, I fired up my annealer and I grabbed some range brass sitting around and ran them through at 10 seconds.@Straightshooter1 Can you post a photo of the 10 second brass anneal? Curious what color the brass gets to.


No. The necks and shoulders are much softer than what's at the web. The brass actually get harder as you move down the body to the base.So, a few questions about annealing too much. I ask this because of the comments about “flaming“ the brass too long and softening too much of the brass. Isn’t the entire case the same hardness (or softness) when it’s new
Not necessarily. It all depends on the annealing process being used. You got to keep in mind what happens with the annealing is a function of the amount of heat being used AND the amount of time in the heat.and does annealing make the annealed area softer than when brass is new?
Softening too much can certainly be a problem, as a fully annealed case neck won't hold onto the bullet and you'd be able to push a bullet in and out with your hand. That's not something you want and having it too soft could result in not being able to extract the case since there'd be no springback and it's be wedged into your chamber and/or the case could rupture. You want your cases to springback so they can be ejected and that requires some hardness to the brass. If it's too hard, then the case can split as it resists expansion when fired. You want something in-between to work properly and there's plenty of room in-between to do so.Is softening too much of the case really a problem or is it just something we keep reading on the internet? If we are making the neck softer than when brass is new then it makes some sense but if annealing just returns it to factory specs then it doesn’t.
Hmmm??? 250°C/480°F for how long?To stress relieve cartridge brass, the recommended temperature is around 250°C (480°F).
While annealing the neck shoulder area, the lower case body may get stress relieved, a good thing.
Less chance of case head separations.
The one good place to use Tempilaq in teaching neck annealing was to demonstrate to the students how the heat propagates down the case body. (That is also a back-handed way of saying the internet lore of using the 750F on the necks is not a good method.)To stress relieve cartridge brass, the recommended temperature is around 250°C (480°F).
While annealing the neck shoulder area, the lower case body may get stress relieved, a good thing.
Less chance of case head separations.

You’re a heck of a guy! Thanks. But if I’d worded my question more clearly it would have said “photo during the annealing process to see how red the necks get”. Don’t sweat it man. I’m gathering that my annealing is a bit on the conservative side and need to get the necks hotter.But, just for YOU, I fired up my annealer and I grabbed some range brass sitting around and ran them through at 10 seconds.
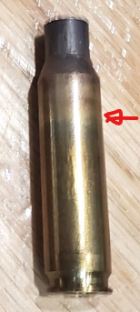
And it should be noted, like on this Winchester brass, the thinner the brass the faster it'll heat up and that "patina" is further down the case body than the others having used the same amount of heat and time.The one good place to use Tempilaq in teaching neck annealing was to demonstrate to the students how the heat propagates down the case body. (That is also a back-handed way of saying the internet lore of using the 750F on the necks is not a good method.)
By painting a stripe of 400F Tempilaq down the case body and then running it through the process, the trainees got to see how far down the body the 400F line would go.
Generally, even when using a relatively "slow" flame annealing time, the 400F goes roughly a body diameter below the body-shoulder junction, and less when regular rates were used.
If you noticed the "patina" created on Straighshooter1's brass photos, somewhere about the end of that patina is where the 400F level would be seen. This level is way above the level where the case body tends to fail due to stretching. YMMV
View attachment 1609198
Yes, in fact if you study the user's manuals on rigs like the AMP, you would see their recommendation to manage the process with the average brass weight for this exact reason.And it should be noted, like on this Winchester brass, the thinner the brass the faster it'll heat up and that "patina" is further down the case body than the others having used the same amount of heat and time.
I do seek both sizing consistency AND bullet seating consistency. For sizing, I measure shoulder bump for it's consistency; and I find the rest of the case is pretty consistent (e.g. at the .200 mark and neck diameter). For bullet seating, since I use an arbor press and LE Wilson seating die, I can feel any significant seating variations and I measure the CBTO's. Not long ago I pick up the Accuracy One to measure seating depth and it's showed me I tend to have .0005 variation, if any (I attribute that little variance due mostly to my sorting the bullets by BTO where it's measured where the seating stem makes contact with the ogive).We have member that I believe works with Capstone, he might shed some light on Lapua’s annealing process. Maybe @barefooter56 will weigh in.
A question for Straightshooter1~ what is the end result you are seeking ?
Is it sizing consistency or bullet seating consistency or both and how are you confirming the results ?
Thx for testing and sharing.
Jim
The use of an AMP press these days will rival some of the industrial labs in terms of feedback on neck prep.I do seek both sizing consistency AND bullet seating consistency. For sizing, I measure shoulder bump for it's consistency; and I find the rest of the case is pretty consistent (e.g. at the .200 mark and neck diameter). For bullet seating, since I use an arbor press and LE Wilson seating die, I can feel any significant seating variations and I measure the CBTO's. Not long ago I pick up the Accuracy One to measure seating depth and it's showed my I tend to have .0005 variation, if any.
Yeah, I really do like that AMP press and briefly considered purchasing it. Then, like you mentioned, once spending some time with it, I couldn't see myself using it that much once having determined the case prep process that worked best. If I knew someone close by who had one, I'd certain ask to borrow it for a bit, just to get some hard data (I like hard dataThe use of an AMP press these days will rival some of the industrial labs in terms of feedback on neck prep.
You can even say it bypasses all of that esoteric metallurgy background. Nothing wrong with using the Wilson force packs or similar to sense the seating force, I am just bringing it up as a teaching tool.
Any time we study the grip of the case on the projectile, that force is the product of the integrated work and pressure between the neck and the bullet times the friction coefficient, so managing the friction coefficient is as important as the sizing. Don't underestimate the effects of chamfer, flare, or crimp. (I know Straighshooter1 is way past this, but I am writing it for the rookies that read here.)
If I were to start a student today, showing them the effects of annealing, neck prep, cleaning etc., would also include those seating forces. Teaching ballistics always includes the targets, but you guys get the point. AMP presses are not cheap, and one can argue that once the student has spent some time with one, they may or may not need to keep using one.
Educating rookies is expensive but leaving them ignorant will cost society more in the long run. YMMV
I use that seating comparator also, I’ve been seeing .0005 in a very small percentage 10% with an occasional .001 tossed in. I can live with that as I sit those aside for sighters.I do seek both sizing consistency AND bullet seating consistency. For sizing, I measure shoulder bump for it's consistency; and I find the rest of the case is pretty consistent (e.g. at the .200 mark and neck diameter). For bullet seating, since I use an arbor press and LE Wilson seating die, I can feel any significant seating variations and I measure the CBTO's. Not long ago I pick up the Accuracy One to measure seating depth and it's showed my I tend to have .0005 variation, if any (I attribute that little variance due mostly to my sorting the bullets by BTO where it's measured where the seating stem makes contact with the ogive).
The AMPS website has accurate hardness values along the entire length of cartridges.I bought an Ugly Annealer a couple of years ago and have used it to anneal 1000’s of pieces of brass.
Brass is too expensive to be losing them as often as I was and figured I’ve paid for the Ugly already, a couple of times! And that’s about all I can tell you about annealing.. Well, it makes the brass softer, now I’ve told you everything I know!
So, a few questions about annealing too much. I ask this because of the comments about “flaming“ the brass too long and softening too much of the brass. Isn’t the entire case the same hardness (or softness) when it’s new and does annealing make the annealed area softer than when brass is new? Is softening too much of the case really a problem or is it just something we keep reading on the internet? If we are making the neck softer than when brass is new then it makes some sense but if annealing just returns it to factory specs then it doesn’t.

