• This Forum is for adults 18 years of age or over. By continuing to use this Forum you are confirming that you are 18 or older. No content shall be viewed by any person under 18 in California.

Flame Annealing - almost perfect

As I mentioned in another thread, I recently bought a Webster Hardness Tester (it's a counterfeit) to get a better idea of what my annealing efforts were actually like. Am reporting back with what I've observed after doing some testing to see how this tester might help.

It's always been my objective to try and anneal my brass to a hardness at or close to what new brass is. . . like Lapua's brass. But I never had any way to take any kind of measurement and would just anneal to what I thought would be close enough. It was really nothing more than guess work. Now that I have this Webster Harness Tester, I can get some idea where I'm at. Though I know it's not going to give me what I'd call "accurate" real harness number, I'm after a way to put consistent test numbers together in order to compare how what I do with annealing to how factory brass comes ready to load.

When I measured quite a few different lots of Lapua virgin brass the reading was just under 15 (like between 14.5 and 15). Measuring Peterson virgin brass, the hardness reading was just over 15. Therefore, I set my target measurement to be at 15, at which point my brass is ready for loading.

Grabbed some .308 once fired range brass (PPU's to be specific) and used them to test and get some idea for the timing in the annealing process. I'd vary the amount of time in the flame and after the cases would cool down, I'd take a measurement. Then I'd run another anneal session at a different time. . . and so on. Before I'd anneal my Lapua cases, I took some measurements on my fired cases that have been fired 14 times and annealed after every firing and got a consistent reading of 17. Previous annealing's were all done with the "glow method" having the case drop out of the flame the moment the necks began to glow in a darkened room. Then the sizing and the rest of the case prep was done.
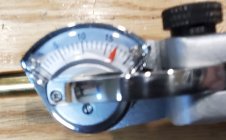
FL Sizing and Expanded after 5 sec Anneal.jpg

One of the things I found with the various testing I did with the PPU cases, what how much the sizing process changed the hardness. I really had to leave the case in the flame a lot longer to get the hardness indication well below my target so that with my sized cases, the hardness was then at my target indication. I had to get my fired Lapua brass down to a 13.
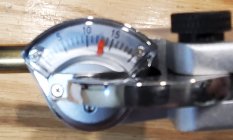
10 sec Flame Anneal.jpg

After FL sizing and expanding the necks to my target diameter the hardness rose to my target indicated hardness of 15.
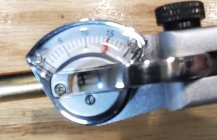
FL Sizing and expand after 10 sec Flame Anneal.jpg

Keep in mind, I wasn't just measuring just one piece of brass, but several pieces as I wanted to see the consistencies, if any. The tool showed me very consistent results. Again, I don't know exactly what the hardness is. But I do know that my final hardness measurement is now the same, or very close to the same, as my various lots of .308 virgin brass.

Somewhat of a surprise to me was how much additional time I had to leave the cases in the flame to get that 13 reading that I needed. In the past, when I use the "glow method" it was about 5 seconds in my swirl flame torch and that would get the reading just under a 15. But then the sizing process is what would move it up to 17 and why all my previously anneal brass measures 17. Now, to get that reading of 13 before sizing, I have to leave the cases in the flame for 10 seconds :eek:. . . and the neck glows pretty good for a few seconds, obviously (as seen in a darkened room).

Once I get my box of Lapua brass processed, I'll have to see if I need to make any adjustments to "neck tension" and how they feel when seating projectiles, and. . . what the chrono and targets report. :)

I've got a box of 2x fired formed Lapua brass that I annealed just a few years ago. The timing of that annealing was done by watching for a yellow flame (no glowing) and dropping the cases out of the flame then. The result of the hardness test was an 18 (after sizing of course).
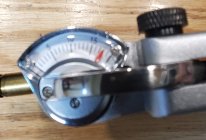
FL Sizing and Expanded after orange flame.jpg

Sorry about the picture quality. Had a hard time holding the tool properly and getting a pic taken at the same time. :rolleyes:
 
Last edited:
I'm interested in the tester you used. I looked online for a Webster Hardness Tester and found something that appears significantly different. Price is $1600. Can you tell us which device you used? I might go down the same path you are, but not for $1600.

Edit: Heh Heh.... Great minds think alike! I see Murray Brook has the same question.
 
Good stuff. Can you tell us a bit about the tool you used, ease of use, price, where you purchased it etc. TKS
I'm interested in the tester you used. I looked online for a Webster Hardness Tester and found something that appears significantly different. Price is $1600. Can you tell us which device you used? I might go down the same path you are, but not for $1600.

Edit: Heh Heh.... Great minds think alike! I see Murray Brook has the same question.
I got this tester off of Amazon, and yes . . . it's a counterfeit. I can't justify spending $1600 either as I don't see a need for the kind of precision that Webster provides in their great products. For some time I'd been looking for something affordable, like on eBay, but got tire of waiting. Decided to get this knock off and take a close look to see if it'd be a useful tool or not. I was prepared to return it right away if the quality wasn't good enough. IMHO, it's made well enough for the price . . . especially since I'm going to have to do some mill work on it to be able to use it on magnum cases (don't like having to do that on a $1600 tool. :eek: I think it's pretty rotten that the Chinese company that produces it is labeling it as a "Webster" Hardness Tester. They could probably sell just as many with a different name and be more legit about it.

 
I like measuring stuff :)
Can the anvil be removed and replaced/modified for 22 cal?
Have you thought of cutting a few cases to measure "hardness" at the body shoulder junction, before/after annealing?
 
I like measuring stuff :)
Can the anvil be removed and replaced/modified for 22 cal?
No, it doesn't appear like the anvil can be removed on this or even on the official Webster testers. I think they pressed in so they can me removed (easily anyway). There's a YouTube video I viewed some time ago about how someone took an official Webster tester (they have pretty large anvils and milled it to where it was way shorter. They they inserted a pilot hole for a small anvil so that the surface of the new smaller anvil was level with the surface of the old anvil. The milling was done without removed the anvil and devised a way of hold the tool so the milling could be done with some precision.

Have you thought of cutting a few cases to measure "hardness" at the body shoulder junction, before/after annealing?
No, I haven't thought about doing that. Guess I'll have to give that a try one of these days, though can't measure very close to that junction on the body with this tool. I'm sure any increase in hardness indication would be much smaller that what's seen on the neck after sizing since there not as much movement of the brass going on. But it would be interesting to see some quantification. :)
 
As I mentioned in another thread, I recently bought a Webster Hardness Tester (it's a counterfeit) to get a better idea of what my annealing efforts were actually like. Am reporting back with what I've observed after doing some testing to see how this tester might help.

It's always been my objective to try and anneal my brass to a hardness at or close to what new brass is. . . like Lapua's brass. But I never had any way to take any kind of measurement and would just anneal to what I thought would be close enough. It was really nothing more than guess work. Now that I have this Webster Harness Tester, I can get some idea where I'm at. Though I know it's not going to give me what I'd call "accurate" real harness number, I'm after a way to put consistent test numbers together in order to compare how what I do with annealing to how factory brass comes ready to load.

When I measured quite a few different lots of Lapua virgin brass the reading was just under 15 (like between 14.5 and 15). Measuring Peterson virgin brass, the hardness reading was just over 15. Therefore, I set my target measurement to be at 15, at which point my brass is ready for loading.

Grabbed some .308 once fired range brass (PPU's to be specific) and used them to test and get some idea for the timing in the annealing process. I'd vary the amount of time in the flame and after the cases would cool down, I'd take a measurement. Then I'd run another anneal session at a different time. . . and so on. Before I'd anneal my Lapua cases, I took some measurements on my fired cases that have been fired 14 times and annealed after every firing and got a consistent reading of 17. Previous annealing's were all done with the "glow method" having the case drop out of the flame the moment the necks began to glow in a darkened room. Then the sizing and the rest of the case prep was done.
View attachment 1608468

One of the things I found with the various testing I did with the PPU cases, what how much the sizing process changed the hardness. I really had to leave the case in the flame a lot longer to get the hardness indication well below my target so that with my sized cases, the hardness was then at my target indication. I had to get my fired Lapua brass down to a 13.
View attachment 1608473

After FL sizing and expanding the necks to my target diameter the hardness rose to my target indicated hardness of 15.
View attachment 1608477

Keep in mind, I wasn't just measuring just one piece of brass, but several pieces as I wanted to see the consistencies, if any. The tool showed me very consistent results. Again, I don't know exactly what the hardness is. But I do know that my final hardness measurement is now the same, or very close to the same, as my various lots of .308 virgin brass.

Somewhat of a surprise to me was how much additional time I had to leave the cases in the flame to get that 13 reading that I needed. In the past, when I use the "glow method" it was about 5 seconds in my swirl flame torch and that would get the reading just under a 15. But then the sizing process is what would move it up to 17 and why all my previously anneal brass measures 17. Now, to get that reading of 13 before sizing, I have to leave the cases in the flame for 10 seconds :eek:. . . and the neck glows pretty good for a few seconds, obviously (as seen in a darkened room).

Once I get my box of Lapua brass processed, I'll have to see if I need to make any adjustments to "neck tension" and how they feel when seating projectiles, and. . . what the chrono and targets report. :)

I've got a box of 2x fired formed Lapua brass that I annealed just a few years ago. The timing of that annealing was done by watching for a yellow flame (no glowing) and dropping the cases out of the flame then. The result of the hardness test was an 18 (after sizing of course).
View attachment 1608485

Sorry about the picture quality. Had a hard time holding the tool properly and getting a pic taken at the same time. :rolleyes:
Which model did you buy? W-B75b is for Brass and >6 internal diameter.
 
As I mentioned in another thread, I recently bought a Webster Hardness Tester (it's a counterfeit) to get a better idea of what my annealing efforts were actually like. Am reporting back with what I've observed after doing some testing to see how this tester might help.

It's always been my objective to try and anneal my brass to a hardness at or close to what new brass is. . . like Lapua's brass. But I never had any way to take any kind of measurement and would just anneal to what I thought would be close enough. It was really nothing more than guess work. Now that I have this Webster Harness Tester, I can get some idea where I'm at. Though I know it's not going to give me what I'd call "accurate" real harness number, I'm after a way to put consistent test numbers together in order to compare how what I do with annealing to how factory brass comes ready to load.

When I measured quite a few different lots of Lapua virgin brass the reading was just under 15 (like between 14.5 and 15). Measuring Peterson virgin brass, the hardness reading was just over 15. Therefore, I set my target measurement to be at 15, at which point my brass is ready for loading.

Grabbed some .308 once fired range brass (PPU's to be specific) and used them to test and get some idea for the timing in the annealing process. I'd vary the amount of time in the flame and after the cases would cool down, I'd take a measurement. Then I'd run another anneal session at a different time. . . and so on. Before I'd anneal my Lapua cases, I took some measurements on my fired cases that have been fired 14 times and annealed after every firing and got a consistent reading of 17. Previous annealing's were all done with the "glow method" having the case drop out of the flame the moment the necks began to glow in a darkened room. Then the sizing and the rest of the case prep was done.
View attachment 1608468

One of the things I found with the various testing I did with the PPU cases, what how much the sizing process changed the hardness. I really had to leave the case in the flame a lot longer to get the hardness indication well below my target so that with my sized cases, the hardness was then at my target indication. I had to get my fired Lapua brass down to a 13.
View attachment 1608473

After FL sizing and expanding the necks to my target diameter the hardness rose to my target indicated hardness of 15.
View attachment 1608477

Keep in mind, I wasn't just measuring just one piece of brass, but several pieces as I wanted to see the consistencies, if any. The tool showed me very consistent results. Again, I don't know exactly what the hardness is. But I do know that my final hardness measurement is now the same, or very close to the same, as my various lots of .308 virgin brass.

Somewhat of a surprise to me was how much additional time I had to leave the cases in the flame to get that 13 reading that I needed. In the past, when I use the "glow method" it was about 5 seconds in my swirl flame torch and that would get the reading just under a 15. But then the sizing process is what would move it up to 17 and why all my previously anneal brass measures 17. Now, to get that reading of 13 before sizing, I have to leave the cases in the flame for 10 seconds :eek:. . . and the neck glows pretty good for a few seconds, obviously (as seen in a darkened room).

Once I get my box of Lapua brass processed, I'll have to see if I need to make any adjustments to "neck tension" and how they feel when seating projectiles, and. . . what the chrono and targets report. :)

I've got a box of 2x fired formed Lapua brass that I annealed just a few years ago. The timing of that annealing was done by watching for a yellow flame (no glowing) and dropping the cases out of the flame then. The result of the hardness test was an 18 (after sizing of course).
View attachment 1608485

Sorry about the picture quality. Had a hard time holding the tool properly and getting a pic taken at the same time. :rolleyes:
Keeping the brass in the flame that long - how do you keep the body from overheating?
 
Any concerns at 10 seconds that the case body might be getting too hot ?
Yes, I had some concerns about that and why I first ran some range brass before my Lapua to see what I was gong to get. I did have to make an adjustment to how the flame was contacting the neck, especially since I use a swirl flame torch. My initial 5 second set up, the flame would bulge over and past the shoulder/body junction by about 1/16. For this 10 seconds, I changed the angle where so that the fame was only as far as onto the shoulder and not on the body to mitigate as much heat creep as possible. I'm sure there was more heat going down the body than before, but not enough for enough time to cause a problem. When I get them loaded up to fire, I'll be looking for any other changes. So now, I'm not really concerned about them working properly, but I do wonder if longevity is affected.

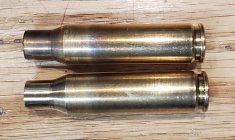
Here's a pic of two of the annealed cases: the top one is when the annealing process is after cartridge has been fire with no cleaning done; the bottom case is where the neck and shoulder has been cleaned with steel wool after the annealing and the case has been FL sized (cases will look better after dry tumbling with rice to remove Imperial Sizing Die Wax)
10 Second Annealed Cases.jpg


Keeping the brass in the flame that long - how do you keep the body from overheating?
While I have no doubt that more heat is going down the body, I don't think enough is going down for enough time to cause any problem. Though annealing discoloration is not an indication of how much annealing is being done or where, it can give one some idea of what the heat is doing along the length of the case. Rocketvapor made a good suggestion for sectioning a case at the shoulder/body junction before and after annealing to see what changes are occurring below that junction. I'll probably do that and report back.
 
Last edited:
Thank you for posting your results with that hardness measurement tool. Didn't realize how quickly the hardness increases from a single sizing.

You can always anneal twice... once before sizing and again just prior to charging and seating the bullet.
 

Upgrades & Donations

This Forum's expenses are primarily paid by member contributions. You can upgrade your Forum membership in seconds. Gold and Silver members get unlimited FREE classifieds for one year. Gold members can upload custom avatars.


Click Upgrade Membership Button ABOVE to get Gold or Silver Status.

You can also donate any amount, large or small, with the button below. Include your Forum Name in the PayPal Notes field.


To DONATE by CHECK, or make a recurring donation, CLICK HERE to learn how.

Forum statistics

Threads
165,802
Messages
2,203,315
Members
79,110
Latest member
miles813
Back
Top