• This Forum is for adults 18 years of age or over. By continuing to use this Forum you are confirming that you are 18 or older. No content shall be viewed by any person under 18 in California.

Chamber flush system build log.

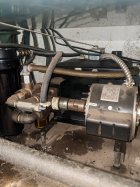
I scabbed mine together with random crap I accumulated over the years as a millwright. The pump is a Viking gear type fuel oil pump coupled to a fan motor. Since gear pumps are positive displacement, I used a brass bypass regulator to the left of the pump that returns excess oil back to the tank. It also regulates the maximum pressure to around 60psi. It's all mounted on a hydraulic tank from Surplus Center. (If you've never heard of them, check them out. They sell a ton of useful stuff) The whole thing lives under the lathe.

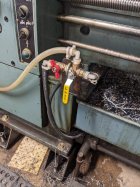
I used a 3 way valve in combination with a ball valve to control oil flow. With the yellow handle down, the hose running to the barrel is connect to a hose that drains back to the tank. It's handy for blowing the lines clear so I don't have a mess when I unhook things.

With the yellow handle moved to the right, oil is supplied through the red valve and goes to to the barrel. I can throttle the oil flow with the red valve anywhere from a trickle to a 20' jet.

These pressure washer QD fittings are really handy for stuff you unhook a lot. The o-ring in them holds up well to oil also.
Hotop 2 Sets NPT 3/8 Inch Stainless Steel Male and Female Quick Connector Kit Pressure Washer Adapters (Internal Thread) https://a.co/d/coSfgzT
 

Attachments

  • PXL_20220901_021245579.jpg
    PXL_20220901_021245579.jpg
    477.2 KB · Views: 73
  • PXL_20220901_021304243.jpg
    PXL_20220901_021304243.jpg
    434.6 KB · Views: 71
So now that you’re done…have you used it and thoughts on chambering with the oil versus how you did it before?

Ballpark and using hindsight…what‘s a ballpark for what you have or would have if you made it the second time, in it total? My comment has always been…the first one is rarely the best design.

The little bit I've pecked around on some test barrels, I can tell it will be night and day, especially on the last few thou of the chamber.

I am happy with my setup. I like that the whole system is self-contained on a cart I can push behind my lathe when not in use

I have a couple of minor tweaks. The air inlet is getting a needle valve, and I might replace the two on/off valves I have with a 3-way valve like ksracer did above
 
What’s the rough cost on your setup…not looking down to the penny but within +/- $50?

Interesting you said the last little bit of the chamber because that’s when this system appears like a pain to me…I bet I check mine 3-4 times the last .020-030 and it seems like it would be a pain to shutoff and clean out the chamber of oil for a measurement. I am certain it speeds everything up leading to that, especially based upon the videos you and others have posted.

Thanks for posting…just still on the fence.
Just having a conversation here.
Don't you have to clean the chamber regardless for each measurement? If you get within .040" it should require one measurement and a final cut with the reamer. If you have to worry your way in your process may need improving.
As far as cleaning I have air inline with the coolant. I shut the oil off and step on a foot valve for the air. I hold a cup over the tenon to catch the oil. Blow out with hand held nozzle, wipe clean with a patch on a chamber swab and take a measurement.
 
@Judd - Standalone setup like this - I'd say 500 bucks. 250 for the pump and 250 in odds and ends. The tank I got was spendy so I'm over that, but I'd be OK with one of those fuel cells shared earlier.

@DaveTooley - I got myself into a habit of running a patch through from the muzzle end several times to make sure I keep the throat/leade/pilot area clear of any chips. Keeping that area clean was the main reason I wanted to do this.
 
and it seems like it would be a pain to shutoff and clean out the chamber of oil for a measurement.
Everyone does it differently, dependent on tooling.
I don't need to measure often, using a micrometer reamer stop. When I get to the point where I'm close enough to warrant a measurement, I'll shove a patch into the throat area, wipe out the chamber well with a big fluffy cotton shop swab (https://www.brownells.com/gun-cleaning-chemicals/patches-mops/cleaning-swabs/shop-swabs-prod564.aspx) and take the measurement. If I've got a ways to go, I'll set the micrometer stop and use the flush system one more time to get to within .020-.025 or so. Then re-measure, then sneak up on it with a couple more passes re-setting the stop and checking without using the flush. This is overly cautious, once you've got the number and are using a positive stop or other means to accurately measure travel shouldn't need to do multiple passes. I hate over-shooting so I'll stick with my pussyfoot approach...:)
 
I'm similar - I get it close enough to check action fit with a gauge and feelers... Adjust the mars and off I go.
 
Just having a conversation here.
Don't you have to clean the chamber regardless for each measurement? If you get within .040" it should require one measurement and a final cut with the reamer. If you have to worry your way in your process may need improving.
As far as cleaning I have air inline with the coolant. I shut the oil off and step on a foot valve for the air. I hold a cup over the tenon to catch the oil. Blow out with hand held nozzle, wipe clean with a patch on a chamber swab and take a measurement.
You’re 100% correct on the worrying your way…not really a worry but I’m for sure sneaking up on it and being a self taught newbie…I’m certain my process still needs improving.

I was talking to a mentor the other day about his setup and how he does things and when I asked about his reamer holder in the tailstock…he looked at me like I had three heads and asked…why don’t you use your tool post? My response…did know I could run this JGS holder off a tool post. He laughed shook his head (I’m sure asking himself why he took me on as a project LOL!) and showed me a tool holder with a Jacobs 33 in it that the reamer holder slides right on. Since then I’ve been looking at ways to utilize this new information and my setup.

One of the previous posts here, showed a caliper attached to the tailstock and I’ve done that to mine…it’s not ideal and I don’t like it...I say that, I guess it’s alright as long as you are aware the slack that is in it and set it up correctly before you put the reamer back in the barrel. Like many things along this road I’ve traveled, I learned this lesson the hard way…first chamber with it went .010 deep and I had to set everything back haha!

A reamer stop is another option I’ve looked at…still undecided but currently, I bet I measure 3-4 times in the last .050 of the chamber.

To be fair, this is a hobby and not something I’m doing for work (good thing too because we’d be eating Ramen or hamburger helper for every meal :p ) so while I’ve looked at time/efficiency, it’s just now something I’m starting to dig into and really looking for opportunities for improvement. Also one of the main reasons this post has been so interesting.
For decades I used a 2" travel indicator on a magnetic base for both the tenon length and reamer travel. The only slack I had to get out were in the threads in the tailstock. Bump the reamer a couple of times to seat it in the chamber and set the dial to zero. Then go to the number. I could see where there could be slack in the mount using a caliper.
 
I like having the reamer in the tailstock. It's easy to feel for vibrations... it's one of those things you learn after doing it a few times. I keep my left hand lightly on the reamer holder and can tell if something is off, chattering, needs to be flushed, etc.

If you're considering the mars reamer stop... do it. Great little device that takes a lot of stress out of that last thou :)
 
Since then I’ve been looking at ways to utilize this new information and my setup.
Well, if you can figure out how that makes a better setup, please 'splain it to me.

I've honestly never checked- never had a reason to, but might out of curiosity's sake- whether a toolholder base ends up perfectly parallel to the spindle's axis. I'd be amazed, if it did. Plenty of float for radial alignment with a pusher or most commercial holders- but no ability to compensate for axial misalignment. Bet if I slapped a toolholder in with a 6" piece of ground rod sticking out towards the headstock to simulate a reamer- no way it would be in axial alignment as precise as the tailstock.
Agree. How do you sweep it in after the barrel has been indicated in and turned and threaded? Do you swing the compound around and feed with the hand wheel or crank on the carriage wheel. It's never made sense to me.
 
Just having a conversation here.
Don't you have to clean the chamber regardless for each measurement? If you get within .040" it should require one measurement and a final cut with the reamer. If you have to worry your way in your process may need improving.
As far as cleaning I have air inline with the coolant. I shut the oil off and step on a foot valve for the air. I hold a cup over the tenon to catch the oil. Blow out with hand held nozzle, wipe clean with a patch on a chamber swab and take a measurement.
I switch off the oil flow.i have a air line on a coiled hose which hangs nicely to hand.hold a piece of cloth over nozzle inserted into chamber,blow oil back down barrel.whind a piece of kitchen towel into chamber which dries-cleans it nicely.insert gauge and measure.
 
For decades I used a 2" travel indicator on a magnetic base for both the tenon length and reamer travel. The only slack I had to get out were in the threads in the tailstock. Bump the reamer a couple of times to seat it in the chamber and set the dial to zero. Then go to the number. I could see where there could be slack in the mount using a caliper.
Dave I use a JGS reamer holder in the tail stock.when I get close to final depth i lock off the carriage and use it as a stop for the tailstock to butt up against.then I just use the graduations on the tailstock hand wheel to obtain final head space dimension.i used to use a travel indicator.
 
At work, to clear the fluid from the barrel:

1. Close ball valve to BTS (barrel through spindle rotary union)

2. Shut off lathe

3. Shut off pump

4. Open ball valve to BTS. This allows the fluid to return back down the line and pull out most of the fluid from the barrel

5. Remove BTS

6. Run a patch on a rod through the barrel from the muzzle end to push out remaining fluid

7. Twist a blue towel into the chamber to soak up fluid

8. Run a 3" patch around a brush on a short chamber cleaning rod

9. Inspect chamber with Hawkeye Borescope

All this takes maybe 2 minutes, and the chamber is dry enough not to get fluid on my Hawkeye. Also, no mess from air blown oil going where I don't want it to go
 

Upgrades & Donations

This Forum's expenses are primarily paid by member contributions. You can upgrade your Forum membership in seconds. Gold and Silver members get unlimited FREE classifieds for one year. Gold members can upload custom avatars.


Click Upgrade Membership Button ABOVE to get Gold or Silver Status.

You can also donate any amount, large or small, with the button below. Include your Forum Name in the PayPal Notes field.


To DONATE by CHECK, or make a recurring donation, CLICK HERE to learn how.

Forum statistics

Threads
165,800
Messages
2,203,290
Members
79,110
Latest member
miles813
Back
Top