• This Forum is for adults 18 years of age or over. By continuing to use this Forum you are confirming that you are 18 or older. No content shall be viewed by any person under 18 in California.

Induction brass annealer redux

Just wanted to drop in and post a thanks to Gina and Hollywood.
So thanks to you both.
Only joined this forum specifically for access to this thread, but have found much more useful info.
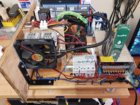
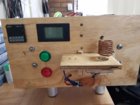
Finished my annealer today, it is more or less identical to the base model.
Just had to substitute some 240v stuff in as I am in Australia.
Goes like a champ, 3.6 seconds for 223, the rest of my calibres will have to wait till I get to shoot some off.

Regards
Geoff.
Nice work, Geoff! I'd love to see it action or pictures!

Also, someone tell me this is a bad idea :rolleyes:
 

Attachments

  • geiahoodiealt1.png
    geiahoodiealt1.png
    316.9 KB · Views: 95
  • geiahoodierear.png
    geiahoodierear.png
    301.1 KB · Views: 73
Last edited:
Hi Dulcimer,

Nothing special in the pics, but there you go.
Once I redo my coil, did not quite get this one tight enough, I might get excited and do a youtube vid of it running.
But it looks the same as most others in operation.
The only difference to original plans really is I wired in a 48 to 12 volt converter to run all the low voltage stuff.
Din rail mounted circuit breakers, and contactor. Anything with 240 volt is up off the base board in case of coolant leaks.

Have run my first 50 cases though, but will need to redo my timings when I fit the new Mk2 coil.

Regards
Geoff.
 

Attachments

  • 20200425_144610.jpg
    20200425_144610.jpg
    407.6 KB · Views: 346
  • 20200425_144635.jpg
    20200425_144635.jpg
    209.2 KB · Views: 322
Hi Dulcimer,

Nothing special in the pics, but there you go.
Once I redo my coil, did not quite get this one tight enough, I might get excited and do a youtube vid of it running.
But it looks the same as most others in operation.
The only difference to original plans really is I wired in a 48 to 12 volt converter to run all the low voltage stuff.
Din rail mounted circuit breakers, and contactor. Anything with 240 volt is up off the base board in case of coolant leaks.

Have run my first 50 cases though, but will need to redo my timings when I fit the new Mk2 coil.

Regards
Geoff.
I like that you have mounted the annealer board vertically rather than the traditional horizontal. Definitely a space saver and it makes it very simple to direct the cooling fan straight at the board.
 
Hi Folks. Thanks to Regina, Erick and everyone contributing for a great project thread. Have been reading it for a few days. Finally got to the end. My 7mm TCU brass made from 223 could sure use this. Just don't tell my wife that I'm considering another project. I've got a few ideas I haven't seen anyone try. Looks useful and fun.
 
The "GinaErick Club" mugs came in today, others should expect theirs by next week. I'm opening up the design and edited clip art for everyone to use should they want to get one themselves.
This one's the mug: https://sprd.co/utPuJJA
This one's the hoodie: https://sprd.co/W1moT4i
I have no affiliation with the company, but their website makes it straight forward enough to choose another product for the design to go on. Feel free to add your touches if you so desire!

I do have one extra mug I want to put up for random drawing. If you're interested, like this post and I'll put your name in the hat.
Drawing will be @ 1400 EST 5/12**** using random.org/lists. Whoever is #1 will get it; no claims will result in the next in line, so on and so forth..
:)

****5/12: The drawing results are in: Congrats to davexre! Enjoy your mug!
 

Attachments

  • GEIA_Mug_Front.jpg
    GEIA_Mug_Front.jpg
    147.3 KB · Views: 65
  • GEIA_Mug_Rear.jpg
    GEIA_Mug_Rear.jpg
    180.2 KB · Views: 71
  • inductorBlk.png
    inductorBlk.png
    37.2 KB · Views: 68
  • InductorWht.png
    InductorWht.png
    177.9 KB · Views: 55
Last edited:
Here's an index with most of the builds I could find. :confused: Hopefully compiling this will make it easier for newcomers to find inspiration from previous builds. I also envision including a concept index, (current limiting, coil designs, etc) but I could use help with that. If I've missed anyone's build or if there's a post you think I should add, please let me know and I'll update.

As a fair warning, the great deal of contribution that GrocMax, SGK, and many members have provided hasn't made it on the list; the entire thread deserves a read if you haven't done so!


Google Doc Link: GINAERICK Creator Index
 
Last edited:
Index is a great idea. Supply voltage might also be good to index.

How many folks are running 36V as opposed to the 'standard' 48V, and how is that working out?

I read the whole thread once, probably should do it again...
 
Love coming back to this and seeing how it has progressed. :) As for developing an AZTEC, best to try and Hardness Vickers test it at a metallurgy lab if you can afterwards just to verify. :)
 
I only reload 243, I was reloading also 223 but the std factory ammo in the Lithgow Arms 102 was so good, and not that expensive for my occassional use, decided to just focus on 243. I presently have metal packers above the bracket underneath the box (ie between l-bar and bix underside) that drops the corian plate 2 or 3mm. These photos show how far into the coil it sits. Any suggestions or comparisons welcomed.

I would have the line on your case sit in the center of the work coil
 
Inner diameter of coil 1.125". Add another 1/8th for center to center (approx). 7 turns. Length of coil will be, I expect, a little over an inch (8x3mm plus a little more) - I just entered 1.125". Calculator yields 1.13uH. Close enough.
 
Inner diameter of coil 1.125". Add another 1/8th for center to center (approx). 7 turns. Length of coil will be, I expect, a little over an inch (8x3mm plus a little more) - I just entered 1.125". Calculator yields 1.13uH. Close enough.

I understood, diameter of coil and length of coil are the dimensions of One Coil. It is clear now.
 
DSxS6VgZ_CWRNQZK8yQh2eVR2h_U4IG2mhnEQ_iSu_ASz7VwqaUzsSS_opMGP0ufp78-eq_-zn0PVglRcl5NELjeTCq9g2tx18iShp1x8-HG02-Ctrb5c7C7OuVKNSHNOE7F5xSYbpChzoffW1bIPWN5MLKZ7QQO7GwmMzqcLztgRL4PaXEPAYCsTgIExMYIZQ7phj6slIRK21J10gLDTWI_PBVt2TVTT9OFu_K7RZNlEwSIgVZD0IlzF293IcQbTqJM2G8RIXEDtPorOVNhGJlwUv23G3SSvHToOcilnt3xEQQqcat78MmkBSD3Cf-oGORd__2XFZi60NMoYdrixfrcAHE5iQSZRMS9e5Za175THUc6ARRhY69S5QEYdpw1HLu5QjflTNvx6xkxki7E8b9eT3Mh-O9xmThsZY0i9Y98038eU9qV_4XdPPvsf_TGT0ukpBR80hXlNbz0yx-AULjxRYQWlDzbj9hDrw3GQVIDwz8991TMhfeNyZ5tKRY1LPDMZFIntgclj6Q9l6vcBl3snlmc7jLqlKx5nf0AC2ZawdJW4iEGulqZAuF3TcRKcWgZqThl19Cf46xfVnPATYsCxb0S0jSQLSz99oCeSP91japgEuX-MzYeqZ3ScEcwXQWy-bBZrP5Ptm6UXF7csTLlrM65W5erDrKg9Nf2nGTQFrc4Jc6PU3_ES8h4fg=w576-h768-no


3D Printed Mini Case Feeder Experimental Design. Might be useful for the annealer as well. Shown here on Dillon XL750 awaiting RC servo to drive it. The first servo only had 90 degrees, this is designed for about 135 degrees of travel.
 
Last edited:
Well spotted Andrew - yes, the resistors are for 48V.

My timer is " PTR4-SP Controller 4-Way Programmable Time Relay 99 step multi-channel " from EBay for about $50. The buttons are beneath the screen (in the black area of the photo) and are a bit small and fiddly but they work. As I have said before, I got this timer because I was not certain that the Sestos timer would accept an input signal from my proximity sensor to start the process. I now believe that it does.

s-l500.jpg


The relay is " Heavy Duty Chassis Mount Relay " - 30A - $7.95 from Jaycar

View attachment 1174257
Both have worked flawlessly for over 6,000 rounds now.


Hi Bruce, the 1000w 20A power supply arrived so swapped out the 600W that was only giving 11.1A and used the opportunity to also swap the 240v relay for that 12V relay. Lasted 2 cycles and welded contacts. Reduced anneal time to 7sec for the first test and neck was glowing red, lots more power. I have a spare relay but wont fit it until the 60V diode arrives and hopefully that will protect contact tips; otherwise I will refit the 12V SSR as its proper heatsink has finally arrived.
 
Hi Bruce, the 1000w 20A power supply arrived so swapped out the 600W that was only giving 11.1A and used the opportunity to also swap the 240v relay for that 12V relay. Lasted 2 cycles and welded contacts. Reduced anneal time to 7sec for the first test and neck was glowing red, lots more power. I have a spare relay but wont fit it until the 60V diode arrives and hopefully that will protect contact tips; otherwise I will refit the 12V SSR as its proper heatsink has finally arrived.
Sorry to hear your relay failed. As I said mine has done over 6,000 cases without a problem. I guess I was lucky and got a good one!! I think the 1000w is a good solution, as it reduces annealing time significantly compared over the 600w. I am always concerned about the heat running down and softening the body of the case.
 

Upgrades & Donations

This Forum's expenses are primarily paid by member contributions. You can upgrade your Forum membership in seconds. Gold and Silver members get unlimited FREE classifieds for one year. Gold members can upload custom avatars.


Click Upgrade Membership Button ABOVE to get Gold or Silver Status.

You can also donate any amount, large or small, with the button below. Include your Forum Name in the PayPal Notes field.


To DONATE by CHECK, or make a recurring donation, CLICK HERE to learn how.

Forum statistics

Threads
165,800
Messages
2,203,290
Members
79,110
Latest member
miles813
Back
Top