


I figured a forum where guys like to tinker and do projects would be a good place to post this.
You gentlemen that have custom cartridges chambered in .224 cal or larger may find this project useful;
It's been way too frequent that I will be placing an order at a shooting supplier on the web, and at the last moment I remember to add a much needed snap-cap into my basket. But usually the dealer is either out of stock, or it's a custom chambering that isn't made, or it's one of those hard red solid-metal dummy cartridges that I cringe even thinking about slamming into a chamber! I like my snap-caps to be plastic or a softer metal then pot belly steel. I also want it to have a spring-loaded primer to fully absorb the firing pin energy.
Well, I finally got tired of reverting to a homemade dummy cartridge with a dead caved-in old primer which no longer absorbs the firing pin inertia. So, I set out to figure a way to circumvent this annoying deficiency of never having the snap-cap that I need for my custom chamber. For the cost of about $1.50 worth of material and 1 hour of my spare time I will now have a lifetime supply of snap caps in ANY centerfire caliber or cartridge!
YOU WILL NEED THE FOLLOWING TOOLS;
sizer die, or body die (of this cartridge that you handload)
small table drill press. (a hand-drill might work, but I'd rather not attempt it! )
channel-lock pliers (or adjustable wrench if your 7/8" die lock-ring has flat sides on it)
file, or a sand-stone
hack-saw, or a Dremel cutting wheel (Dremel cut-off wheels will make clean cuts much easier)
tubing cutter, either small or mini (this is a must, or the project will fail)
bench vise, (helpful but not required)
needle nose pliers
7/32" drill bit
3/32 , 1/8" , or 5/32" drill bit or any small diameter bit)
YOU WILL NEED THE FOLLOWING PARTS AND/OR SUPPLIES;
K&S 7/32" brass tube for .224cal or larger (12" lengths are available at Hobby Lobby, or Amazon)
K&S 3/16" solid brass (also check your small local hobby shop for K&S)
small spring (like those found inside of a pen will work good)
2 part epoxy glue or JBWeld (both available at Home Depot)
empty case of the chosen cartridge (fired or unfired, with the old spent primer removed)
bullet of chosen cartridge
_____________________________________________________________________________
") Here we go;
Here we go;
Here's a an assortment of the the essentials. Not pictured in this photo is 2 part epoxy cement or JBWeld, a hack-saw (or Dremel wheel), and needle nose pliers you will also need. You will probably recognize the red snap cap. I included that in the photo just as an example of the kind of snap cap with the energy absorbing spring-loaded primer that we want to create.

Remove the spent primer and tap the empty brass cartridge case into the sizer or body die. Hold the die firm with an adjustable wrench or channel-lock pliers. Center the 7/32" drill bit onto the pimer hole and drill through the case. Be sure to hold the die firm by the rings or the bit will really bite into the brass and start throwing everything around. Holding it firmly this way, and using a press will drill it out clean in no time.

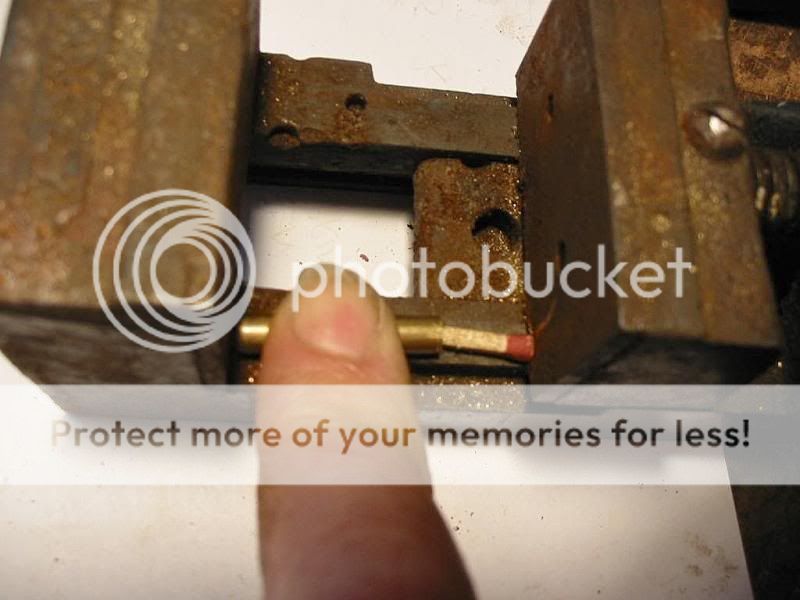
File or grind the end of the 3/16 brass rod so that it is slightly domed, as seen on the example on the left. The rod on the right, after being cut has an end that is too flat and needs to be rounded like the brass rod on the left.
We will now make the spring-loaded primer assembly. Start with a clean piece of 7/32 " tubing as you see on the right. For a 223 or 308 length case, use the tubing cutter to cut a 1 1/8 " length of tube. For shorter length cases, you will need to cut the tube shorter so it is below the neck-shoulder joint of the case. The end of the tubing that you have just cut off will now appear flanged and crimped looking as you see on the left. Do not ream or file it. This is exactly what we want for the primer assembly. This flanged end will hold the dummy-primer in place and keep it from popping out of this casehead end of the tube.

Now cut the domed end piece of brass rod into about a 1/4" long piece. This will serve as the dummy primer. Cut another piece of brass rod about 3/8" long; that will serve as a plug at the back of the tube. With the pen-spring in between, you will slip the 3 parts into the primer assembly tube. Depending on the kind of spring you use and the length and the tension it provides, you may need to pull and stretch the spring for more tension if needed. Or to get it to fit in this short 1 1/8" length tube while providing good tension, you may stretch it and then cut a coil or two off.The idea is to have the 1/4" long dummy primer to be sitting fairly firm with tension inside the tube to provide good resistance to the firing pin hit and absorb that energy. For shorter or longer length cartidge cases then the 223 or 308 that I based this project on, you will want to be sure that this final primer tube assembly and the 3 components are the appropriate length. In other words, depending on the length of the case you are using, you may want to start with a primer tube that is longer or shorter then the 1 1/8" length I used here for a 308 length case. You will accordingly lengthen or shorten the dummy primer and plug as necessary. For shorter cases it could be mandatory to shorten the assembly tube to get it to fit below the case neck-shoulder joint........and for longer cases, while you don't have to lengthen this assembly, you may decide to do so anyway just so these smaller parts are easier to cut and work with. Ultimately the length of this assembly is not important, as long as the dummy primer provides good resistance to the firing pin hit, and the tube isn't so long that it doesn't allow the bullet to be fully seated later into the case neck.

Use a hack-saw or preferably a Dremel cutting wheel to cut a cross into the end of the brass primer tube to make small tabs. These 4 seperate tab ends you have just made will later be crimped and closed with needle nose pliers. Sorry for some poor photos, as my camera refuses to focus up close properly.
Here all 3 parts including the spring are contained inside the 1 1/8" long brass primer assembly tube, and are held firmly in place with the help of a vise and a short length of match-stick compressing it all. The tabs that have been cut at the end of the tube do not show well in this photo, but they are there and are ready to be crimped closed with needle nose pliers. If you don't have needle nose pliers to squeeze the tab ends closed, then use the end of a screw driver to push a tab down. You only need to crimp one tab a little bit and the spring will stay trapped inside the tube. Then you can remove the assembly from the vise and take your time fully closing the other tabbed ends. This step is easier done with helping hands, and instead of using a vise you will hold everything down firmly in place with two hands (still using the match-stick or a small piece of wood dowel) while someone else helps by crimping one tab end inward for you with the pliers. If you attempt to do this step without the help of additional hands, be forewarned that these pieces will likely spring apart on you during more then one attempt to do it all with only 2 hands. Wear glasses so you don't get popped in the eye, and make sure the 3 pieces will be easy to locate should they spring out on you like they did on me during my 4 attempts to do it! If you can place the assembly in saran-wrap or a plastic sandwhich bag, the parts won't get lost.
Here is the completed primer tube assembly with the end crimped and holding the dummy primer, spring, and 3/8" brass plug firmly in place inside of it. Sorry again for the poor close-up photos.

Mix up some 2 part epoxy (preferably 5 or 6 minute), or JBWeld, and use a dowel or small screwdriver to smear it into the primer end of the case. Now slip your completed primer tube assembly through the hole until it sits perfectly flush with the case head face. Stand the cartridge up on a hard surface. It should sit square on your work table. If the primer assembly is protruding just slightly, then gently tap the case head squarely onto a hard table top until the primer assembly now sits firm and square. (no different then how far you want your live primers to be seated flush into a case) You may want to put a hair dryer to the case and warm up the epoxy so that it settles all around the primer tube before it hardens. The idea is to warm up the epoxy inside the case so the epoxy settles at the bottom of the case around the primer tube assembly. Don't overheat the case, as the epoxy will flow easy with minor heat.
And here is the completed case head with dummy primer. Apply your bullet to the desired COAL. Use your 3/32", 1/8", or 5/32" bit to DRILL HOLES ON THE SIDES OF THE CASE SO YOU WILL KNOW AT A GLANCE WHICH OF YOUR ROUNDS ARE REAL AND WHICH ONE IS THE SNAP-CAP. -
Here is the completed snap-cap with the bullet seated just before I drill holes into the sides of the case to clearly distiguish this round from live rounds. I used a paper puch to cut a round piece of masking tape to cover the primer. Then I sprayed the case head in red paint to further distingush this snap-cap as a dummy round. (in addition to the 1/8" holes about to be dilled into the sides of the case)
You gentlemen that have custom cartridges chambered in .224 cal or larger may find this project useful;
It's been way too frequent that I will be placing an order at a shooting supplier on the web, and at the last moment I remember to add a much needed snap-cap into my basket. But usually the dealer is either out of stock, or it's a custom chambering that isn't made, or it's one of those hard red solid-metal dummy cartridges that I cringe even thinking about slamming into a chamber! I like my snap-caps to be plastic or a softer metal then pot belly steel. I also want it to have a spring-loaded primer to fully absorb the firing pin energy.
Well, I finally got tired of reverting to a homemade dummy cartridge with a dead caved-in old primer which no longer absorbs the firing pin inertia. So, I set out to figure a way to circumvent this annoying deficiency of never having the snap-cap that I need for my custom chamber. For the cost of about $1.50 worth of material and 1 hour of my spare time I will now have a lifetime supply of snap caps in ANY centerfire caliber or cartridge!
YOU WILL NEED THE FOLLOWING TOOLS;
sizer die, or body die (of this cartridge that you handload)
small table drill press. (a hand-drill might work, but I'd rather not attempt it! )
channel-lock pliers (or adjustable wrench if your 7/8" die lock-ring has flat sides on it)
file, or a sand-stone
hack-saw, or a Dremel cutting wheel (Dremel cut-off wheels will make clean cuts much easier)
tubing cutter, either small or mini (this is a must, or the project will fail)
bench vise, (helpful but not required)
needle nose pliers
7/32" drill bit
3/32 , 1/8" , or 5/32" drill bit or any small diameter bit)
YOU WILL NEED THE FOLLOWING PARTS AND/OR SUPPLIES;
K&S 7/32" brass tube for .224cal or larger (12" lengths are available at Hobby Lobby, or Amazon)
K&S 3/16" solid brass (also check your small local hobby shop for K&S)
small spring (like those found inside of a pen will work good)
2 part epoxy glue or JBWeld (both available at Home Depot)
empty case of the chosen cartridge (fired or unfired, with the old spent primer removed)
bullet of chosen cartridge
_____________________________________________________________________________
Here we go;Here's a an assortment of the the essentials. Not pictured in this photo is 2 part epoxy cement or JBWeld, a hack-saw (or Dremel wheel), and needle nose pliers you will also need. You will probably recognize the red snap cap. I included that in the photo just as an example of the kind of snap cap with the energy absorbing spring-loaded primer that we want to create.

Remove the spent primer and tap the empty brass cartridge case into the sizer or body die. Hold the die firm with an adjustable wrench or channel-lock pliers. Center the 7/32" drill bit onto the pimer hole and drill through the case. Be sure to hold the die firm by the rings or the bit will really bite into the brass and start throwing everything around. Holding it firmly this way, and using a press will drill it out clean in no time.

File or grind the end of the 3/16 brass rod so that it is slightly domed, as seen on the example on the left. The rod on the right, after being cut has an end that is too flat and needs to be rounded like the brass rod on the left.

We will now make the spring-loaded primer assembly. Start with a clean piece of 7/32 " tubing as you see on the right. For a 223 or 308 length case, use the tubing cutter to cut a 1 1/8 " length of tube. For shorter length cases, you will need to cut the tube shorter so it is below the neck-shoulder joint of the case. The end of the tubing that you have just cut off will now appear flanged and crimped looking as you see on the left. Do not ream or file it. This is exactly what we want for the primer assembly. This flanged end will hold the dummy-primer in place and keep it from popping out of this casehead end of the tube.

Now cut the domed end piece of brass rod into about a 1/4" long piece. This will serve as the dummy primer. Cut another piece of brass rod about 3/8" long; that will serve as a plug at the back of the tube. With the pen-spring in between, you will slip the 3 parts into the primer assembly tube. Depending on the kind of spring you use and the length and the tension it provides, you may need to pull and stretch the spring for more tension if needed. Or to get it to fit in this short 1 1/8" length tube while providing good tension, you may stretch it and then cut a coil or two off.The idea is to have the 1/4" long dummy primer to be sitting fairly firm with tension inside the tube to provide good resistance to the firing pin hit and absorb that energy. For shorter or longer length cartidge cases then the 223 or 308 that I based this project on, you will want to be sure that this final primer tube assembly and the 3 components are the appropriate length. In other words, depending on the length of the case you are using, you may want to start with a primer tube that is longer or shorter then the 1 1/8" length I used here for a 308 length case. You will accordingly lengthen or shorten the dummy primer and plug as necessary. For shorter cases it could be mandatory to shorten the assembly tube to get it to fit below the case neck-shoulder joint........and for longer cases, while you don't have to lengthen this assembly, you may decide to do so anyway just so these smaller parts are easier to cut and work with. Ultimately the length of this assembly is not important, as long as the dummy primer provides good resistance to the firing pin hit, and the tube isn't so long that it doesn't allow the bullet to be fully seated later into the case neck.

Use a hack-saw or preferably a Dremel cutting wheel to cut a cross into the end of the brass primer tube to make small tabs. These 4 seperate tab ends you have just made will later be crimped and closed with needle nose pliers. Sorry for some poor photos, as my camera refuses to focus up close properly.

Here all 3 parts including the spring are contained inside the 1 1/8" long brass primer assembly tube, and are held firmly in place with the help of a vise and a short length of match-stick compressing it all. The tabs that have been cut at the end of the tube do not show well in this photo, but they are there and are ready to be crimped closed with needle nose pliers. If you don't have needle nose pliers to squeeze the tab ends closed, then use the end of a screw driver to push a tab down. You only need to crimp one tab a little bit and the spring will stay trapped inside the tube. Then you can remove the assembly from the vise and take your time fully closing the other tabbed ends. This step is easier done with helping hands, and instead of using a vise you will hold everything down firmly in place with two hands (still using the match-stick or a small piece of wood dowel) while someone else helps by crimping one tab end inward for you with the pliers. If you attempt to do this step without the help of additional hands, be forewarned that these pieces will likely spring apart on you during more then one attempt to do it all with only 2 hands. Wear glasses so you don't get popped in the eye, and make sure the 3 pieces will be easy to locate should they spring out on you like they did on me during my 4 attempts to do it! If you can place the assembly in saran-wrap or a plastic sandwhich bag, the parts won't get lost.

Here is the completed primer tube assembly with the end crimped and holding the dummy primer, spring, and 3/8" brass plug firmly in place inside of it. Sorry again for the poor close-up photos.

Mix up some 2 part epoxy (preferably 5 or 6 minute), or JBWeld, and use a dowel or small screwdriver to smear it into the primer end of the case. Now slip your completed primer tube assembly through the hole until it sits perfectly flush with the case head face. Stand the cartridge up on a hard surface. It should sit square on your work table. If the primer assembly is protruding just slightly, then gently tap the case head squarely onto a hard table top until the primer assembly now sits firm and square. (no different then how far you want your live primers to be seated flush into a case) You may want to put a hair dryer to the case and warm up the epoxy so that it settles all around the primer tube before it hardens. The idea is to warm up the epoxy inside the case so the epoxy settles at the bottom of the case around the primer tube assembly. Don't overheat the case, as the epoxy will flow easy with minor heat.

And here is the completed case head with dummy primer. Apply your bullet to the desired COAL. Use your 3/32", 1/8", or 5/32" bit to DRILL HOLES ON THE SIDES OF THE CASE SO YOU WILL KNOW AT A GLANCE WHICH OF YOUR ROUNDS ARE REAL AND WHICH ONE IS THE SNAP-CAP. -

Here is the completed snap-cap with the bullet seated just before I drill holes into the sides of the case to clearly distiguish this round from live rounds. I used a paper puch to cut a round piece of masking tape to cover the primer. Then I sprayed the case head in red paint to further distingush this snap-cap as a dummy round. (in addition to the 1/8" holes about to be dilled into the sides of the case)

