Thanks jlow. Honestly, I had planned to do it semi correctly but in a rush for time (two little kids) it's more of a hack job.
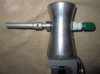
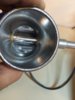
I brought a .374 & .375" reamer home from work and planned to open the holes up to .373-.374" and ream them to the correct dim. But after I opened them up to .374" (9.5mm drill bit I believe) and chamfering the holes, I got the press for I thought "felt" good if that makes sense. The bushings are so thin that I figured a thou would close them up some to account for the undersized shaft, mine was .311" as well nominal and actually a little less where it had worn on the o-ring side. I haven't measured the bushing to see what it closed up to since they are a tiny bit oversized from McMaster, but the fit is perfect for the low load, low speed application.
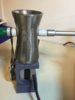
Keeping the bores concentric was my biggest concern, but again due to time your guess is correct, just used the tightest fitting drill bit in my press to line up both sides but only drilled one at a time. I flipped and repeated the procedure. The bushings went in tight, but by hand. They definitely won't move do to the press as well as having no axial load so to speak.
If I could do it over again, I would like to drill initially to a few thou smaller and open up to .373 maybe .374" with a reamer but in the end, it turned out exactly how I wanted....but I'm kind of a perfectionist, but I'll get over it I guess lol.
Bottom line, just line things up well and punch out to 9.5mm, definitely chamfer/sand leading edges smooth as bushings cut easily with pressure and a sharp edge.
Hope that wasn't too much of a nonsense reply, I'm having to type this in a quick like fashion...kids...lol.
Good luck! I highly recommend this mod, or anything to eliminate the current configuration.


 . Anybody who thinks that they themselves is not the weak link will find out one day. The key to safe reloading is recognizing each of he weak points and putting in place something to prevent it from happening.