• This Forum is for adults 18 years of age or over. By continuing to use this Forum you are confirming that you are 18 or older. No content shall be viewed by any person under 18 in California.

Thumler's Tumbler Drive Belt Life - Poor

Please if anyone wants to know how to convert your thumbler tumbler to chain drive, look at 5 TONS W/GUNS on you tube.
Blessings
 
This is an ancient thread, but I wanted to point out that you can make any size belt you want from bulk urethane belting. Unless a local discount store stocks the Eureka belts, you're likely to have to pay $15 for a belt to be shipped to you regardless of whether you go with an EDPM O ring or a Eureka vacuum belt. As of Dec 2022 a 10 ft length of 3/16" dia (5 mm) urethane belt costs $9.60 on ebay:


If anybody's interested, comment on the thread and I'll post how the belt making goes. I drilled out the three spot welds for the motor bracket on my Thumler's Tumbler yesterday (3/16" drill bit is the right size) and slotted the holes so I can move the motor to adjust for belt size / tension.
 
Well, badgoat, that will never slip. A little pricey, but it won't slip. I have had the experience where an overloaded drum stalls on the rollers while I'm not around. I'll see if it happens again, but if it does I'll be shopping for the skateboard tape for the rims that someone else mentioned.

eBay says I'll receive the belt some time between Jan 10 and Jan 17th. Now that I know people still are interested in the subject, I'll post follow up when I get the belting.
 
This is crazy. I run a pair of the Thumlers and have only had to replace one drive ring in many years. I tumble so much brass that I need both of them to keep up.
 
I don't think the original poster was ever able to determine why the factory belts were breaking for him, but he solved the problem with an EDPM O ring which is working better than the official ones he had been using. My tumbler came from a yard/estate sale and was missing the belt. I've made do for a few years with various large O rings and sewing machine belts of unknown identity just because I had them around the shop. They worked but they all eventually stretched and let me down. You can't beat the convenience of buying a factory replacement belt and you're assured that they're going to fit, but they aren't a custom made belt; they're a standard O ring. The O ring the original poster bought seems to be more durable than a factory belt and that appeals to me. Bayou's follow up post about durabililty is here:


I couldn't get Thumlers belts or O rings for less than around $15 when you add in the shipping. I had read about making urethane belts on another forum so I considered that option and it turned out to be cheaper. For about 20 years I had a urethane belt driving the table feed on my Hardinge horizontal mill so I was familiar with urethane belt durability. Having had to replace the tires on my band saw a year or so ago, I was familiar with how urethane doesn't like to stretch. Youtube is replete with videos on how to join urethane belts (easy). I like tinkering and making my own things, so I went that route. I wouldn't disagree with those who like to shoot more than tinker.
 
Type this in on ebay:

5 Pack Buna-N 70D Black O'rings 3/16" CS x 3 3/4" ID x 4 1/8" OD

5 for $7.59 or $8.95 (depending on seller)

I bought these for backups, have one of them on now and still going strong after 3 years of use.......
 
That's the least expensive option so far and includes shipping. Buna-N is the standard O ring material available at most hardware stores. Had I spotted that before I ordered the urethane belting I might have considered those. I don't know why I didn't think to search for O rings on eBay.
 
Last edited:
The wide discrepancy in belt life reported makes me wonder why. Belts made of different materials in different years? We probably all overload our tumblers, but maybe some guys more so than others?
 
Here's a write up on belt life from a rock tumbling supply. They run their machines continuously and get several years out of a belt. It is of interest that they describe their belts as "clear". That to me sounds like a urethane belt. They give a list of things to do to preserve belt life. The article is here:
 
The urethane belting arrived today so as promised, here's my writeup of making a belt.

I didn't have an official belt to work with to know what size to make it, so I wrapped the belt around the pulleys and let that be my guide. Initially I allowed an extra 1/4" for the squeeze out that would occur with the hot joining. This turned out to be too much. The belt is stiff so it isn't tight around the small pulley when you do this and that outward bowing of the belt is adding the extra slack you'll need for the heating. In the end the belt was about 12.5" in length. I cut the belt to length with wire cutters. You could probably do it with a knife.
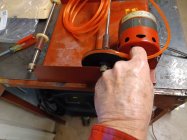
02 Measuring belt length (Large).jpg

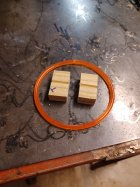
Below is the setup I used to heat the ends of the belt. The torch was applied to the end of the metal, and the two belt ends applied to either side of the metal once it was hot. Then over to some wooden blocks to use as a guide to get the ends alined. I tried to do this once by freehand, but I didn't get it lined up as well as I wanted, so I cut some small wood blocks that I could lay the belt on and slide the ends together.
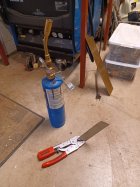
04 Torch and steel for heating belt (Large).jpg

07 Belt with blocks I used for alignment (Large).jpg
If I were doing this again, I'd place the belt ends near the edge of the hot metal and slide them off the plate together so that they touched immediately. It doesn't stay "liquidy" very long once it's off the plate, BUT I learned that you have to hold the ends together for quite awhile until the urethane is cooled enough not to pull apart. Once it's cooled, try to pull it apart. If it pulls apart, heat it again and repeat. Three guesses how I know about that.

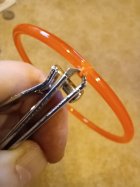
There is some flashing / squeeze out to be removed from the join. Big nail clippers worked well to remove this.
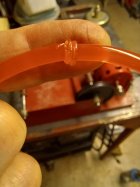
05 First join (Large).jpg

06 Trimming join with nail clipper (Large).jpg

Then it was time to mount it on the tumbler. The first belt looked like it was doing great - and then the join broke!!! In frustration I went back and stuck the belt ends directly into the flame and they were beginning to droop and flame, then pushed them together. I didn't get as good of a join, but it's certainly holding. I've been running the tumbler for about an hour now to be sure it won't break again and will let it run for a few hours. to be sure. I've stressed it by putting drag on the drum to act like it was overweighted. The belt grabs well and isn't slipping or stretching like the other substitute belts I'd tried.

If I had known about the set of 3 belts on eBay I probably wouldn't have made my own. My belt seems to be working, but buying a proper size O ring would be a lot more convenient.

At an hour, I pulled the belt off to look at the join. It's pulling apart on the outer edge, so it looks like I'll be rejoining this. I'm wondering if my plate needs to be hotter to get the urethane to melt / liquify more. This method works, but there's some technique involved.
 
The wide discrepancy in belt life reported makes me wonder why. Belts made of different materials in different years? We probably all overload our tumblers, but maybe some guys more so than others?
There is no doubt that I overload mine. Hence the upgrade to the belt drive. I had only broken one belt over the last several years, but I was experiencing slippage occasionally if the belt happen to get wet. I am looking to upgrade the shaft bushing to bearings. I just can't leave well enough alone.
 
I redid the join on my belt and thought I'd share some additional suggestions. A section of belting about 12.5" long works. The urethane cools rapidly once it leaves the surface of the hot metal, so it's important to jam the two ends together very quickly. This is best accomplished by using a thin piece of metal - about the thickness of a knife blade, and sliding both pieces off simultaneously so that they're almost touching as they leave the metal surface. Have a long block of wood or some other guide to line up the blocks of wood that hold the belt and have it close to the heat source so that the jamming together and final alignment occur within a second or two at the most. Although the urethane cools quickly with regard to fusing to itself, it is still soft for at least a minute after the join and will bend to an acute angle if pressure on the alignment is removed too soon, so hold the ends together for at least a minute after you do it. The joint still felt a little warm at 1 minute, so I ran it under water for a few seconds just to be sure. I cut a slot just slightly smaller than the cross section of the belt in the two blocks I used to hold the belt. The depth of the cut was less than the thickness of the belt to make it easier to keep pressure on the belting so that it didn't slip in the blocks. Pictures below.

"
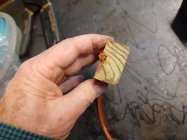
The belt stands a little above the surface to make it easier to hold steady in the blocks. If / when I make another belt, I'll put a screw and washer in the top of the block close to the joined end to hold the belt down rather than using my index fingers. Did I mention the metal radiates a good bit of heat!!!
11 Belt in guide (Large).jpg

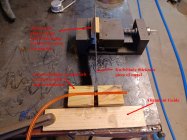
The annotations here are self explanatory. I heated the metal, touched the belt ends to it, then slid them toward me off the hot "blade" and directly onto the long block of wood I used for a guide all the while applying pressure to keep the two ends mooshed together.
12 Setup with joined pieces of belt - annotated (Large).jpg
You might notice that I'm joining a short piece to a longer piece. The long piece was the original belt and I thought it was a little tight on the pulleys. The material is forgiving enough that you can add a short length if you make your belt too short initially.

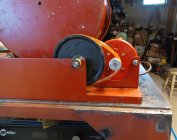
Here's the fit of my belt on the pulleys. I don't know what the fit is like with an OEM belt or one of the replacement O rings but this degree of tension seems to work. I slotted my motor mount so I can move it forward or backward if need be. If one of you with a factory belt or the right sized O ring is so inclined, it would be nice to see what the tension looks like on something that's original.
14 Belt on tumbler - cropped (Large).jpg
 

Upgrades & Donations

This Forum's expenses are primarily paid by member contributions. You can upgrade your Forum membership in seconds. Gold and Silver members get unlimited FREE classifieds for one year. Gold members can upload custom avatars.


Click Upgrade Membership Button ABOVE to get Gold or Silver Status.

You can also donate any amount, large or small, with the button below. Include your Forum Name in the PayPal Notes field.


To DONATE by CHECK, or make a recurring donation, CLICK HERE to learn how.

Forum statistics

Threads
165,963
Messages
2,206,877
Members
79,233
Latest member
Cheeapet
Back
Top