• This Forum is for adults 18 years of age or over. By continuing to use this Forum you are confirming that you are 18 or older. No content shall be viewed by any person under 18 in California.

Reloading bench build...

I have never reloaded in my life. After buying an F-T/R .308 I had to take the plunge. I've purchased quite a bit of equipment that needs a home so a reloading bench is next on my project list. Figured I'd document the build. Hopefully some useful information will be shared. It's really more than just reloading bench. I'm planning on doing general gun work on it as well. I'm overtaking a spare bedroom to house the bench, safes etc... More on that later.

I've saved about a bazillion pics of reloading benches and benches in general and I've based my design on those along with input from regular woodworking benches and such. I have a pretty nice woodworking shop at my house so milling lumber etc.. is no issue. The bench will be built from regular construction lumber that I bought a Lowes along with 3/4" plywood, mdf and melamine.

No formal drawings. I'm working from my usual hand scrawled diagrams. Bench top has a finished size of 80x30. The work surface will be 3/4" almond colored melamine with 2 layers of 3/4" mdf glued and screwed together underneath it. The 3rd layer is just around the edge to support the edge banding. Completed top will be edge banded with 1 1/4" x 2 1/2" pine. The base is 68" x 22" and 35" tall made from more construction lumber milled to 1 1/4" thickness.


I've used lots of construction lumber for such projects before and I've learned to buy oversize and mill to finish widths. Here are the leg parts milled and cut to rough dimensions. These will be finished to 3 3/4" x 3 3/4".


And the glue ups.


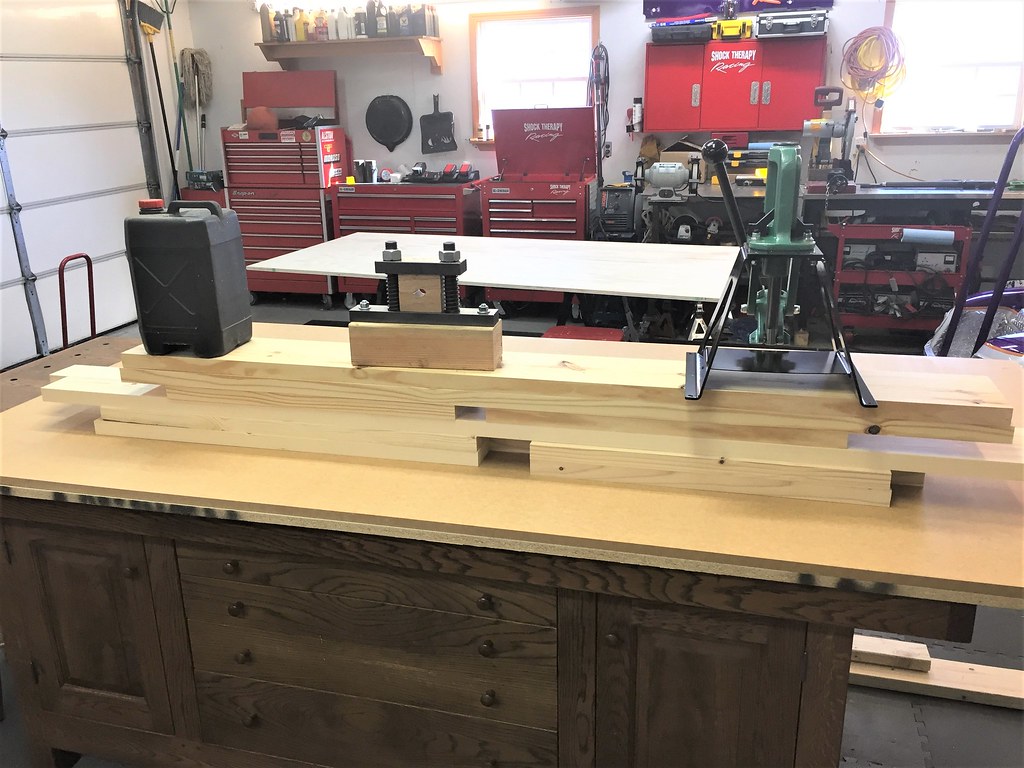
Next was the milling and cutting to rough dimensions of the base parts.


I've also learned that these pieces are likey to warp and/or twist so I stack and weight them until I'm ready to continue.


Next is cutting the sheet goods for the top. I'm very blessed to have a nice table saw with Exactor sliding table for such. I also have my shop arranged so that full sheets are supported by benches on both sides of the table saw. Makes working with full sheets by myself a breeze.


Also in the lessons learned category is the way I make the sandwich of sheet goods for the top. I cut the center layer of mdf to perfect dimensions and then use my router with a flush trim bit to size the top layer that I've cut 1/4" oversize. Very difficult to screw the layers together perfectly if they are all cut to exact size and the flush trim bit produces a perfect edge on the melamine.


Hope someone enjoys the pics and the process. I'll post more as I go.
 
Last edited:
Looks like you are on your way!! Pretty soon you'll probably be wanting to build a 2nd one. I have 2 about like yours and a smaller one used only for cleaning my rifles.
 
Looks like a winner! Helps when you have all the right tools. Are you fastening it to a wall? That takes any wobble out of it.

Thanks! The right tools do make any job simpler. I’ll attach to the wall if necessary. Will wait and see on that one. I’m doing some sort of shelves/hutch also with drawers in the bench also. At this point I plan to get everything set up and going so I can determine exactly what I need to build in addition to the basic bench.
 
Looks like you are on your way!! Pretty soon you'll probably be wanting to build a 2nd one. I have 2 about like yours and a smaller one used only for cleaning my rifles.

My limiting factor will be the room. Sharing some space in there with the wife’s workout equipment etc... Not like I don’t have a 1200 sq. ft. shop as well. :D
 
Session #2 this afternoon went pretty well even though I was in a post Thanksgiving lunch coma. Got the legs milled and finished to final dimension.


Turned my attention to the top. I glued and screwed the first 2 layers together and flush trim routed the edge of the melamine to match the mdf.


The flush trim bit in the router is really the way to go here. Just way to difficult to cut the pieces the same and glue them together correctly.


The 3rd layer is just cut pieces of mdf glued and screwed around the edge to support the edge banding material and give the top the final dimension I wanted of 2 1/4".

I cut the edge banding from 2x4's milled to 1 1/4" thickness. They are just glued to the edge of the top. Quite an undertaking. Very glad for one of my buddies that stopped by to give me a hand. There is an old woodworking adage that says you can never have too many clamps. This would be why...


Tomorrow I'll mill the grooves in the legs and assemble the end panels. The panel legs will be attached to the rails with bench bolts that I have on order. Everything else will be joined with pocket screws. No way to get the bench in the gun room without it being in pieces. More to come...
 
Last edited:
Session #2 this afternoon went pretty well even though I was in a post Thanksgiving lunch coma. Got the legs milled and finished to final dimension.


Turned my attention to the top. I glued and screwed the first 2 layers together and flush trim routed the edge of the melamine to match the mdf.


The flush trim bit in the router is really the way to go here. Just way to difficult to cut the pieces the same and glue them together correctly.


The 3rd layer is just cut pieces of mdf glued and screwed around the edge to support the edge banding material and give the top the final dimension I wanted of 2 1/4".

I cut the edge banding from 2x4's milled to 1 1/4" thickness. They are just glued to the edge of the top. Quite an undertaking. Very glad for one of my buddies that stopped by to give me a hand. There is an old woodworking adage that says you can never have too many clamps. This would be why...


Tomorrow I'll mill the groves in the legs and assemble the end panels. The panel legs will be attached to the rails with bench bolts that I have on order. Everything else will be joined with pocket screws. No way to get the bench in the gun room without it being in pieces. More to come...
thats a real nice table saw you have. i just have a dewalt contractor saw. Ive built many loading benches as ive moved around alot in my life. My latest i just made size of sheet of plywood. 48x96 island--i just use 2x material for most of the top and one sheet of 3/4 plywood over it. That has proved to be plenty strong and good to bolt through. you are doing a much fancier job than mine is. i highly recommend fastening it to the wall or putting a bunch if weight on the bottom shelf so the bench doesnt move when sizing ect. this last one i put around 42 high so i could work standing up comfortably-- i like this. can always use a higher stool to sit down. i do cleaning and scope mounting and borescoping on it and like standing for them to. just a few thoughts-- nice job
 
thats a real nice table saw you have. i just have a dewalt contractor saw. Ive built many loading benches as ive moved around alot in my life. My latest i just made size of sheet of plywood. 48x96 island--i just use 2x material for most of the top and one sheet of 3/4 plywood over it. That has proved to be plenty strong and good to bolt through. you are doing a much fancier job than mine is. i highly recommend fastening it to the wall or putting a bunch if weight on the bottom shelf so the bench doesnt move when sizing ect. this last one i put around 42 high so i could work standing up comfortably-- i like this. can always use a higher stool to sit down. i do cleaning and scope mounting and borescoping on it and like standing for them to. just a few thoughts-- nice job

Thanks. I also like a bench that I can work at standing or sitting. I have them in my shop up to 41". This one will be at 37 1/4". I envision sitting most of the time but still want it workable for standing. I have the Rock Chunker on an Ultramount so it's not mounted directly to the bench top.


One advantage of the multi layer top is they weigh a ton. The base will have 3/4" melamine panels in the ends and a 3/4" melamine shelf on the bottom so it's certainly not light. The back and right end of the bench will be against walls. I'm betting that it'll be fine without actually being attached to the wall but I'll certainly attach it if necessary. I've been building furniture for fun for the last 17 years so that kinda bleeds over into benches and pretty much everything else I build. I enjoy the process.
 
Terry,

Very nice shop and layout. Your Bessey clamp collection is quite impressive. For some reason I see a stock build in you near future. As a wood tinkerer my self I enjoyed the post.

Thanks for sharing,

Ryan
 
Nice shop TerryH!

I ‘make do’ with a 40-year old Craftsman 10” tablesaw (hard to beat cast iron) I’ve added a router table extension to, among other things.

If you take your cabinetry skills of precision and organization to your new-found reloading hobby I predict you’ll do very good things there too!

Where’re you at, if I might enquire?
 
Inline Fabrication makes great products for reloaders. As your interests in reloading expands (trust me, it will) and you have more then one press or accessory to mont,take a look at their quick change mounting system. It will retrofit to the stand you have and allows you to change presses in minutes. I use a Forster Co-Ax press for Rifle Calibers and a Lee Turret Press for Pistols and can switch between presses by just loosening two wing nuts. They also make a rack to hold the presses mounted to the base plates too.
 
Nice shop TerryH!

I ‘make do’ with a 40-year old Craftsman 10” tablesaw (hard to beat cast iron) I’ve added a router table extension to, among other things.

If you take your cabinetry skills of precision and organization to your new-found reloading hobby I predict you’ll do very good things there too!

Where’re you at, if I might enquire?

Thanks. I enjoy the precision required in these disciplines. Even though some days wanting everything just right is as much a curse as a blessing. Hopefully my OCDness will transfer well into reloading and F-T/R. :)

I'm live in Springdale, Ar.
 
Inline Fabrication makes great products for reloaders. As your interests in reloading expands (trust me, it will) and you have more then one press or accessory to mont,take a look at their quick change mounting system. It will retrofit to the stand you have and allows you to change presses in minutes. I use a Forster Co-Ax press for Rifle Calibers and a Lee Turret Press for Pistols and can switch between presses by just loosening two wing nuts. They also make a rack to hold the presses mounted to the base plates too.

I saw those quick change tops. I am quite pleased with the Ultramount. Very well made and at a great price point. I can see me adding more of their stuff in the future. Part of my dilemma at this point is trying to predict the future of my reloading so I can get the bench, specifically the storage layout somewhere close to right the first time.
 
Terry,

Very nice shop and layout. Your Bessey clamp collection is quite impressive. For some reason I see a stock build in you near future. As a wood tinkerer my self I enjoyed the post.

Thanks for sharing,

Ryan

Thanks Ryan. The shop is one of my greatest pleasures. Hours melt away when I'm working in there. Years ago there were some crazy good bulk deals on the Bessey clamps. That's when I stocked up. I'd imagine at some point I'll try a stock build just to see if I can do it even though that sort of shaping is not really my forte'.
 
I'd imagine at some point I'll try a stock build just to see if I can do it even though that sort of shaping is not really my forte'.

You'd be surprised what you can do with a spokeshave and rasps. Rough out with your bandsaw (I think I caught a glimpse of one in one of your pics) then have at it with the hand tools. Some folks even use angle grinders but you have to be careful....

I worked for a few years with a guy who made repro decoys (blanks cut 24-up to a pattern on a spindle-lathe, then finished by hand) back 45 years ago, learned a lot about non-rectilinear woodworking. Having built a smallish sailboat before that helped too; I have a CLC kit sitting in my garage I have every intention of setting to a'building once I can manage to repurpose my half of the garage where wife & I live now. Right now it's got my table-saw & a stack of 8/4 hardwood I've had left over for nigh on 50 years after I built a 4-harness countermarch floor loom for the lady who soon became my wife.

Too happy with my Master Class stocks to bother trying to make something from scratch at present. Too many other preoccupations to take on anything new for the time being.
 
Last edited:

Upgrades & Donations

This Forum's expenses are primarily paid by member contributions. You can upgrade your Forum membership in seconds. Gold and Silver members get unlimited FREE classifieds for one year. Gold members can upload custom avatars.


Click Upgrade Membership Button ABOVE to get Gold or Silver Status.

You can also donate any amount, large or small, with the button below. Include your Forum Name in the PayPal Notes field.


To DONATE by CHECK, or make a recurring donation, CLICK HERE to learn how.

Forum statistics

Threads
165,525
Messages
2,197,985
Members
78,961
Latest member
Nicklm
Back
Top