I would like to present a method to greatly reduce drift errors when using digital scales for reloading.
Specifically load cell (strain gage) scales that always seem to drift requiring recalibration and frequent zero setting.
Drift drives the reloader to purchase scales with better accuracy and resolution better than 0.1 grain. Beam scale users can be happy with long term 0.1 grain accuracy but digital scale users want at least 0.02 grain accuracy and seek out scales with an extra digit of resolution in the hopes of getting that accuracy. The performance metric often quoted is a single kernal of Varget.
Past experience with cheap scales and poor charge consistancy must mean that the best scales are needed to produce downrange bugholes. Is $2000 enough to spend on a scale? $200? What does the extra money get you over a cheaper model?
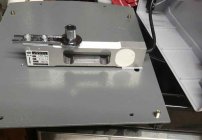
PIC of load cell, 300g X0.001g scale purchased in 2019. Chinese origin of course.


Let's start with ROLLOVER error.
The strain gage scales used by many start off with +/- 0.1 grain resolution. Any reading, even with a perfect digital scale can be between one half count below the reading to one half count above the reading. Half your desired +/-0.1 grain requirement is gone just because it's digital. If you consider the possibility that a zero can be off 1/2 count AND the charge can be off 1/2 count some charges can be off by as much as 0.1 grain before scale error come into play. A scale with better resolution, say 0.02 grain, still has this rollover issue, but it is smaller.
Calibration error. Note the shift to grams from grains. Your +/- 0.1 grain requirement is equal to about 0.00648 grams. That's + and - 6.48 milligrams.
Calibration, often performed at a value close to FULL SCALE, 50 grams on a 50 gram scale, has two primary sources of error.
The calibration weight itself and the stored digital calibration value. Full scale errors are typically percentage based and often insignificant at minor loads on the scale. A relatively large full scale error +/- 0.01 grams @ 50 grams is +/- 0.02%. That percentage of F.S. error is proportional throughout the range. 0.02% @ 5 grams is +/- 0.001 grams (+/- 0.015 grains) and won't be seen on most cheaper scales. The full scale value can drift, is sensitive to level and temperature, but isn't the most significant source of error with a digital scale. Linearity error, related to F.S. error with some scales having a programmed 3 point calibration to help reduce linearity error. Helps reduce the span between zero and the calibration points.
Now the big one, ZERO ERROR.
Just because you have a ZERO indication doesn't always mean the scale is truly at zero. Most analog to digital converters (the electronics that produce displayed values have an 'Auto Zero' that will capture a few counts and display ZERO. This can change each time the scale indicates a value close to zero. The intent is to auto correct small errors in repeatability and drift. At large loads 20 to 40 grams on a 50 gram scale, this creates a negligible percent of reading error. At small loads 2 to 5 grams it is a much larger percentage. Auto Zero might be applied over and over causing several counts of error. Still looks like a zero, but it ain't.
Still reading?
My 300 gram, 0.001 gram scale uncorrected error makes it marginally useful for weighing charges. If zero drift could be monitored and corrected when greater than 1 or two counts (tared) then charge weights would be more accurate. How can you tell if the zero is wrong?
Start by letting the scale warm up BEFORE calibrating. Let the scale sit for a couple minutes after calibration to let the load cell relax after being loaded to large calibration loads, and Tare/Zero. Some battery powered scales will shut off after 2 or 3 minutes making it difficult to properly warm up and stabilize. The scale shown also has a rechargeable 6v, 2.5AH battery.
Now put a good 10 gram weight on the scale, outside your powder pan. A 10.000 gram indication should not interfere with reading charge weights. This is your new FAKE zero. Just watch it each time the empty pan is place on the scale.
You should check this with a couple of known good check weights. 2 grams will look like 12.000, 5 grams will look like 15.000. This prevents the scale from getting close to Zero and the Auto Zero from trying to alter the reading.
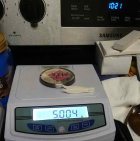
Referring to the picture below, Zero drift, Tare out drift, 10 gram fake zero, 2g added to FAKE zero, then 5g, and
5 grams plus 5mg.

If the 10.000 Fake zero changes by more than a couple counts, remove the 10 gram weight and tare the pan again.
Watching a 0.000 reading tells you nothing. Watching the 10.000 reading gives you a known starting point you can watch.
You might be surprised how stable your scale is if you don't let it zero between powder charges.
Also works with 0.01 gram resolution scales.
Specifically load cell (strain gage) scales that always seem to drift requiring recalibration and frequent zero setting.
Drift drives the reloader to purchase scales with better accuracy and resolution better than 0.1 grain. Beam scale users can be happy with long term 0.1 grain accuracy but digital scale users want at least 0.02 grain accuracy and seek out scales with an extra digit of resolution in the hopes of getting that accuracy. The performance metric often quoted is a single kernal of Varget.
Past experience with cheap scales and poor charge consistancy must mean that the best scales are needed to produce downrange bugholes. Is $2000 enough to spend on a scale? $200? What does the extra money get you over a cheaper model?
PIC of load cell, 300g X0.001g scale purchased in 2019. Chinese origin of course.


Let's start with ROLLOVER error.
The strain gage scales used by many start off with +/- 0.1 grain resolution. Any reading, even with a perfect digital scale can be between one half count below the reading to one half count above the reading. Half your desired +/-0.1 grain requirement is gone just because it's digital. If you consider the possibility that a zero can be off 1/2 count AND the charge can be off 1/2 count some charges can be off by as much as 0.1 grain before scale error come into play. A scale with better resolution, say 0.02 grain, still has this rollover issue, but it is smaller.
Calibration error. Note the shift to grams from grains. Your +/- 0.1 grain requirement is equal to about 0.00648 grams. That's + and - 6.48 milligrams.
Calibration, often performed at a value close to FULL SCALE, 50 grams on a 50 gram scale, has two primary sources of error.
The calibration weight itself and the stored digital calibration value. Full scale errors are typically percentage based and often insignificant at minor loads on the scale. A relatively large full scale error +/- 0.01 grams @ 50 grams is +/- 0.02%. That percentage of F.S. error is proportional throughout the range. 0.02% @ 5 grams is +/- 0.001 grams (+/- 0.015 grains) and won't be seen on most cheaper scales. The full scale value can drift, is sensitive to level and temperature, but isn't the most significant source of error with a digital scale. Linearity error, related to F.S. error with some scales having a programmed 3 point calibration to help reduce linearity error. Helps reduce the span between zero and the calibration points.
Now the big one, ZERO ERROR.
Just because you have a ZERO indication doesn't always mean the scale is truly at zero. Most analog to digital converters (the electronics that produce displayed values have an 'Auto Zero' that will capture a few counts and display ZERO. This can change each time the scale indicates a value close to zero. The intent is to auto correct small errors in repeatability and drift. At large loads 20 to 40 grams on a 50 gram scale, this creates a negligible percent of reading error. At small loads 2 to 5 grams it is a much larger percentage. Auto Zero might be applied over and over causing several counts of error. Still looks like a zero, but it ain't.
Still reading?
My 300 gram, 0.001 gram scale uncorrected error makes it marginally useful for weighing charges. If zero drift could be monitored and corrected when greater than 1 or two counts (tared) then charge weights would be more accurate. How can you tell if the zero is wrong?
Start by letting the scale warm up BEFORE calibrating. Let the scale sit for a couple minutes after calibration to let the load cell relax after being loaded to large calibration loads, and Tare/Zero. Some battery powered scales will shut off after 2 or 3 minutes making it difficult to properly warm up and stabilize. The scale shown also has a rechargeable 6v, 2.5AH battery.
Now put a good 10 gram weight on the scale, outside your powder pan. A 10.000 gram indication should not interfere with reading charge weights. This is your new FAKE zero. Just watch it each time the empty pan is place on the scale.
You should check this with a couple of known good check weights. 2 grams will look like 12.000, 5 grams will look like 15.000. This prevents the scale from getting close to Zero and the Auto Zero from trying to alter the reading.
Referring to the picture below, Zero drift, Tare out drift, 10 gram fake zero, 2g added to FAKE zero, then 5g, and
5 grams plus 5mg.

If the 10.000 Fake zero changes by more than a couple counts, remove the 10 gram weight and tare the pan again.
Watching a 0.000 reading tells you nothing. Watching the 10.000 reading gives you a known starting point you can watch.
You might be surprised how stable your scale is if you don't let it zero between powder charges.
Also works with 0.01 gram resolution scales.
Last edited:


